


To Define Beard Line
1. Hold Trimmer vertically
with front of Trimmer fac-
ing you.
2. Start with trimmed edge
of beard and with down-
ward motions trim area
directly under the beard
line.
To Thin and Taper Beard
1. Use a small comb to hold
hairs in place while trim-
ming.
2. Hold Trimmer with front
of Trimmer facing away
from you.
3. Trim hair ends using an
upward motion.
4. Turn Trimmer OFF.
To Trim Moustache with
Trimmer Guard Attachment
• Be certain Trimmer Guard
Attachment is on to pre-
vent trimming off too
many hairs.
1. Comb hairs outward so
they are at their maximum
height and in the same
direction.
2. Set Zoom Ring to desired
setting.
• Hold Trimmer vertically
with front of Trimmer fac-
ing you.
• Trim hairs using a down-
ward motion following the
direction of your hair
growth or you may trim
against your hair growth—
whichever is preferred.
NOTE: Since all hairs do
not grow in the same
direction, you may want
to try different trimming
positions (i.e. upwards,
downwards or across).
Practice is best for opti-
mum results.
To Trim Moustache without
Trimmer Guard Attachment
1. Remove Trimmer Guard
Attachment.
2. Place a finger on upper lip
to lift hair up, away from
skin.
3. Trim hairs using an
upward motion.
4. After achieving desired
length, use a downward
motion to blend mous-
tache hairs (Fig. 10).
NOTE: Use a slow and
gentle pressure. Too
much pressure may trim
more hair than desired.
5. Turn Trimmer OFF.
To Trim Sideburns
1. Comb sideburns following
the direction of your hair
growth.
2. Be certain Trimmer Guard
Attachment is ON.
3. Hold Trimmer vertically
with front of Trimmer fac-
ing you.
4. Trim sideburns using a
downward motion.
5. Turn Trimmer OFF.
To Achieve The
“Stubble” Look
• The Trimmer Guard
Attachment is unique
because it has a small slot
between the two rows of
teeth enabling you to trim
hairs to only .06
in./1.5mm in length.
1. Be certain Trimmer Guard
Attachment is ON and
Zoom Ring is on the low-
est setting (#1).
2. Hold Trimmer horizontally
with front of Trimmer fac-
ing downwards or upwards.
3. Trim hairs using a down-
ward or upward motion,
whichever is more com-
fortable, following the
direction of your hair
growth (Fig. 11).
4. Turn Trimmer OFF.
IMPORTANT
• Always switch Trimmer
OFF before cleaning.
• Never clean, remove or
replace Trimmer Guard
Attachment with motor on.
• Do NOT apply pressure to
cutters.
• Do NOT touch cutters
with hard objects as this
may damage them.
• If Trimmer is not used reg-
ularly, remove batteries to
prevent possible damage
due to chemical leakage.
• DO NOT use while
bathing, showering or
immerse the unit in water
or other liquids as damage
to Trimmer may occur.
• NEVER use harsh or cor-
rosive cleaners such as
benzene or bleach.
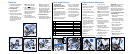
During Use
• If cut hairs have accumu-
lated in the comb area,
pull Trimmer Guard
Attachment off Trimmer
(Fig. 13) and remove hairs
by shaking and/or blowing
(Fig. 14).
Once A Week
1. Be certain Trimmer is in
OFF position.
2. Remove Trimmer Guard
Attachment.
3. Hold Trimmer as shown
and gently push cutter tab
(located beneath the cut-
ters) backwards (Fig. 15).
4. Lightly brush out cutters,
hair chamber and
Trimmer Guard Attach-
ment (Fig. 16 &17) with
cleaning brush provided.
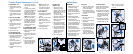
To Replace Cutters
If your cutters become dam-
aged or worn, do not contin-
ue using the Trimmer.
Replace cutters immediately.
1. Remove the old cutters by
pushing cutting unit back-
wards (see Fig. 15) and
then pull it upwards off
Trimmer.
2. Place the two notches of
the new cutting unit into
the guide slots (Fig. 18).
3. Push the cutting unit back
until it “clicks” into place
(Fig. 19).
11
10
Trimmer Guard Attachment (continued) Maintenance
13
14
15
16
2
1
17
18
2
1
1
19
CLICK