


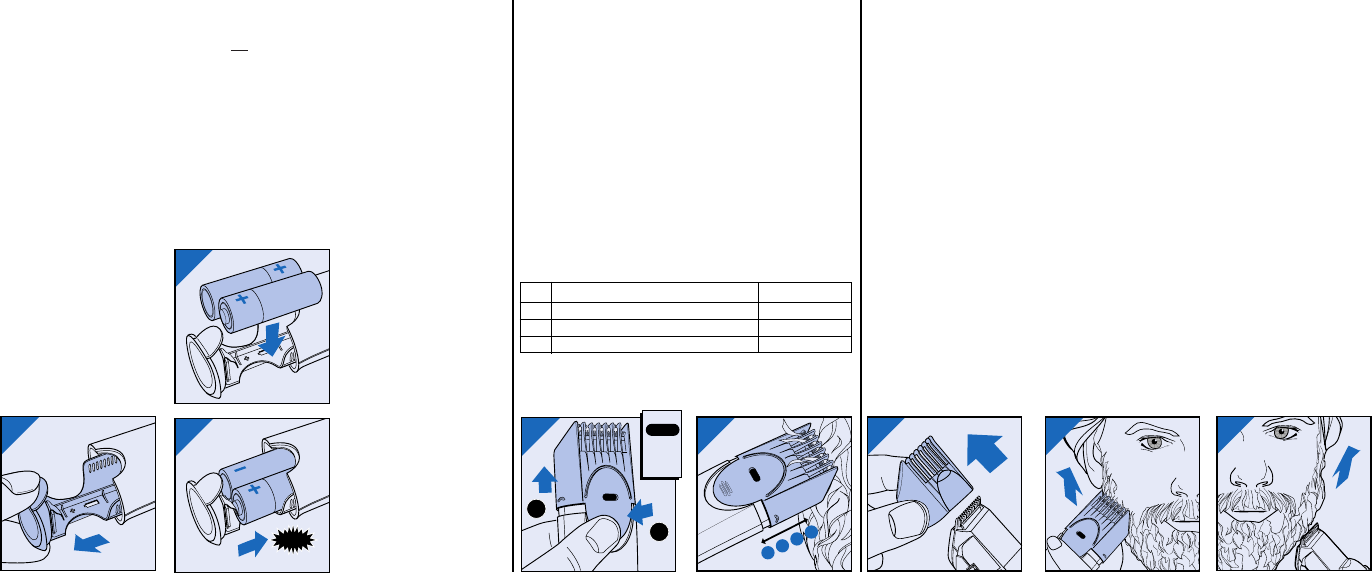
Batteries
• Your new Trimmer requires
2 “AA” 1.5 V alkaline or
carbon zinc batteries.
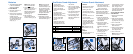
To Insert Batteries
1. Be certain Trimmer is in
the OFF position.
2. Hold Trimmer horizontally
and press the release tabs
located at base of
Trimmer. Gently slide bat-
tery compartment out of
Trimmer housing until it
stops (Fig. 1)
NOTE: Battery compart-
ment is not
removable.
3. Insert the batteries as
shown making sure the (+)
and (-) markings on the
batteries match those on
inside compartment of
Trimmer (Fig. 2).
4. Slide the battery
compartment back into
Trimmer housing (Fig. 3).
NOTE: Trimmer will not
operate if batteries are
inserted incorrectly. If you
do not intend to use the
appliance for a long time,
remove the batteries.
Leaking batteries can cause
damage to the product.
To Remove Batteries
1. Follow steps 1-2 above.
Push the batteries out of the
holder as shown (Fig. 4).
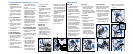
• Trimmer Guard
Attachment must be in
place on the Trimmer in
order to use the One
Stroke Comb Adjustment
feature.
• One Stroke Comb
Adjustment with Trimmer
Guard Attachment
ensures precise trimming
and has 4 adjustable
positions (see chart
below).
• Slide One Stroke Comb
Adjuster to desired set-
ting. Adjuster will “click”
into position.
• Start at a longer setting
(#4) to prevent accidental-
ly trimming hairs too
short (Fig. 5).
• Trim against the direction
of hair growth (Fig. 6)
• As you become familiar
with the settings, slide
Adjuster to desired trim-
ming length.
To Remove
• Remove Trimmer Guard
Attachment if you are:
• Defining hair lines
• Trimming nape of neck
• Removing single, unwant-
ed hairs
1. Be certain Trimmer is in
the OFF position.
2. Hold Trimmer base with
one hand, grasp sides of
Trimmer Guard Attach-
ment and gently slide
Attachment off Trimmer
(Fig. 7).
NOTE: Attachment can be
removed while it is on any
setting.
To Replace
1. Be certain Trimmer is in
the OFF position.
2. Hold Trimmer in one hand
and replace Attachment
back onto Trimmer until it
“clicks” into position.
NOTE: The Trimmer Guard
Attachment can be placed on
Trimmer only one way. If it
does not fit properly, reverse it.
To Trim Beard
1. Comb hairs outward so
that they are at their maxi-
mum height and in the
same direction.
2. With Trimmer Guard
Attachment in place, set
One Stroke Comb
Adjuster to desired set-
ting.
3. Slide On/Off switch to the
ON position and begin
trimming (Fig. 8).
4. Turn Trimmer OFF.
IMPORTANT: If using
Trimmer without Trimmer
Guard Attachment, use a
slow, very light “skim-
ming” technique to prevent
trimming off more than the
desired amount of hair.
To Trim Outer Edge of Beard
& Add Definition
1. Remove Trimmer Guard
Attachment.
2. Hold Trimmer diagonally
with front of Trimmer fac-
ing away from you (Fig. 9).
3. Turn Trimmer ON.
4. Start at chin and work
back toward ear.
5. Follow line of jawbone to
cut away longer hairs on
outer edge of beard.
6. Turn Trimmer OFF.
NOTE: Practice is best for
optimum results.
1
2
3
CLICK
5
4
3
2
1
4
2
1
6
4
1
2
3
4
One Stroke Comb Adjustment
#1 Stubble Length or Closely Cropped .06 in./1.5 mm
#2 Short .12 in./3 mm
#3 Medium .2 in./5 mm
#4 Long .28 in./7 mm
7
8
4
Trimmer Guard Attachment
9