


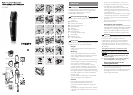
Trimming
Preparing for trimming
1 Make sure that the hair is dry and clean.
2 Comb the hair in the direction of growth
with a comb.
Beard trimming with comb
1 Put the beard trimming comb on the trimming
attachment and push it home (‘click). (Fig. 4)
2 Press the hair length selector and slide it to
the desired setting (see table below). (Fig. 5)
, The selected setting appears in the window
to the left of the hair length selector.
Note: When you trim for the rst time, start at the
highest setting (9) to familiarise yourself with the
appliance.
Note: Using setting 1 with the comb installed results
in a ‘stubble look’.
Settings of beard trimming comb
Setting Hair length after trimming
1 2mm
2 4mm
3 6mm
4 8mm
5 10mm
6 12mm
7 14mm
8 16mm
9 18mm
3 To trim in the most effective way, move the
appliance slowly against the direction of hair
growth. (Fig. 6)
Do not move the appliance too fast. Make smooth
and gentle movements and make sure the surface
of the comb always stays in contact with the skin.
4 Regularly remove the comb to blow and/or
shake out hair that has accumulated.
You have to set the trimming length again after
you have removed the comb!
Beard trimming without comb
Trimming without the comb results in a very short
stubble beard.
Be careful when you use the appliance without
the comb, because the trimming attachment
removes every hair it touches.
1 To remove the comb, press the hair length
selector (1) and slide the comb upwards
(2) (Fig. 7).
Never pull at the exible top of the comb. Always
pull at the bottom part.
2 Make well-controlled movements and touch
your beard only lightly with the trimming
attachment.
Contouring scalp hair without comb
Use the appliance without the comb to contour
scalp hair edges.
Be careful when you use the appliance without
the comb, because the trimming attachment
removes every hair it touches.
1 To remove the comb, press the hair length
selector (1) and slide the comb upwards
(2) (Fig. 7).
Never pull at the exible top of the comb. Always
pull at the bottom part.
2 Make well-controlled movements and touch
the scalp hair contours only lightly with the
trimming attachment.
- To shape the contours round the ears, tilt the
appliance in such a way that only one edge of
the trimming attachment touches the hair
ends. (Fig. 8)
- To contour the nape hairline, hold
the appliance with the teeth of the trimming
attachment pointing towards the skin. (Fig. 9)
- To contour the sideburns, hold the appliance
with the teeth of the trimming attachment
pointing towards the skin (Fig. 10).
Dening beard, moustache and
sideburns
1 To remove the comb, press the hair length
selector (1) and slide the comb upwards
(2) (Fig. 7).
2 Press the release button (1) and pull the
trimming attachment off the appliance
(2). (Fig. 11)
3 Put the precision attachment on the appliance
(‘click’). (Fig. 12)
, Hold the appliance upright when you use the
precision attachment. (Fig. 13)
Shaving
Shaving with the micro shaver
attachment
Before you use the micro shaver attachment,
always check it for damage or wear. If the foil or
cutter is damaged or worn, do not use the
attachment as injury may occur. Replace the foil
or the cutter before you use the attachment
again.
1 Put the micro shaver attachment on the
appliance. (Fig. 14)
2 Gently press the micro shaver attachment
onto the skin.
Do not press too hard.
3 Shave along contoured edges to remove any
stubble and to create a smooth, well-dened
beard line.
Cleaning
Do not clean the appliance with water or a
moist cloth.
Never use scouring pads, abrasive cleaning agents
or aggressive liquids such as alcohol, petrol or
acetone to clean the appliance.
1 Make sure the appliance is switched off and
disconnected from the mains.
2 Remove the comb and/or attachment.
3 Separate the top part of the micro shaver
attachment from its body (Fig. 15).
Avoid touching the shaving foil, as it is very
delicate.
Do not clean the foil with the brush, as this can
cause damage.
4 Blow and/or shake out any hair that has
accumulated in the attachment.
5 Clean the outside and inside of the
attachment with the brush supplied. (Fig. 16)
6 Place the attachment back onto the appliance.
Replacement
Only replace worn or damaged attachments or
combs with original Philips replacement attachments
or combs, that are available from your dealer or an
authorised Philips service centre.
If you have any difculties obtaining replacement
attachments or combs for your appliance, contact
the Philips Consumer Care Centre in your country
or consult the worldwide guarantee leaet.
Environment
- Do not throw away the appliance with the
normal household waste at the end of its life,
but hand it in at an ofcial collection point for
recycling. By doing this, you help to preserve
the environment (Fig. 17).
- The built-in rechargeable battery contains
substances that may pollute the environment.
Always remove the battery before you discard
and hand in the appliance at an ofcial collection
point. Dispose of the battery at an ofcial
collection point for batteries. If you have trouble
removing the battery, you can also take the
appliance to a Philips service centre. The staff
of this centre will remove the battery for you
and will dispose of it in an environmentally
safe way. (Fig. 18)
Removing the rechargeable battery
1 Remove the adapter from the wall socket and
pull the appliance plug out of the appliance.
2 Let the appliance run until the motor stops.
3 Insert a screwdriver in the groove next to
the shaft at the top of the appliance.Turn
the screwdriver to separate the two housing
halves. (Fig. 19)
4 Lift the battery out of the housing with a
screwdriver. Twist the connecting wires until
they break (Fig. 20).
Do not connect the appliance to the mains again
you have removed the battery.
Guarantee and service
If you need service or information or if you have a
problem, please visit the Philips website at
www.philips.com or contact the Philips Consumer
Care Centre in your country (you nd its phone
number in the worldwide guarantee leaet). If there
is no Consumer Care Centre in your country, go
to your local Philips dealer.