


Making the "Geometricks" MultiStyler ready for use
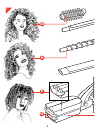
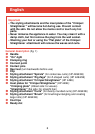
How to change the styling attachments (fig. 2-6)
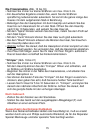
• When changing styling attachments during use only touch the plastic
parts. The metal parts are hot!
- To release the styling attachment, turn the clamping ring (C) in the
direction of the arrow (fig. 2).
- Pull the styling attachment from the handle (fig. 3).
- When mounting the required styling attachment, ensure that the
heel rest (F) is at the underside (fig. 4).
- Insert the styling attachment firmly into the main unit (fig. 5).
- Secure by turning the clamping ring (fig. 6).
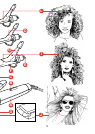
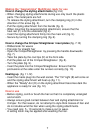
How to change the Crimper/Straightener inset plates (fig. 7-10)
• Ribbed side: for waves
• Flat side: for straight hair
- Open the Crimper/Straightener by pressing the handle downwards
(fig. 7).
- Take the plate by the cool tips (N) at the front side.
- Pull the plate out of the Crimper/Straightener (fig. 8).
- Turn the plate (fig. 9).
- Insert the plate into the Crimper/Straightener. Ensure that the
protrusions at the sides enter the runners correctly (fig. 10).
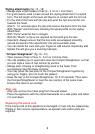
Heating up (fig. 11-12)
- Insert the mains plug into the wall socket. The "On"-light (B) will come on
and the styling attachment will heat up (fig. 11).
- When the "Ready"-dot (O) on the styling attachment becomes dark the
appliance is ready for use (fig. 12).
How to use
• Before styling, comb or brush the hair so that it is completely untangled
and smooth.
• Always ensure good contact between hair and styling attachment or
Crimper. For that reason, do not attempt to style thick tresses of hair and
do not double-wind the hair when using the styling attachments.
• You need only 5 - 10 seconds to make a curl or wave.
A setting lotion may be applied after washing the hair.
7