


ENGLISH
Introduction
With your new Philips Ladyshave you can quickly,
easily and comfortably remove unwanted hair
from dry or wet skin.
This Ladyshave can only be operated on batteries.
Important
Please read these instructions before using the
appliance.
◗ Store the appliance at a temperature between
15cC and 35cC.
◗ Make sure that your hands and the appliance
are dry when inserting the batteries.
◗ Regular cleaning and proper maintenance
ensure optimal results and guarantee the
longest lifetime for your Ladyshave.
◗ To keep the Ladyshave watertight:
- Make sure that the rubber sealing ring of the
battery holder stays clean and undamaged.
- Apply some vaseline to the rubber sealing
ring from time to time.
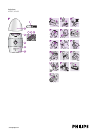
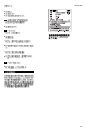
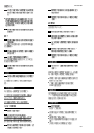
General description (fig. 1)
AProtection cap.
- Put the protection cap on the shaving head
every time you have used the Ladyshave to
prevent damage.
- You can also attach the protection cap to
the bottom of the appliance to make it
longer when you are shaving your legs and
bikini line. This will allow you to better reach
these areas.
BShaving head. Equipped with two trimmers
(C and E) and a shaving foil (D).
CStraight trimmer. To remove longer hairs from
arms, legs and bikini area.
DShaving foil. To remove shorter hairs.
ECurved trimmer. To shave the underarms.
FOn/off slide. I = on, O = off.
GBattery holder.
HCover of battery holder.
IBrush.
Preparing the appliance for use
The Ladyshave runs on two R6 AA 1.5 volt batteries.
We strongly advise you to use Philips LR6
PowerLife batteries. They supply sufficient energy
for approx. 40 minutes of shaving.
Batteries contain substances that may pollute the
environment.
Make sure your hands and the appliance are dry
when inserting the batteries.
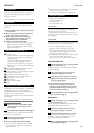
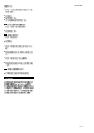
1 Remove the cover of the battery holder
(H) by pulling it in the direction of the
arrow (fig. 2).
2 Put the batteries in the battery holder (fig. 3).
Make sure the + and - poles of the batteries are
pointing in the right direction.
3 Push the cover of the battery holder back
onto the appliance ('click').
◗ To avoid damage due to battery leakage:
B
Do not expose the Ladyshave to direct sunlight.
B
Do not expose the appliance to temperatures
higher than 35cC.
B
Remove the batteries if the appliance is not going
to be used for a month or more.
B
Do not leave empty batteries in the appliance.
Using the appliance
The Ladyshave is suitable for:
- shaving the underarms;
- shaving the legs;
- shaving the bikini line.
On wet skin
You can use your Ladyshave on wet skin, e.g.
while having a bath or shower.
The best results are obtained if you lather your
skin (with soap or shaving cream) before you start
shaving (fig. 4).
On dry skin
If you prefer to use the Ladyshave dry, make sure
that your skin is clean and completely dry.
B
There is no difference between using the
appliance on wet or and using it on dry skin.
B
Do not apply alcohol-based lotions to the skin
directly before or after shaving. If you want, you
can apply some talcum powder.
B
Avoid pressing the shaving head too hard onto the
skin as this will adversely affect shaving
performance and may cause some skin irritation.
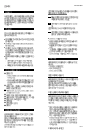
Legs and bikini line
1 Switch the appliance on by moving the slide
(F) to position I (fig. 5).
Stretch the skin with your free hand to make the
hairs stand upright.
2 Place the straight trimmer (C) and the
shaving foil (D) gently on the skin.
3 Move the Ladyshave slowly over the skin
against the direction of hair growth while
pressing it lightly (fig. 6).
◗ You can attach the protection cap to the
bottom of your Ladyshave when you are
shaving your legs and bikini line. The cap will
make the Ladyshave longer, allowing you to
better reach these areas (fig. 7).
4 Switch the appliance off by moving the slide
(F) to position O (fig. 8).
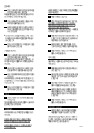
Underarms
1 Switch the appliance on by moving the slide
(F) to position I (fig. 5).
When shaving the underarm area, place on arm
behind your head to stretch the skin.
2 Place the rounded trimmer (E) and the
shaving foil (D) gently on the skin.
3 Move the Ladyshave slowly over the skin.
You can move the Ladyshave up and down or
from left to right (fig. 9), depending on which
movement you find most pleasant.
4 Switch the appliance off by moving the slide
(F) to position O (fig. 8).
4222 002 28044
2/14