


You will hear clicks when you move the lamp unit past certain xed positions.
Instead of using the above step-by-step method, you can also pull the lamp unit up by its handle in one single movement. (Fig. 8)
5 Turn the lamp unit a quarter turn. (Fig. 9)
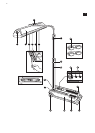
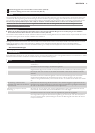
6 Place the tanning appliance beside a bed as indicate in the gure. (Fig. 10)
The distance between the UV lter and the surface on which you are lying down (e.g. the bed), must be 85 cm.
7 Loosen the height adjustment lock by sliding the collar down the stand. Pull the lamp unit up at the same time to a height of 85 cm
above the bed. (Fig. 11)
Let go of the collar to lock the lamp unit into position.
You can check the distance between the lamp unit and the bed by pulling out the measuring tape.
The measuring tape will automatically rewind if you move the red tab sideways.
The appliance is now ready for use.
Using the appliance
1
Fully unwind the mains cord.
2 Put the plug in the wall socket.
Consult the table in these instructions for use and your own notes.
Put on the protective goggles provided.
The protective goggles should only be used when tanning with a Philips tanning appliance. They should not be used for other purposes. The
protective goggles comply with protection class II according to directive 89/686/EEC.
3 Set the timer to the appropriate time for the tanning session. (Fig. 12)
4 Lie down under the lamp unit.
The timer will automatically switch the tanning appliance off when the set tanning time has elapsed.
The timer can be set to a maximum tanning time of 45 minutes.
During the last minute of the session you will hear a beeping sound.
During this minute you can reset the timer to tan the other side of your body. By doing so, you avoid the 3-minute waiting time which is
necessary to allow the tanning lamps to cool down after they have been switched off.
After the tanning session
1 Keep track of the number of sessions you have had by means of the memory knobs. The appliance has two memory knobs: one for each
person. (Fig. 13)
Cleaning
1
Always unplug the appliance and let it cool down before you start cleaning it.
2 Clean the outside of the appliance with a damp cloth.
3 Clean the protective goggles with a moist cloth.
Do not let any water run into the appliance.
4 Do not use any scouring agents or scouring pads.
Never use abrasive liquids like scourers, petrol or acetone to clean the appliance.
You can clean the outside of the UV lter with a soft cloth sprinkled with some methylated spirits.
Storage
1
Let the appliance cool down for 15 minutes before you put it in transport position and store it.
In the meantime, you can wind up the cord and put it in the base of the appliance.
2 Make sure the cord is stored properly and does not get stuck between the hinging parts of the appliance when you put the appliance in
transport position.
3 Loosen the height adjustment lock by sliding the collar down the stand. Push the stand down at the same time. Then let go of the collar.
(Fig. 14)
4 Turn the lamp unit a quarter turn. (Fig. 15)
5 Lift the lamp unit a little with one hand and unlock it by pushing the two unlocking slides down with your other hand. (Fig. 16)
6 Hold the two unlocking slides down with one hand and fold the lamp unit into vertical position with your other hand. Then let go of the
unlocking slides. (Fig. 17)
7 Lower the stand and the lamp unit carefully onto the base of the appliance. (Fig. 18)
8 Lock the lamp unit onto the base by pushing the slides on the base in the direction of the arrow. (Fig. 19)
9 The tanning appliance can be stored under a bed. (Fig. 20)
10 It can also be stored in a cupboard in upright position. (Fig. 21)
Replacement
The light emitted by the tanning lamps will become less bright in time (i.e. after a few years in case of normal use). When this happens, you will
notice a decrease in the tanning capacity of the appliance. You can solve this problem by setting a slightly longer tanning time or by having the
tanning lamps replaced.
The UV lter protects against exposure to undesired UV light. It is therefore important to have a damaged or broken lter replaced right away.
Have the tanning lamps (Philips HPA expower 400-600), the UV lter and the cord replaced by a dealer or service centre authorised by
Philips. Only they have the knowledge and skills required for this job and the original spare parts for the appliance.
,
,
,
-
-
,
,
,
,
ENGLISH6