


Fig. 14. Replace the cluster frame with the shaving heads.
Do not forget to secure the cluster frame by
pressing the wheel downward and turning it
clockwise.
Fig. 15. Do not apply any pressure to the guards when
replacing the shaving unit on to the shaver.
Fig. 16. If you have used a degreasing liquid (e.g. alcohol) to
clean the shaving heads, or if your skin is very dry,
lubricate the guards with one drop of light machine
oil.
Every six months
Fig. 17. Put two drops of light machine oil on the teeth of the
trimmer.
Replacement shaving heads
Worn or damaged shaving heads must be replaced only with
the original Philips replacement heads type HP 1917.
Protecting the environment
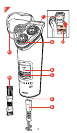
How to remove the built-in rechargeable battery
(when discarding the appliance) (fig. 18-21, page 42)
• Please note: You can also take the appliance to a Philips
Service Centre. The staff will be happy to help you.
- Remove the plug from the wall socket.
- Before removing the battery should be completely
empty.
Let the appliance run until the motor stops.
- Push the trimmer slide (f) upwards (fig. 18).
- Unscrew the two countersunk screws at the back side of
the shaver. For this purpose you can use a small
screwdriver (width approx. 2 mm) or a Torx T-8 type
screwdriver (fig. 19).
- Remove the back plate of the appliance (fig. 20).
- Cut the two connector strips (fig. 21).
You will recognise the battery by the print NIMH.
Do not connect the appliance to the mains power after
the battery has been removed.
8