


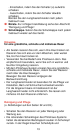


Every three months
If your skin is of an oily type or if you have been using a pre-
shave lotion, this procedure should be carried out once a
month.
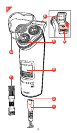
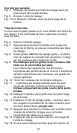
Fig. 6. Pull the shaving unit from the shaver.
Fig. 7. Press the wheel downward and turn it anti-clockwise
(see the arrow). Then lift the cluster frame holding
the shaving heads from the shaving unit.
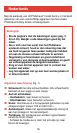
Fig. 8. Slide one shaving head (guard and cutter) out of the
frame. Keep your finger under the shaving head to
prevent the cutter from falling out of the guard.
Fig. 9. Keep the guard and cutter together because
each pair has been especially ground to match
each other. If the guards and cutters are mixed, it
may take a couple of weeks before optimal shaving
performance is restored.
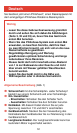
Fig. 10. Hold the cutter as shown...
Fig. 11 ....and brush it carefully clean as illustrated.
Use only the short bristled end of the brush.
Fig. 12. Clean the inside of the guard, using the long bristled
end of the brush.
Fig. 13. Slide the shaving head back into place. Then clean
the other two shaving heads one by one in the
same way.
Fig. 14. Replace the cluster frame with the shaving heads.
Do not forget to secure the cluster frame by
pressing the wheel downward and turning it
clockwise.
Fig. 15. Do not apply any pressure to the guards when
replacing the shaving unit.
Fig. 16. If you have used a degreasing liquid (e.g. alcohol) to
clean the shaving heads, or if your skin is very dry,
lubricate the guards with one drop of light machine
oil.
Every six months
Fig. 17. Put two drops of light machine oil on the teeth of the
trimmer.
6