


®
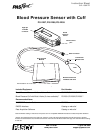
Model No.PS-2207,PS-2208,PS-2209 Introduction
3
Indicator Light Emitting Diodes
The sensor has two light emitting diodes (LEDs) mounted inside the pressure sensor
case. When they are active, the LEDs can be seen through the case. One is orange and
the other is green.
The orange LED begins to flash as the cuff is being inflated (starting when the pres-
sure reaches 50 mmHg). Once the cuff is inflated, the orange LED shines continu-
ously while the sensor is making pressure readings. The orange LED goes out when
the air in the cuff is released and the pressure drops to about 35 mmHg. The green
LED flashes to indicate a heart beat.
Usage
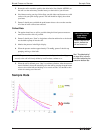
Experiment ideas:
• Determine the effects of exercise on blood pressure and heart rate.
• Explore the effects of body position on blood pressure and heart rate.
• Compare the blood pressure and heart rate of students in the class.
Procedure
Sensor Setup
1. First, find a partner. A student cannot measure his or her own blood pressure.
Partner 1 should be the patient and partner 2 should conduct the measurement.
2. Connect the blood pressure cuff to the Blood Pressure Sensor. Align the quick
connector at the end of the tube from the cuff with the quick connector port on
the sensor. Push the quick connector onto the port and turn the connector clock-
wise until the connector clicks into place on the port.
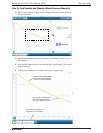
3. Connect the Blood Pressure Sensor to a PASPORT interface.
4. If you will be using a computer, connect the PASPORT interface to the com-
puter’s USB port.
5. Create Digits displays of pressure, diastolic pressure, and systolic pressure. Your
may also want to view pressure versus time data in a Graph display.
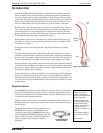
Cuff and Arm Placement
1. The patient should remove any constrictive clothing or jewelry that may interfere
with the cuff placement.
2. Locate the approximate position of the main artery (brachial artery) on the inside
of your upper left arm by pressing with your fingers near the inside edge of your
biceps muscle about five or ten centimeters (cm) above the elbow pit.
3. Partner 2 should help the patient wrap the cuff snugly around the upper left arm
above the elbow with the two tubes hanging down (one on each side of the arm).
4. Use the hook-and-pile material to hold the cuff in place. Position the cuff's bot-
tom edge at about 2.5 cm (one inch) above the elbow pit.
Figure 23: Quick-connector
onto sensor
Sensor
Quick-
connector
NOTE: Refer to your
PASPORT interface users
guide for information about
setting up data displays and
recording data..
Elbow
pit
Cuff
Figure 3: Cuff onto
upper left arm
Upper Left
Arm
Tub es