


9
ATTENTION:
2 nickel metal hydride batteries
that are recyclable power the prod-
uct you have purchased. Please
call 1-800-8-BATTERY for informa-
tion on how to recycle the batter-
ies.
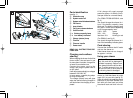
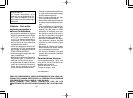
How to remove the built-in
rechargeable batteries before
disposal of the shaver
(see fig. 10)
The batteries in this shaver are not
intended to be replaced by consum-
ers. However, the batteries may be
replaced at an authorized service
center. The procedure described be-
low is intended only for removal of
the rechargeable batteries for the
purpose of proper disposal.
Always make sure that the batteries
have been removed from the shaver
before disposing of it.
1. Disconnect the power cord from
the AC outlet, and remove the
power cord from the shaver.
2. Remove the outer foil frame and
the inner blades.
3. Remove the trimmer driving bar
(a), slit blade driving bar (b) and
two screws (c).
4. Remove the four screw covers (d)
(using something like a tooth-
pick), four screws (e), and the
panel cover (f).
5. Remove the screw (g) and the
bottom cover (h).
6. Remove the back panel (i).
7. Remove the batteries from the
battery block (j).
WARNING:
Do not attempt to replace the bat-
tery for the purpose of reusing the
shaver. This could result in the risk
of fire or electric shock.
Caution – To prevent
personal injury or damage
to the product,
• Do not charge the shaver where the
temperature is below 0°C (32°F) or
above 40°C (104°F), where it will
be exposed to direct sunlight or a
heat source, or where there is a lot
of moisture.
• Use only the included power cord
RE7-05 to charge the ES8016/
ES8017/ES8018/ES8019 shaver.
• Dry the shaver completely before
charging it.
• Keep the power cord away from wa-
ter and handle it only with dry
hands.
• Grip the plug when disconnecting
the power cord from an AC outlet;
tugging on the power cord may
damage it.
• Store the power cord in a dry area
where it will be protected from dam-
age.
• Do not pull, twist, or severely bend
the power cord.
8
rection of your beard. You may gently
increase the amount of pressure as
your skin becomes accustomed to
this shaver. Applying excessive pres-
sure does not provide a closer shave.
System outer foil
(see fig. 5)
System outer foil has a slit blade (a)
between 2 foils (b). They move up
and down independently to follow the
contours of your face.
The slit blade catches and cuts
longer and lying hairs easily.
Using the trimmer
(see fig. 6)
Slide the trimmer handle up to open
the trimmer.
Place the trimmer at a right angle to
your skin and move it downward to
trim sideburns.
Cleaning your shaver
(see fig. 7)
Warning – To prevent electric
shock or personal injury, discon-
nect the power cord from the
shaver and turn the shaver off be-
fore cleaning.
For cleanliness and convenience, we
recommend that you clean your
shaver with water and a liquid hand
soap. Regular cleaning will keep your
shaver in good condition while pre-
venting odors or bacteria from devel-
oping, and maintain the cutting per-
formance.
With the system outer foil in place,
apply some hand soap onto the outer
foil.
Turn the shaver on and pour some
water over the outer foil.
After about 10-20 seconds, turn the
shaver off.
Remove the foil frame and clean it
with running water.
Wipe off any moisture from the
shaver with a dry cloth and remove
the protective cap to allow the sys-
tem outer foil to dry completely.
Replacing shaving head
components
It is recommended that you replace
the system outer foil at least once a
year and the inner blade at least once
every 2 years to maintain your shav-
er’s cutting performance.
Replacing the system outer foil
(see fig. 8)
Squeeze the system outer foil re-
lease buttons and lift the system
outer foil upward to remove it. To in-
sert the new system outer foil, press
down until it snaps into place.
Replacing the inner blades
(see fig. 9)
Squeeze the foil frame release but-
tons and lift the foil frame upward to
remove it. Remove the inner blade,
one at a time, by grasping them firmly
at both ends and pulling straight
away from the shaver. To insert the
new inner blade, hold the blade, one
at a time, at both ends and press
downward until it snaps into the
shaver.
8 9