


7
as your skin becomes accustomed
to this shaver. Applying excessive
pressure does not provide a closer
shave.
Using the trimmer
(see fig. 4)
Slide the trimmer handle up until it
clicks in.
Place the trimmer at a right angle to
your skin and move it downward to
trim sideburns.
Cleaning your shaver
(see fig. 5)
For cleanliness and convenience, we
recommend that you clean your
shaver with water and a liquid hand
soap. Regular cleaning will keep your
shaver in good condition while pre-
venting odors or bacteria from devel-
oping, and maintain the cutting per-
formance.
With the outer foil in place, apply
some hand soap onto the outer foil.
Turn the shaver on and pour some
water over the outer foil.
After about 10-20 seconds, turn the
shaver off.
Remove the outer foil and clean it
with running water.
Wipe off any moisture from the
shaver with a dry cloth and remove
the protective cap to allow the outer
foil to dry completely.
Replacing shaving head
components
It is recommended that you replace
the outer foil at least every year and
the inner blade at least every 2 years
to maintain your shaver’s cutting per-
formance.
Replacing the outer foil
(see fig. 6)
Squeeze the outer foil release but-
tons and lift the outer foil upward to
remove it. To insert the new outer foil,
press down until it snaps into place.
Replacing the inner blades
(see fig. 7)
Squeeze the foil frame release but-
tons and lift the foil frame upward to
remove it. Remove the inner blades,
one at a time, by grasping them firmly
at both ends and pulling straight
away from the shaver. To insert the
new inner blades, hold the blades,
one at a time, at both ends and press
downward until they snap into place.
ATTENTION:
A nickel cadmium battery that is
recyclable powers the product
you have purchased. At the end
of it’s useful life, under various
state and local laws, it is illegal
to dispose of this battery into your
municipal waste stream. Please
call 1-800-8-BATTERY for infor-
mation on how to recycle this
battery.
7
6
Before use
This Wet/Dry shaver can be used for
wet shaving with shaving lather or for
dry shaving. You can use this water-
tight shaver in the shower and clean
it in water. The following is the sym-
bol of Wet shaver. The symbol means
that the hand-held part may be used
in a bath or shower.
Treat yourself to wet lather shaves
for at least 3 weeks and notice the
difference. Your Panasonic Wet / Dry
shaver requires a little time to get
used to because your skin and beard
need about a month to adjust to any
new shaving method.
Charge the shaver for at least 16
hours before using it for the first time
or when it has not been in use for
more than 6 months.
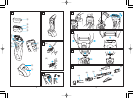
Parts identification
(see fig. 1 )
A Protective cap
B Outer foil
C Outer foil release buttons
D Foil frame
E Inner blades
F Foil frame release buttons
G On/Off switch
H Switch lock button
I Trimmer
J Trimmer handle
K Charging adaptor
L Charge indicator lamp
Charging
(see fig. 2)
Switch the shaver off and set it firmly
into the charging adaptor. Keep the
adaptor level.
Plug the adaptor into an AC outlet.
The charge indicator lamp will glow
red and it will stay on until the shaver
is removed from the adaptor.
You can fully charge the shaver in 8
hours if it seems to be losing speed.
A full charge will supply enough
power for about 7 shaves (3 minutes
per shave for a normal beard).
Before traveling, charge it fully for 8
hours if you will not be taking the
charging adaptor with you.
For a better shave
Put a thin layer of shaving foam on
your face which works as a lubricant.
Shaving foam is the most suitable
among many other shaving aids (gel,
soap, cream, etc.). Do not put a thick
layer of shaving foam as it may af-
fect the shaver’s performance. If the
shaving head is clogged with foam,
simply rinse it under running water.
Depress the switch lock button and
slide the On/Off switch upward to turn
the shaver on. Hold the shaver at a
right angle (90°) to your skin (see fig.
3). Start out shaving by applying gen-
tle pressure to your face. Stretch your
skin with your free hand and move
the shaver back and forth in the di-
rection of your beard. You may gen-
tly increase the amount of pressure
6