


For service, please contact:
North America:
Oster Direct
®
Services
904 Red Road, McMinnville, TN 37110
(800) 830-3678
or an Authorized Service Center
© 2012 Sunbeam Products, Inc. doing business as Jarden Consumer Solutions.
All rights reserved. Distributed by Sunbeam Products, Inc. doing business as Jarden
Consumer Solutions, Boca Raton, Florida 33431. Printed in USA
GCDS-OST26509-AB PN 155512
Servicing of a Double Insulated Appliance
In a double insulated appliance, two systems of insulation are provided instead of
grounding. No grounding means is provided on a double-insulated appliance, nor
should a means for grounding be added. Servicing a double-insulated appliance
requires extreme care and knowledge of the system and should be done only by
qualified service personnel.
Replacement parts must be identical to those parts being replaced.
A double-insulated appliance is marked with the words “DOUBLE INSULATION” or
“DOUBLE INSULATED”
The symbol may also be marked on the appliance.
1 YEAR LIMITED WARRANTY
Sunbeam Products, Inc, or if in Canada, Sunbeam Corporation (Canada) Limited
(collectively “Sunbeam”) warrants that for a period of one year from the date of
purchase, this Oster® Professional Product will be free from defects in material
and workmanship. Sunbeam, at its option, will repair or replace this product or
any component of the product found to be defective during the warranty period.
Replacement will be made with a new or remanufactured product or component.
If the product is no longer available, replacement may be made with a similar
product of equal or greater value. This is your exclusive warranty. This warranty is
valid for the original retail purchaser from the date of initial retail purchase and is
not transferable. Keep the original sales receipt. Proof of purchase is required to
obtain warranty performance. Sunbeam dealers, service centers, or retail stores
selling Sunbeam products do not have the right to alter, modify or any way
change the terms and conditions of this warranty. This warranty does not cover
normal wear of parts or damage resulting from any of the following: negligent use
or misuse of the product, use on improper voltage or current, use contrary to the
operating instructions, disassembly, repair or alteration by anyone other than
Sunbeam or an authorized Sunbeam service center. Further, the warranty does
not
cover: Acts of God, such as fire, flood, hurricanes and tornadoes.
What are the limits on Sunbeam's Liability?
Sunbeam shall not be liable for any incidental or consequential damages caused
by the breach of any express, implied or statutory warranty or condition.
Except to the extent prohibited by applicable law, any implied warranty or
condition of merchantability or fitness for a particular purpose is limited in
duration to the duration of the above warranty. Sunbeam disclaims all other
warranties, conditions or representations, express, implied, statutory or
otherwise. Sunbeam shall not be liable for any damages of any kind resulting
from the purchase, use or misuse of, or inability to use the product including
incidental, special, consequential or similar damages or loss of profits, or for any
breach of contract, fundamental or otherwise, or for any claim brought against
purchaser by any other party. Some provinces, states or jurisdictions do not allow
the exclusion or limitation of incidental or consequential damages or limitations
on how long an implied warranty lasts, so the above limitations or exclusion may
not apply to you.
This warranty gives you specific legal rights, and you may also have other rights
that vary from province to province,state to state or jurisdiction to jurisdiction.
In the U.S.A., this warranty is offered by Sunbeam Products, Inc located in Boca
Raton, Florida 33431. In Canada, this warranty is offered by Sunbeam Corporation
(Canada) Limited, located at 20 B Hereford Street, Brampton, Ontario L6Y 0M1.
PLEASE DO NOT RETURN THIS PRODUCT TO EITHER OF THESE ADDRESSES.
How To Obtain Warranty Service
Or an Authorized Service Center
Send this product to our Oster Direct
®
service center located at 904 Red Road,
McMinnville, TN 37110-8653 U.S.A. or to an authorized service center for Oster
®
Professional Products as indicated below:
In the U.S.A.
If you have any question regarding this warranty or would like to obtain warranty
service, please call 1 800 830-3678 and a convenient service center address will
be provided to you.
In Canada
If you have any question regarding this warranty or would like to obtain warranty
service, please call 1 800 830-3678 and a convenient service center address will
be provided to you. When sending the product to the service center:
• Fill out and attach the Service Information Form (found at the end of this
manual) to the Product.
• If returning a clipper, include blades.
• When ordering parts, please specify the model number and series letter
indicated on your product.
• Include a copy of the original sales receipt.
• Carefully package the product and send either mail or courier with shipping
and insurance prepaid to the service center.
When using or cleaning this clipper, do not use any non Oster approved
aerosol sprays or blade washes, especially those containing methylene
chloride, dimethyl benzyl ammonium chloride, or 1-1-1 trichloroethylene.
Damage caused by these chemicals will void your warranty. You may use
Oster
®
Blade Wash
®
cleaner and Oster
®
Blade Lube™ oil, which do not
harm the product.
™
Blade Care and Cleaning
Lubricating
Blades should be oiled regularly to reduce heat and maintain sharpness.
Before removing the blade, be sure it has cooled down.
1. With clipper in off position, push blade
away from clipper with your thumb.
2. Place 1 or 2 drops of Oster
®
Clipper and
Blade Lube™ oil on the blade. Wipe
excess oil with a dry, soft cloth.
3. Turn on clipper and push blade toward
clipper until it snaps securely into place.
Cleaning
1. Clean the excess hair from your blades
by using the cleaning brush.
2. To clean the blades, plug clipper into electrical outlet and turn on.
3. In a shallow pan, immerse blade teeth into Oster
®
Blade Wash
®
cleaning solution.
CAUTION: DO NOT IMMERSE THE CLIPPER.
4. Remove blade from cleaning solution and while holding clipper blade
end down, wipe the blades with a dry, clean cloth.
5. If after cleaning, you find that the blades still do not cut properly, it is
possible that a few fine pieces of hair are still trapped between the
blades.
6. If this occurs, remove the blade. Without loosening the tension springs
screws, slide the upper blade to one side but not completely out from
under the tension spring.
7. Wipe the surface between the blades clean with a dry cloth. Place a
drop of oil where the upper and lower blades meet and in the guide slot
of the tension spring.
8. Slide upper blade to the other side and repeat process.
Sharpening
Oster
®
cutting blades are of individual hollow-ground design, hardened to
extend cutting life. As with any cutting tool, the cutting edges will become
dull after extensive use. If sharpening is necessary, send blades to an Oster
Authorized Service Center.
Storing Your Clipper
Store your clipper in a clean, dry space. Be careful not to tangle the cord
while storing the clipper. Do not wrap cord around the clipper when storing.
This can damage the cord insulation.
WARRANTY: U.S. and CANADA: 1 Year Limited Warranty
Sunbeam Products, Inc. doing business as Jarden Consumer Solutions or if in Canada,
Sunbeam Corporation (Canada) Limited doing business as Jarden Consumer Solutions
(collectively “JCS”) warrants that for a period of one year from the date of purchase, this
product will be free from defects in material and workmanship. JCS, at its option, will
repair or replace this product or any component of the product found to be defective
during the warranty period. Replacement will be made with a new or remanufactured
product or component. If the product is no longer available, replacement may be made
with a similar product of equal or greater value. This is your exclusive warranty. Do NOT
attempt to repair or adjust any electrical or mechanical functions on this product. Doing
so will void this warranty.
This warranty is valid for the original retail purchaser from the date of initial retail purchase
and is not transferable. Keep the original sales receipt. Proof of purchase is required to
obtain warranty performance. JCS dealers, service centers, or retail stores selling JCS
products do not have the right to alter, modify or any way change the terms and
conditions of this warranty.
This warranty does not cover normal wear of parts or damage resulting from any of the
following: negligent use or misuse of the product, use on improper voltage or current, use
contrary to the operating instructions, disassembly, repair or alteration by anyone other
than JCS or an authorized JCS service center. Further, the warranty does not cover: Acts
of God, such as fire, flood, hurricanes and tornadoes.
What are the limits on JCS’s Liability?
JCS shall not be liable for any incidental or consequential damages caused by the breach
of any express, implied or statutory warranty or condition.
Except to the extent prohibited by applicable law, any implied warranty or condition of
merchantability or fitness for a particular purpose is limited in duration to the duration of
the above warranty.
JCS disclaims all other warranties, conditions or representations, express, implied,
statutory or otherwise.
JCS shall not be liable for any damages of any kind Resulting from the purchase, use or
misuse of, or inability to use the product including incidental, special, consequential or
similar damages or loss of profits, or for any breach of contract, fundamental or
otherwise, or for any claim brought against purchaser by any other party.
Some provinces, states or jurisdictions do not allow the exclusion or limitation of
incidental or consequential damages or limitations on how long an implied warranty lasts,
so the above limitations or exclusion may not apply to you.
This warranty gives you specific legal rights, and you may also have other rights that vary
from province to province, state to state or jurisdiction to jurisdiction.
How to Obtain Warranty Service
In the U.S.A.
If you have any question regarding this warranty or would like to obtain warranty service,
please call 1 800 830-3678 and a convenient service center address will be provided to
you.
In Canada
If you have any question regarding this warranty or would like to obtain warranty service,
please call 1 800 830-3678 and a convenient service center address will be provided to
you.
In the U.S.A., this warranty is offered by Sunbeam Products, Inc. doing business as
Jarden Consumer Solutions located in Boca Raton, Florida 33431. In Canada, this
warranty is offered by Sunbeam Corporation (Canada) Limited doing business as Jarden
Consumer Solutions, located at 20 B Hereford Street, Brampton, Ontario L6Y 0M1. If
you have any other problem or claim in connection with this product, please write our
Consumer Service Department. PLEASE DO NOT RETURN THIS PRODUCT TO ANY
OF THESE ADDRESSES OR TO THE PLACE OF PURCHASE.
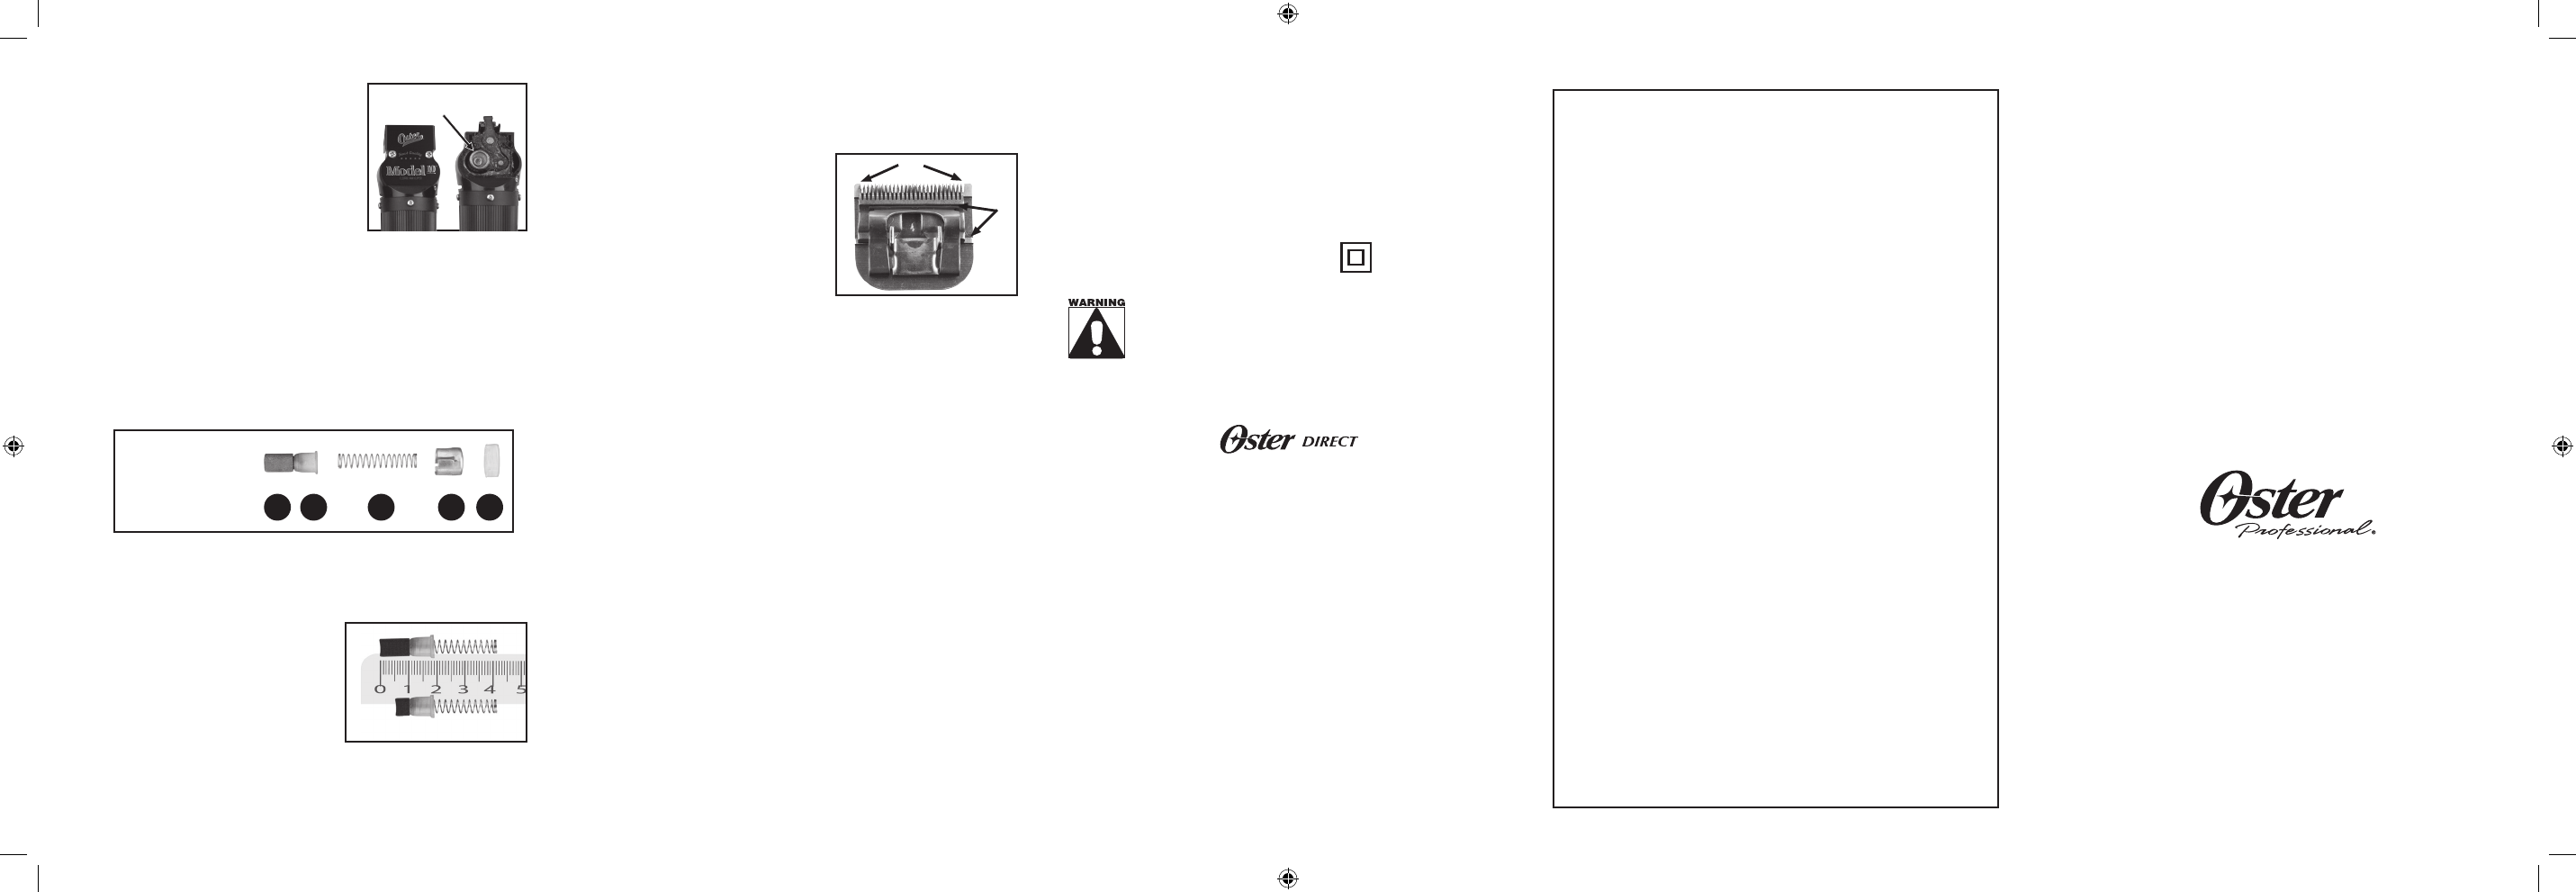
1. Using a small Phillips-head screwdriver,
unscrew name plate mounting screws.
2. Remove name plate to expose gear drive
assembly.
3. Remove cap from Oster
®
Gear Grease tube
and apply a generous amount of grease to
eccentric, gears and bearing, as illustrated.
4. Once finished greasing, replace name plate
and tighten screws.
Removing and Replacing Worn Out Carbon Brushes
Your clipper contains a carbon brush that will wear out with normal use.
When this begins to occur, the clipper will operate intermittently. If the clipper
does not turn on, this is a sign that the carbon brush is worn out and needs
to be replaced.
Important:
• Youwillneedtoreplacebothcarbonbrushesatthesametime,
even if only one brush is worn out.
• UseonlyOster
®
carbon brushes. Carbon brushes used in electric
motors are carefully selected for size and grain to ensure optimum
performance. Using other brushes will compromise your clipper’s
performance.
To remove and replace carbon brush, follow below instructions:
1. Unscrew and remove brush cap.
Tip: A dime is an ideal tool for loosening the cap.
2. Pull out nylon cap and brass cap with your fingers by using a “picking”
action.
3. Remove spring and carbon brush.
4. Inspect length of carbon brush. Replace
if length is reduced to 5 mm or less.
5. To insert new carbon brush, hold the
brush and turn it until it falls into place.
6. If spring became loose, insert it into
brush tube.
7. Place brass cap over the spring, press-
ing down to seat brass cap into the
brush tube.
8. Insert nylon cap over brass cap.
9. Replace brush cap and turn clockwise to screw securely into place.
1234
5
1. Nylon cap
2. Brass cap
3. Spring
4. Brush tube
5. Carbon brush
ECCENTRIC, GEAR
AND BEARING
KEEP
REPLACE
OIL
OIL
10-76010_12EM1.indd 2 8/7/12 11:03 AM