


5. Record the temperature from the display.
6. Release the MEASURE button. The last reading will
remain locked on the display for 10 seconds after
releasing the button.
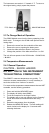
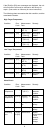
2.6 SCAN Mode Temperature Measurements
Use this measurement mode for thermal scanning of a tar-
get or when measuring targets located at a distance. The
OS950 is a wide-angle thermal scanner with a fixed emis-
sivity of 0.9. The target's temperature is continuously dis-
played and updated 10 times per second for as long as you
hold the MEASURE button down.
The OS950 displays the average temperature of everything
within the sensor's field of view measurement area. The
size of the measuring area depends on the distance of the
device from the target. The OS950 has a 1:1 field of view,
which
means that this unit will measure a 1"diameter target area
when the device is 1" from the target.
2.6.1 General Operation
For continuous temperature measurement of a target or for
temperature measurement at a distance, use the following
procedure.
1. Determine the appropriate measurement distance from
your desired target.
2. Make sure the MODE switch is on SCAN.
3. Point the nosepiece at the target.
4. Press and hold the MEASURE button.
5. Record the temperature from the display.
6. Release the MEASURE button. The last reading will
remain locked on the display for 10 seconds after
releasing the button.
Chapter Three - Measurement Tips
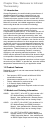
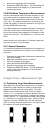
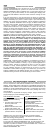
3.1 Optimizing Target Area Measurements
When performing a continuous thermal scan of a target, or
measuring a target located at a distance, proper target
alignment will help assure accurate results. Since the
OS950's sensor measurement area is fixed at a field of
view of 1 to 1, it is important to properly determine the best
measuring distance from the target, to optimize the reading.
A field of view of 1 to 1 means that the OS950 viewing area
is 1" diameter for 1" distance from target. Optimize optical
alignment, so that the OS950 views only the target and
does not overlap the measurement area. See Figure below
for examples of proper optical alignment.
5
POOR POOR GOOD