


© National Instruments Corporation 11 SCC-TC Series Thermocouple Input Modules User Guide
8. Enter the specific values for your application in the Settings tab.
Context help information for each setting is provided on the right side
of the screen.
9. Choose the type of thermocouple you have connected to your SCC
module. For the CJC Source parameter, select Built-In.
10. Click Test to test the channel. You should be able to view your
measurement in the window that appears.
You have finished configuring the NI-DAQmx task or global channel.
Creating a Virtual Channel in Traditional NI-DAQ
To create a Traditional NI-DAQ virtual channel, complete the following
steps:
1. Open Measurement & Automation Explorer.
2. Right-click Data Neighborhood and select Create New.
3. Select Traditional NI-DAQ Virtual Channel and click Finish.
4. Click Next to select Analog Input as the type of channel to configure.
5. From the drop-down list, select the appropriate Thermocouple type
and click Next.
6. Enter the rest of the values as they apply to your setup and click Next.
7. On the next screen, specify information about the E Series DAQ device
being used and the CJC source and click Finish.
8. To test the channel, click Test.
You have finished configuring the Traditional NI-DAQ virtual channel.
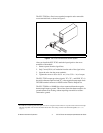
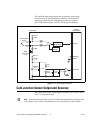
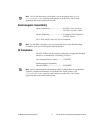
Calibrating System Offsets
To calibrate the offset voltage of the SCC-TC0X in the system using the
E Series DAQ device, complete the following steps. The E Series DAQ
device must be on for 30 minutes before you calibrate the offset voltage.
1. Select the desired channel and gain on the E Series DAQ device.
2. Short the inputs on the SCC-TC0X screw terminals or miniplug.
3. While acquiring data on the selected channel, use a screwdriver to
adjust the potentiometer protruding through the top of the module until
you read 0 VDC.