


Thank you for your confidence in our product. Please follow the
installation procedures carefully, and one step at a time. This grab
bar is intended to provide maneuvering assistance and stability only,
and should not be utilized to support the entire weight of a person.
Failure to properly adhere to these instructions may result in serious
or fatal injury.
ATTENTION: Please read this entire installation manual before
marking or drilling into your wall to avoid causing unnecessary
blemishes to the wall surface. The grab bar MUST
be mounted into
the studs to ensure a safe and secure fastening. If you are unable to
positively determine the exact location of the studs, please consult
the advice of a local building contractor for assistance.
ITEMS INCLUDED: Six (6) Mounting Screws
TOOLS REQUIRED: Safety Glasses, Stud Finder, Pencil, Phillips
Screwdriver, Electric Drill, Wood and/or Ceramic Drill Bits.
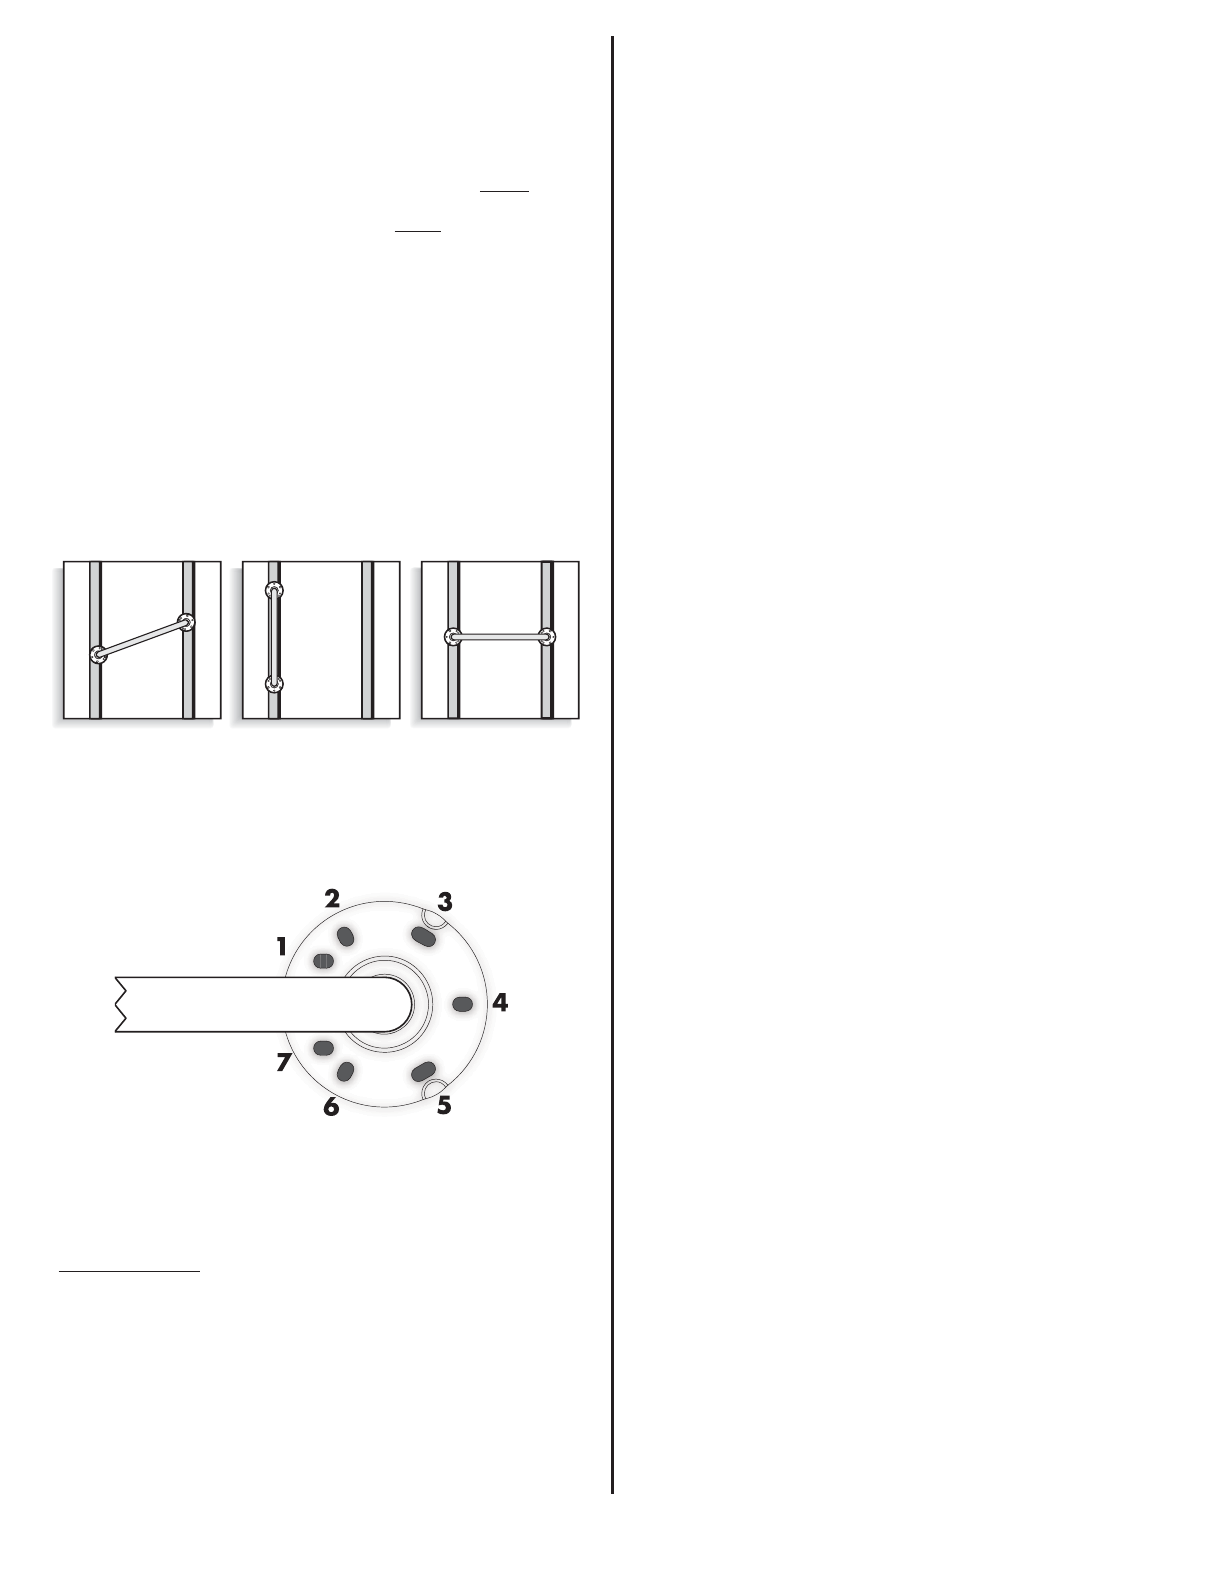
1. Carefully establish the desired mounting location. Choose a
mounting orientation (Diagonal, Vertical, or Horizontal), which
provides the greatest contact with the wall studs that are being
used for mounting.
2. Precisely mark the wall for all mounting holes being used, making
sure that at least TWO (2) screws in each mounting flange will
securely contact a wood stud within the wall.
Each mounting flange has a highly versatile hole pattern, which
can assist greatly when confronted with wall stud spacing that is
different than the standard 16 inch spacing. Please select and use
a combination of mounting holes that will secure each flange with
evenly distributed
pressure. When only two screws are installed
per flange, these screws shall NOT be installed adjacent to each
other in the same area, leaving the opposite side of that flange
unsecured. Please refer to the flange shown, and use the
following hole pairings as a guide for hole selection:
For Diagonal Mounting: Use holes (1/2 & 5), or (3 & 6/7)
For Vertical Mounting: Use holes (1 & 4), or (4 & 7)
For Horizontal Mounting: Use holes (2 & 6), or (3 & 5)
3. If mounting the grab bar to ceramic tile, first drill holes into the
TILE ONLY that are slightly larger then the threads on the screws,
without drilling into the studs. (This will help prevent the
mounting screws from cracking the tile when they are being
tightened.) When drilling, apply light, steady pressure to avoid
cracking the tile. Next, drill the mounting holes into the studs,
while using a drill bit that is slightly smaller then the screw
threads. This will allow the screw to have a good grip into the
wood studs.
NOTE: If mounting to a surface that will be in direct contact with
water, it is advisable to apply a sufficient quantity of silicone caulk
around (and inside) each mounting hole, to prevent water entry into
the wall cavity.
4. With all of the holes drilled, start all screws in their holes before
tightening any one screw all the way in. Gradually tighten all
screws, stopping just prior to being snug. This will allow for
minor re-positioning during final tightening. Once the grab bar is
in its final position, firmly tighten all screws so that both
mounting flanges are securely mated to the wall surface.
5. Once the grab bar is securely mounted to the wall, press the
decorative trim plates onto each mounting flange, also using a
slight turning motion to fully seat the cover to the wall surface.
GRAB BAR CLEANING: The grab bar handle should be kept clean to
ensure a reliable gripping surface. Please use only mild soap and
water for cleaning, and do not apply any harsh cleaning chemicals,
such as chlorine bleach or acids.
TECHNICAL ASSISTANCE: If you have any problems installing or
using this grab bar, please carefully and thoroughly review the
instruction manual. If you require assistance, please contact our
Technical Assistance department at 856-234-8803 during regular
business hours between 8:00AM and 4:30PM Eastern Standard Time,
Monday through Friday.
LIMITED LIFETIME WARRANTY: If this unit fails because of defects
in materials or workmanship within the lifetime of the product, LUX
will, at its option, repair or replace it. This warranty does not cover
damage by accident, misuse, alteration, or failure to follow
installation instructions. Please return malfunctioning or defective
units to the location from which the purchase was made, along with
proof of purchase. Please refer to “TECHNICAL ASSISTANCE” before
returning grab bar. Purchaser assumes all risks and liability for
incidental and consequential damage resulting from installation and
use of this unit. Some states do not allow the exclusion of incidental
or consequential damages, so the above exclusion may not apply to
you. This warranty gives you specific legal rights and you may also
have other rights which vary from state to state. Applicable in the
U.S.A. and Canada only.
© 2010 LUX PRODUCTS CORPORATION. ALL RIGHTS RESERVED