


14 15
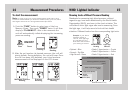
To start the measurement
Note: In order to get your correct measurement result and to avoid
erroneous measurements you should be seated quietly, your arm, hand,
and fingers should be still during measurement procedure.
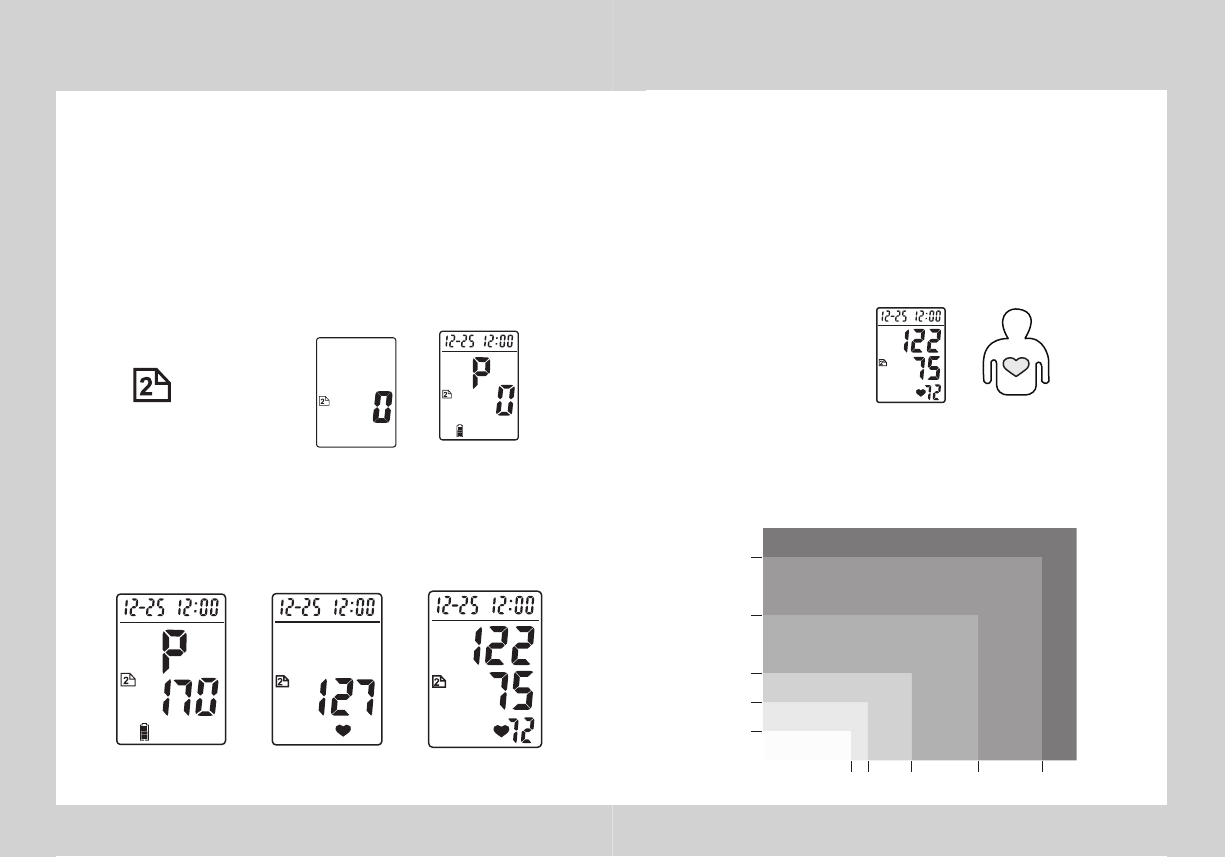
A. Push the "PAGE" button to select one of the four
Memory Zones. Then push "POWER" twice. It will then
display a "FLASHING 0". After a few moments the
unit will automatically inflate displaying the increasing
pressure reading.
B. After the unit reaches its desired pressure, the cuff will
slowly deflate. During deflation, the unit will beep. Once
the cuff has been fully deflated, your blood pressure
measurement will be displayed on the LCD screen.
Measurement Procedures
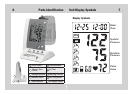
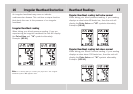
WHO Lighted Indicator
Memory
Zone
Power
Flashing 0
Pressure
Reading
Maximum Pressure
Reading
Pressure
Deflating
Blood Pressure
Reading
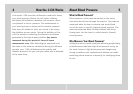
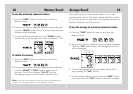
Showing levels of Blood Pressure Reading
Standards for assessing high blood pressure, without
regard to age, have been established by the World Health
Organization (WHO), as shown in the chart as below. This
unit offers 6-color light signs after user's measuring. From
the light sign, it will help users to find out their health
situation. Different levels show the corresponding light color.
Example: If your Blood
Pressure reading is
122/75, then light sign
will indicate the color
Blue Green which means
your reading is Normal
Blood Pressure
Reading
Light Sign
Indicator
• Optimal – Blue
• Normal – Sky Blue
• High-Normal – Green
• Grade 1 Hypertension — Purple
• Grade 2 Hypertension — Yellow
• Grade 3 Hypertension — Red
ON/OFF
Diastolic Pressure
Systolic Pressure
mmHg
Grade 3 hypertenslon (severe)
Grade 2 hypertenslon (moderate)
Grade 1 hypertenslon (mlld)
Hlgh-normal
Normal
Optlmal
(Blue)
(Sky Blue)
(Green)
(Purple)
(Yellow)
(Red)
mmHg
180
160
140
130
120
80
85 90 100
110