


4
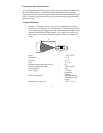
d. Temperature display - maximum value
e. Battery symbol – low battery indicator
f. Temperature units – °F or °C
g. Operating Button
h. Lens
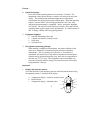
2. Making a measurement
The object being measured should be a minimum of twice the size of the
infrared thermometer’s lens. The ideal measuring distance is 3 to 12 inches,
which will yield a measurement area of ½ inch to 2 inches. As the infrared
thermometer is moved away from the object being measured the area being
measured increases (6:1 ratio).
The infrared thermometer is switched on by holding the operating button down
for 1.5 seconds or more. By continuously holding down the operating button
the measured value will be updated as long as the operating button is pressed.
Releasing the operating button will finish the measurement. The “Hold”
indication signals that measuring has stopped. The backlight will shut off 4
seconds after the operating button is released. The infrared thermometer will
automatically switch off 8 seconds after the last measurement. Holding down
the operating button again will clear the minimum and maximum memory and
begin a new measurement.
3. Minimum and maximum temperature indication
The minimum and maximum value memories are cleared at the start of a
measurement by pressing the operating button. The temperature will be
measured and the minimum and maximum temperatures will be determined for
as long as the button is pressed. The minimum temperature is shown in the
lower left-hand part of the display and the maximum temperature can be seen in
the lower right hand part. These values each apply to the current measuring
cycle and are cleared as soon as the button is pressed again.
4. Changing the temperature units ( °F/°C )
The units for the temperature display can be switched between degrees Celsius
(°C) and degrees Fahrenheit (°F) by pressing the button briefly twice (double
click).