


7 GB
Product specific
safety notices
Do not subject the Outdoor Thermometer to
extreme temperatures (< -25 °C / > +50 °C),
heavy vibrations or strong mechanical stresses.
Ensure that the solar cell does not become
dirty and is not covered with snow or ice in the
winter. This reduces the performance capability
of the solar cell.
Cold temperatures have a negative influence
on the battery operating period. If you do not
need the Outdoor Thermometer for an extended
period, e.g. in the winter, it should be switched
off, cleaned and stored in a dry and warm area.
Remove the batteries to avoid damage to the
batteries themselves or to the solar housing.
mWarning! Never open the solar housing.
Arrange for repair or component exchange
work to be carried out only by the Service
Centre or qualified electricians .
m Warning! The batteries may not be short-
circuited. Overheating, fire risks or the explod-
ing of the batteries could be the consequence.
mWarning! Risk of explosion! Never throw
batteries into water or a fire.
Chemical fluids may leak from batteries that are
very old or exhausted, and these fluids could
damage the appliance. You should therefore
remove the batteries if you do not require the
Outdoor Thermometer for an extended period.
Wear protective gloves:
Leaking or damaged batteries can cause
acid burns if they come into contact
with bare skin, thus in these cases you should
always wear suitable protective gloves.
Use only batterries of the correct size and of
the correct type.
Tip: Ensure that when the Outdoor Thermometer
is removed the support tube and the earth
spike are also removed, to avoid any possible
danger that they may cause (e.g. stumbling ).
Commissioning
Assembly / Location selection
To obtain the optimal results, place the Outdoor
Thermometer in a location at which the solar cell is
subject to the maximum amount of direct sunlight.
Do not place the Outdoor Thermometer under
bushes, trees, overhangs etc which could reduce
the total amount of sunlight received.
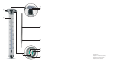
Ensure that the solar cell
Q
and the photo
sensor
W
cannot be covered or come into shade.
Ensure that the solar cell
Q
is not influenced
by other light sources, e.g. house or street illu-
mination. If it is, the lamp will not switch on at
twilight.
During the assembly and the placing of the ap-
pliance do not use force, e.g. hammer blows -
these damage the product.
Screw the temperature tube
O
onto the sup-
port tube
E
.
Insert the earth spike
R
into the support tube
E
.
Put the earth spike
R
, on which the thermom-
eter tube
O
and the support tube
E
are now
placed, into the ground (lawn, flower-bed, etc).
Ensure it is standing securely.
Rotate the solar housing
P
carefully in a clock-
wise direction onto the thermometer tube
O
.
Remove the protective foil from the solar cell
Q
should one be placed over it.
Switching the illumination on and off
The solar housing
P
requires ca. 2-3 sunny days
to fully charge
Y
the batteries. Initially, you should
thus leave the solar lamp switched off for 2-3 days
(Switch position "OFF").
Remove the solar housing
P
by carefully ro-
tating it anti-clockwise from the thermometer
tube
O
.
On the underside of the solar housing
P
place
the AUTO / OFF swich
I
to:
AUTO: The solar lamp is switched on. As the
daylight reduces, the lamp switches on auto-
matically.
Safety / Commissioning