User Guide for installing driver and software
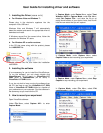
1. Installing the Driver (use a. or b.)
a. For Windows Vista and Windows 7:
Please plug in the electronic eyepiece into the
computer via its USB cord.
Windows Vista and Windows 7 will automatically
detect the camera and search for appropriate driver to
download and install.
If Windows cannot find the correct drive, follow the
procedure for Windows XP users.
b. For Windows XP or earlier versions:
In the CD that came along with the product, please
find 14823.EXE file.
Double click on the file, and follow the installation
instructions.
2. Installing the software
It is unnecessary for you to install the VirtualDub.exe.
To run the software, you can simply double click
VirtualDub.exe (32 bit users) in VirtualDub-1.9.7
32Bit folder or Veedub64.exe (64 bit users) in
VirtualDub-1.9.7 64Bit folder.
If you do not wish to keep running the software from
the CD, feel free to copy the VirtualDub-1.9.7 32Bit
folder or VirtualDub-1.9.7 64Bit folder to a location of
your preference on your computer. Run the software in
the same way as you would on the CD.
3. How to record your experiment
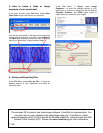
Open VirtualDub software.
Under File Menu, select Capture AVI… to enter
Capture Mode.
In Capture Mode, under Device Menu, select Trust
Webcam 14823.In Capture Mode, under File Menu,
select Set Capture File… and save the file to an
easily found location of your choice. Later, that file will
hold the raw record that you will capture.
In Capture Mode, under Capture Menu, select
Capture Video to start recording your experiment.
In Capture Mode, under Capture Menu, select Stop
Capture to stop recording your experiment.
In Capture Mode, under File Menu, select Exit
capture mode to return to main window.


