


SECTION 7—BATTERIES
Part No 1143150 57 TDX™ Wheelchairs
Installing Batteries
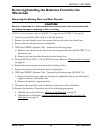
NOTE: For this procedure, refer to FIGURE 7.3 on page 56 and FIGURE 7.4 on page 57.
NOTE: Positioning of the batteries into the battery tray is completed with battery tray positioned
in wheelchair and partially pulled out. Refer to FIGURE 7.3 for full view of wheelchair base.
Illustrations in FIGURE 7.4 are shown without the wheelchair for clarity.
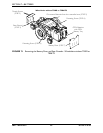
1. Position the battery with battery connector bracket in the REAR of the battery tray in
the orientation as shown. See DETAIL “A”.
NOTE: Front of battery tray is designated by the battery stop. Rear of the battery tray is the
opposite end.
NOTE: Orientation of the battery is critical otherwise batteries will not connect to the controller
or each other.
2. Position the remaining battery in the front of the battery tray in the orientation shown
so that the wiring harnesses can be connected together. See DETAIL “B”.
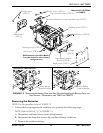
3. Connect front battery to rear battery. See DETAIL “B”.
4. Connect battery straps. See DETAIL “C”.
5. Slide the battery tray into the wheelchair.
NOTE: Refer to FIGURE 7.3.
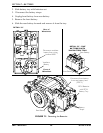
6. If wheelchair is equipped with ventilator tray, perform the following:
A. Install ventilator battery in the orientation.
B. Connect ventilator battery to wiring harness.
C. Connect the strap to secure the ventilator battery to the tray.
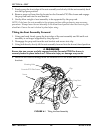
7. Install the battery door and rear shroud. Refer to Installing the Battery Door and Rear
Shroud on page 58.
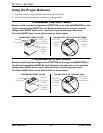
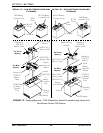
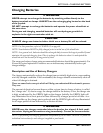
FIGURE 7.4 Installing Batteries
DETAIL “A”
DETAIL “B”
DETAIL “C”
Battery with Battery
Connector Bracket
Front of the
Battery Tray
Rear of the Battery Tray
Battery Stop
Connect front
battery to rear
battery HERE
Rear Battery
Front Battery
Battery
Straps
Battery Connector Bracket