


4
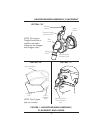
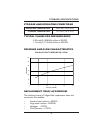
HEADGEAR/MASK ASSEMBLY, PLACEMENT
AND USAGE (FIGURE 1)
NOTE: Wash the headgear before using it for the first time, as dye may
run. Refer to CLEANING THE MASK AND HEADGEAR in this manual.
NOTE: Invacare recommends washing your face before fitting the
mask. This will remove excess facial oil and extend the life of the mask.
1. Check the nasal mask, ensuring that the nasal cushion is attached,
the swivels function, and the exhalation ports are clear.
2. Attach the headgear to the nasal mask by sliding the upper
headgear straps through the loophole of the forehead support.
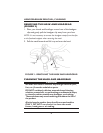
3. Adjust each strap by folding it back and attaching it to itself,
using the hook and loop fastener straps.
4. Slide the lower headgear strap through the loopholes of the
headgear clips.
5. Loosely secure the straps by folding them back and using the
hook and loop fastener straps.
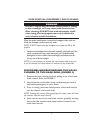
6. Connect a standard 22mm bore, 6-foot tube from your flow
generator to the tubing swivel by pressing the tube end over
the swivel.
7. Turn ON the flow generator BEFORE placing the mask on
your face.
8. Place mask on face with headgear straps behind head.
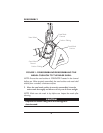
9. Adjust the mask position on the nose. Depress the forehead
support adjustment tab and slide the forehead support up or
down until it contacts the forehead and the upper portion of the
nasal cushion lightly touches the bridge of the nose. The mask
should fit comfortably.
10. Place the mask loosely over the nose, with minimal pressure.
11. Attach the headgear clips to the nasal mask.
NOTE: If a leak occurs, tighten the headgear straps by readjusting the
hook and loop fasteners.
HEADGEAR/MASK ASSEMBLY, PLACEMENT
WARNING
DO NOT pull the straps too tight, this can cause skin
irritation and may deform the nasal cushion, causing a leak.
If the mask and headgear are adjusted correctly and a
problem persists, contact your healthcare professional.