


2
NOTE: The most desirable location for the mount-
ing screws will be determined by the size of the
client involved and the angle achieved by trying the
various attachment points with the client seated
comfortably in the wheelchair.
2. Determine the most suitable attachment point.
Put the padded side of the belt toward the seat-
ing surface.
3. Align the hole located at the anchor end of the
belt with the chosen attachment point and in-
sert one (1) of the mounting screws provided.
HAND TIGHTEN ONLY. Repeat for opposite
side.
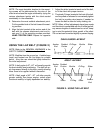
USING THE LAP BELT (FIGURE 2)
NOTE: Refer to the GENERAL WARNINGS in the
SAFETY SUMMARY of this instruction sheet.
NOTE: Stabilize from the ground up. A stable base
(seat) and footrest are the first steps to a stable
pelvis. Also, the user should be lightly clothed for
the initial adjustment.
NOTE: A belt angle of 45
o
- 60
o
will usually provide
the best stability and positioning. The belt will ap-
ply its pressure directly to the hips, usually allowing
more force to be applied without discomfort.
NOTE: A belt angle of 60
o
- 90
o
will often provide
greater mobility than lesser angles, unless client
functional mobility is highly dependent on stability.
1. Adjust the slide, located at each end of the belt,
to fit the client with proper tension.
2. The plastic D-rings, located at the front of the belt,
can be pulled or released to conveniently tighten
the belt to provide extra tension if needed or
loosen the belt to allow for bulky clothing, etc.
NOTE: When all final adjustments have been made
and the client is comfortable with the fit of the lap belt,
any excess lengths of material can be cut off, keep-
ing in mind the potential future growth of the client.
The cut end can be melted slightly to prevent fraying.
CHILD/JUNIOR LAP BELT
Anchor
End
D-Rings
Padded
Portion
Slider
Buckle
ADULT LAP BELT
Slider
Anchor
End
Padded
Portion Buckle D-Ring
FIGURE 2 - USING THE LAP BELT
Slider
Anchor
End
D-Ring
Slider