Adjustable Back Upholstery
Assembly, Installation and Operating Instructions
SAVE THESE INSTRUCTIONS
NOTE: Check all parts for shipping damage. In case of
damage, DO NOT use. Contact Carrier/Invacare for fur-
ther instructions.
SAFETY SUMMARY
The following recommendations are made for the
safe and proper installation and use of the Oxygen
Holder:
GENERAL WARNINGS
DO NOT install this equipment without first read-
ing and understanding this instruction sheet. If you
are unable to understand the Warnings, Cautions
and Instructions, contact a healthcare profes-
sional, dealer or technical personnel if applicable,
before attempting to install this equipment - oth-
erwise, injury or damage may occur.
INSTALLATION WARNINGS
After ANY adjustments, repair or service and BE-
FORE use, make sure that all attaching hardware
is tightened securely.
USER WARNINGS
After the adjustable back upholstery has been
positioned to the end user’s individual needs, the
hook and loop fasteners straps MUST be securely
fastened before applying the back upholstery
cover . The adjustable back should be checked
whenever entering the chair to ensure that the
hook and loop fasteners are securely fastened.
Your therapist and physician should be consulted
if you have any questions regarding individual
limitations and needs.
As the needs of the individual become more com-
plex, the evaluation becomes more important.
ADJUSTABLE BACK UPHOLSTERY
The adjustable back upholstery is a new feature. It is a
positioning device with numerous applications.
THE ADJUSTABLE TENSION
STRAPS.
The straps can be adjusted to various levels of tension to
accommodate individual end users. In a typical scenario,
the bottom two (2) straps can be adjusted tightly to sup-
port and/or assist the extensor muscles.
The top two (2) straps would be left looser to allow the
upper body to lean back over the upholstery to fight grav-
ity. This configuration may enable the back canes to be
lowered for a quad. In another instance, you might loosen
all of the straps and allow the end user to sink all the way
back into the chair. Every person will be different. Let the
therapist experiment with different positions and then
decide. It is easy to change.
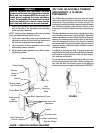
THE BACK UPHOLSTERY COVER
(FIGURE 1)
The back upholstery cover is designed for three (3) rea-
sons:
The first is as a modesty cover to prevent one’s posterior
from protruding out of the chair.
The second is to keep the cushion from sliding out the
back of the chair.
The third is as a sacral support depending upon how far
or tight the flap is pulled under the seat cushion.
Removing Non-Adjustable Tension Back
Upholstery
1. Cut cable tie that secures back upholstery to tab on
axle mounting place.
2. Remove lock nut and button head cap screws that
secure cane handles to frame tube.
3. Remove cane handles from frame tube.
4. Remove phillips head screws that secure upholstery
to cane handles.
5. Remove upholstery from cane tubes.
Installing Adjustable Back Upholstery
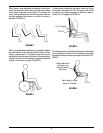
1. Slide one (1) cane handle into each section (anchor
loop/adjuster strap) of the adjustable back upholstery
with grommet hole facing the rear of the chair.
2. Secure adjustable back upholstery to cane handles
with mounting screws.
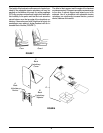
3. Set each cane in frame tube at desired height.
4. Thread screw from the outside of the frame tube through
cane handle and securely tighten with locknut.
NOTE: Clean upholstery with warm water and mild de-
tergent to remove superficial soil.
5. Slip adjuster straps through corresponding anchor
loop and adjust back upholstery. Secure with hook
and loop fasteners.
1


