OVER
SAVE THESE INSTRUCTIONS
NOTE: Check ALL parts for shipping damage before
using. In case of damage, DO NOT use. Contact
Dealer/Carrier for further instruction.
SAFETY SUMMARY
The following recommendations are made for the
safe use of the Invacare Forearm Crutches:
GENERAL WARNINGS
DO NOT install or use this equipment without first
reading and understanding these instructions. If
you are unable to understand the Warnings, Cau-
tions or Instructions, contact a healthcare profes-
sional, dealer or technical personnel before at-
tempting to install this equipment - otherwise, in-
jury or damage may occur.
Make sure that a qualified dealer or therapist
instructs the user on the proper use and op-
eration of the Forearm Crutches.
Always test to see that all parts of the crutches
are secure before using.
Snap buttons MUST fully protrude through the hole
of each leg extension to ensure a positive lock.
Ensure that snap buttons are fully engaged and
aligned in the proper height adjustment hole
of each crutch before use. This ensures that the
adjustable legs are securely locked and an
even height adjustment is achieved.
Periodically inspect rubber crutch tips to en-
sure that they are not ripped, worn or missing.
Replace them if any of these conditions exist.
Inspect handgrips and cuffs for damage, i.e.,
cracked, bent or broken. Call your dealer if
any of these problems exist.
Cuffs are designed to add stability to the Fore-
arm Crutch and are not intended to support
the users weight.
The Forearm Crutches can provide
ambulatory assistance to an individual weigh-
ing up to 300 lbs. (135 kg.) per crutch. The Fore-
arm Crutches are designed to provide support
and stability in assisting the user.
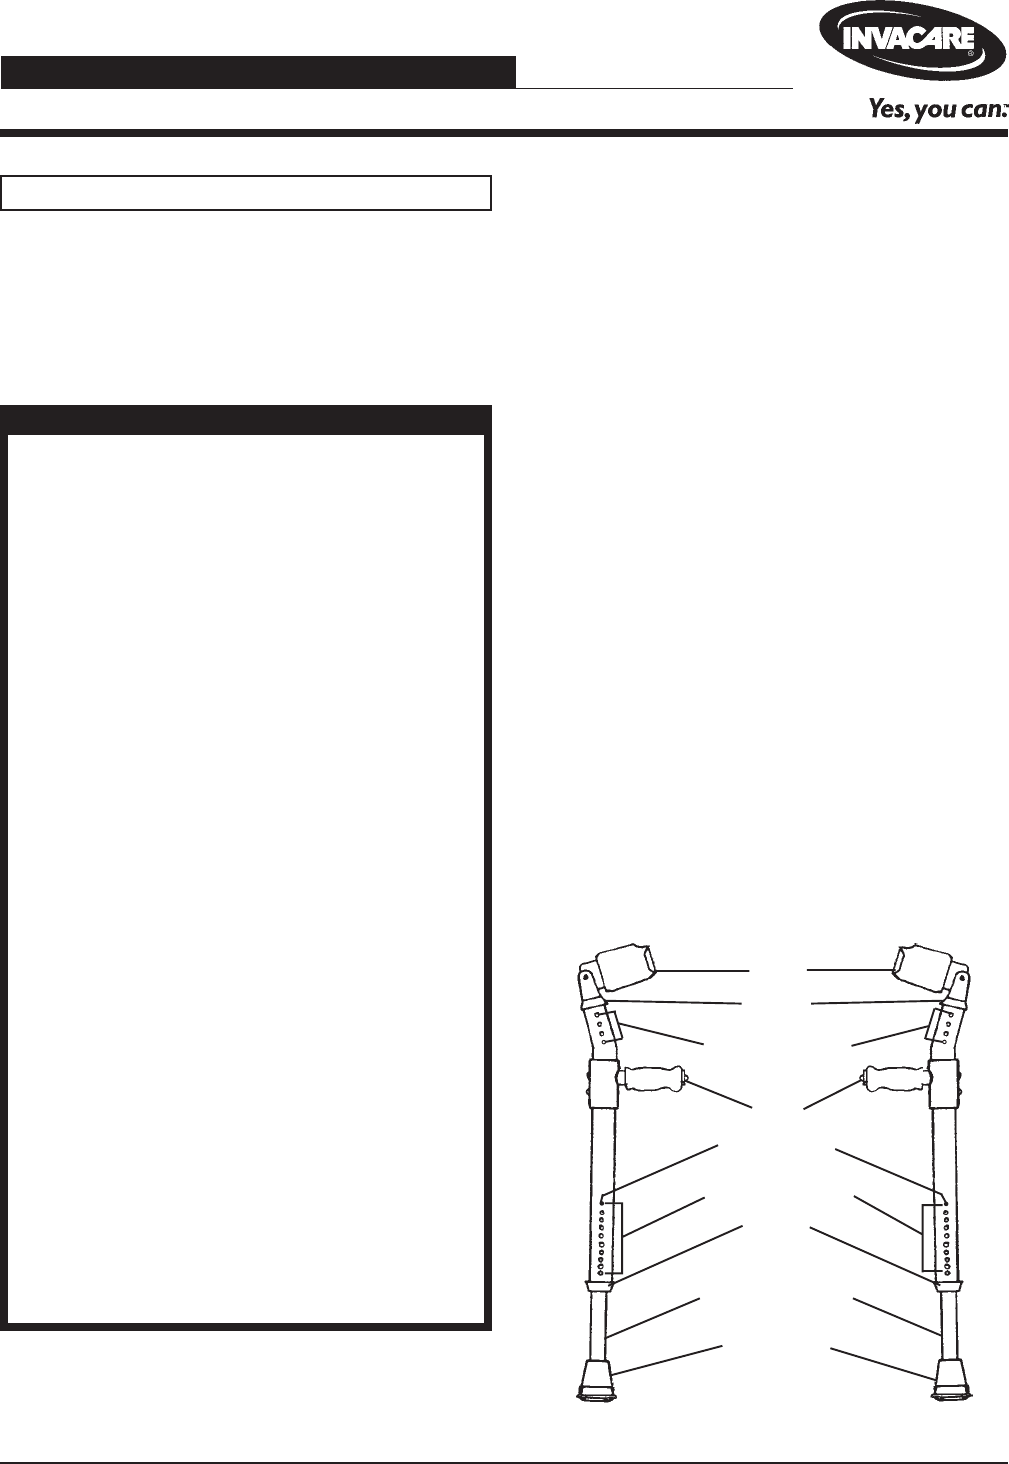
FIGURE 1 - HEIGHT ADJUSTMENTFIGURE 1 - HEIGHT ADJUSTMENT
FIGURE 1 - HEIGHT ADJUSTMENTFIGURE 1 - HEIGHT ADJUSTMENT
FIGURE 1 - HEIGHT ADJUSTMENT
HEIGHT ADJUSTMENT (FIGURE 1)
NOTE: Refer to the GENERAL WARNINGS in the
SAFETY SUMMARY of this instruction sheet.
1. Depress the snap buttons on the leg extensions and
adjust the leg extensions up or down to achieve the
proper height for the user.
2. Ensure that leg extensions are engaged in the same
respective adjustment hole and the snap buttons fully
protrude through the hole of each leg for an even
height adjustment.
3. Adjust cuff height by depressing snap button on each
cuff and inserting the snap button into the adjust-
ment hole.
4. Ensure that cuffs are engaged in the same respec-
tive adjustment hole and snap buttons fully protrude
through adjustment hole of each cuff for an even
height adjustment.
5. Rotate ALL collars until tight to secure cuffs and
leg extensions.
6. A dealer or therapist should instruct the user on the
proper adjustment and use of the crutches.
7. Periodically inspect all moving parts of the
crutches for proper operation.
NOTE: The crutch cuffs can be widened or narrowed to
help ensure a secure fit around the arms of the user.
Cuffs
Collars
Cuff Adjustment
Holes
Grips
Snap Button
Adjustment Holes
Collars
Leg Extensions
Crutch Tips
Forearm Crutches
Assembly, Installation and Operating Instructions
Model Nos. 6125, 6153, 6154


