


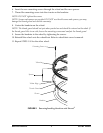


Part No. 1144492 3 Natural-Fit Handrims
Removing/Installing Handrims with Tabs
NOTE: For this procedure, refer to FIGURE 2 on page 4.
Tools Needed:
• Phillips head screwdriver
• 3/8” wrench
•Air pump
• Tire irons (tools to remove the tire) - if necessary
• Pliers - if necessary
1. Remove the wheel from the wheelchair. Refer to wheelchair owner’s manual.
2. Deflate and remove the tire from the wheel.
3. Using a Phillips screwdriver and a 3/8” wrench, remove the six mounting screws and
locknuts that secure the old handrim to the wheel. Discard the old handrim.
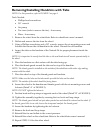
4. Inspect the tabs on the handrim of the Natural-Fit for proper placement inside the
wheel.
NOTE: It is important to evenly bend the tabs so the oval handrim will mount symmetrically to
the wheel.
5. Place the handrim on a flat surface with the tabs facing up.
6. Place the thumb guard around the tabs and on top of the handrim.
NOTE: The thumb guard is installed on the outside of the wheelchair with wider edge making
contact with the wheel.
7. Place the wheel on top of the thumb guard and handrim.
NOTE: Make sure the holes on the tabs match up with the holes on the wheel.
NOTE: The outside of the wheel should be facing down.
8. Secure the wheel to the handrim and thumb guard with the six mounting screws and
locknuts (Detail “A” of FIGURE 2).
NOTE: DO NOT tighten the locknuts.
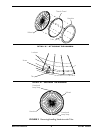
9. Position hook and loop straps at opposite ends of the wheel (Detail “B” of FIGURE 2).
10. Tighten the assembly together by securing the two hook and loop straps.
NOTE: The thumb guard should not spin when pushed on and should be centered on the wheel. If
the thumb guard tilts to one side, loosen the straps and readjust the thumb guard.
11. Secure the handrim by tightening the six locknuts.
12. Remove the hook and loop straps.
13. Reinstall the tire and inflate to the correct pressure.
14. Reinstall the wheel on the wheelchair. Refer to the wheelchair owner’s manual.
15. Repeat STEPS 1-14 for the other wheel.