


6
Repeat steps 3 through 5 for each additional field you need
to change.
7
Select DONE.
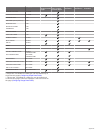
Configuring the Data Fields
Data provided on an instrument page can be shown in various
ways depending upon the instrument page that is displayed.
1
Select > CONFIGURE DATA FIELDS.
2
Select a data field.
3
Select a configuration option.
4
Adjust the configuration.
Filtering the Data
Certain data types can be filtered to control how quickly the
marine instrument responds to changes in the data (Data Type
Information).
1
When viewing data you need to filter, select >
CONFIGURE DATA FIELDS.
2
Select a data field.
3
Select FILTER SETTING.
4
Adjust the filter setting.
• Setting the filter to "0" turns off filtering.
• The higher the filter setting, the more gradually the
instrument displays changes in the data it receives.
For example, when you increase the filter setting for wind
speed data, the instrument is less responsive to
momentary gusts of wind and displays a more constant
wind speed.
Adjusting the Data Update Rate
You can adjust the rate at which the marine instrument shows
updated data.
1
When viewing the instrument screen with data you need to
adjust, select > CONFIGURE DATA FIELDS.
2
Select a data field.
3
Select UPDATE RATE.
4
Select an update rate.
Examples of update-rate speeds are shown next to each
selection.
Configuring Graph Data Fields
Some single-function instrument pages display graph data (Data
Type Information). You can configure how data is shown on the
graphs.
1
From an instrument page with a graph, select >
CONFIGURE DATA FIELDS > GRAPH SETTINGS.
NOTE: The GRAPH SETTINGS menu item does not appear
on instrument pages that do not contain a graph.
2
Select an option:
• To determine how long the graph data displays, select
GRAPH DURATION.
• To configure the scale of values displayed in the graph,
select GRAPH SCALE.
Configuring Gauge Data Fields
Some data types can be shown as a gauge when they appear
as the last function on a two-function instrument page (Data
Type Information). You can configure how data is shown on the
gauge.
1
From an instrument page with a graph, select >
CONFIGURE DATA FIELDS > GAUGE SETTINGS.
NOTE: The GAUGE SETTINGS menu item does not appear
on instrument pages that do not contain a gauge.
2
Select a value to adjust the limits of the gauge.
Using the Race Timer
To view the race timer on a page, you must add it as a data field
from the SAILING category.
You can use the race timer to count down to a race, and then
measure the duration of the race. The race timer is
synchronized with other GNX instruments and compatible
Garmin
®
chartplotters on the same NMEA 2000 network.
TIP: To quickly open the race timer screen, you can hold
from a main page. This shortcut works from any page, whether
or not the race timer has been added to the page.
1
From a page with the race timer as a data field, select >
CONFIGURE DATA FIELDS > RACE TIMER SETTINGS.
2
Select an option:
• When the device is in prerace mode and the timer is not
running, select START to start the prerace timer, select
RESET to reset the prerace timer, or select SETUP to
adjust the initial prerace timer value.
• When the prerace timer is running (counting down), select
or to advance the timer to the next minute up or the
next minute down, or select STOP to stop the prerace
timer.
• When the race timer is running (counting up), select STOP
to stop the race timer, or select to reset the timer back
to 0:00.
Device Configuration
System Settings
Select > SETUP > SYSTEM.
UNITS: Sets the units of measure.
HEADING: Sets the reference and the variance used in
calculating heading information.
BEEPER: Sets when audible sounds are used.
GPS POSITION: Sets the position format and the map datum.
The map datum is dependent on the position format.
AUTO POWER: Enables the device to turn on automatically
when the NMEA network turns on.
LANGUAGE: Sets the on-screen language.
TIME: Sets the time format, time zone, and daylight savings time
for your location.
SYSTEM INFORMATION: Displays software information.
FACTORY DEFAULT: Resets the device settings to factory
default values.
Selecting the Heading Type
1
Select > SETUP > SYSTEM > HEADING.
2
Select NORTH REFERENCE.
3
Select an option:
• To automatically set the magnetic declination for your
GPS position, select MAGNETIC.
• To set true north as the heading reference, select TRUE.
• To set grid north as the heading reference (000°), select
GRID.
Adjusting the Heading Variance
By default, the heading variance is set automatically. You can
adjust this value manually.
1
Select > SETUP > SYSTEM > HEADING > VARIANCE >
USER VARIANCE.
2
Adjust the variance.
3
Select to save the variance adjustment.
Configuring the Beeper
1
Select > SETUP > SYSTEM > BEEPER.
2 Device Configuration