


4
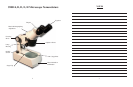
This stereo microscope is well designed and sturdily built. It has high quality optics and
precision mechanics. The inclined head rotates 360 degrees for comfortable viewing.
The S90014 series microscopes include 10x widefield eyepieces, and come in a variety of
magnification and illumination configurations (see chart below). There are three types of
illumination in the S90014 series: Cordless LED, Fluorescent, and Halogen. USB/Analog
model S90014G is also available, and includes a seperate users guide for the software.
LED and Halogen models come pre-assembled in the box and ready to use. Fluorescent
models require minimal assembly.
Introduction:
Model# Objectives Magnification Illumination
S90014 1x, 2x 10x, 20x Halogen
S90014A 1x, 2x 10x, 20x Fluorescent
S90014B 1x, 3x 10x, 30x Halogen
S90014C 1x, 3x 10x, 30x Fluorescent
S90014D 1x, 3x 10x, 30x LED
S90014E 2x, 4x 20x, 40x Halogen
S90014F 2x, 4x 20x, 40x Fluorescent
S90014G 2x, 4x 20x, 40x Fluorescent
S90014H 2x, 4x 20x, 40x LED
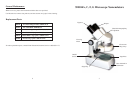
Assembly (fluorescent models only):
Fluorescent models in the S90014 series include a fluorescent ring lamp. Attach the ring
lamp to the objective turret by sliding the lamp over the turret, and securing in place with
the 3 phillips (+) screws. Your microscope is now assembled and ready for use.
Three Way Illumination:
All S90014 series microscopes have a 3 way illumination switch. Your choices are:
A. Upper and lower lamps on simultaneously
B. Upper lamp only
C. Lower lamp only
5
Using your microscope:
Turn the microscope on using the on/off switch. Place your sample on the stage plate and
look through the eyepieces. Adjust the focusing knob until your specimen is in focus.
Adjust the interpupillary distance of your eyepieces utilizing the “folding” motion of the
head. Both eyes should be focusing on your sample. If one eye appears out of focus,
focus on the specimen with your right eye only. Once in focus with the right eye, close
that eye and look at the sample with your left eye. If sample is out of focus, use the di-
opter adjustment on the left eyetube to bring it into focus. Once this is done, your micro-
scope is ready for use and dioptic differences have been adjusted. There are two magnifi-
cation settings on your microscope, to change the magnification, rotate the objective turret
90 degrees. The microscope comes with a frosted stage plate, and a black and white
stage plate. The frosted plate is used on transparent specimens that light can pass
through. Use the black and white stage plate for macro objects that require light from the
top. Try viewing your specimen with both sides of the black and white plate to get the
best image.
Lamp replacement:
WARNING: Unplug the microscope from the wall outlet, or remove the batteries
from your microscope before replacing your bulbs! Do not touch the new bulb with
your bare fingers. Use a tissue or surgical glove. Oils from the skin will lessen the life of
your bulb.
HALOGEN & LED MODELS: To replace the upper bulb, unscrew the black lamp
housing behind the objective turret. Pull the bulb straight out, and push the new bulb into
the lamp socket. Remove the stage plate to expose the lower bulb. Remove the bulb by
pulling to the left, and push the new bulb into the lamp socket.
FLUORESCENT MODELS: To replace the ring lamp, remove the single phillips (+)
screw which attaches the lamp to the lamp housing. Pull the lamp straight down, and push
the new lamp straight up. Secure in place with the phillips screw. Remove the stage plate
to expose the lower bulb. Remove the bulb by pulling straight forward, and push the new
bulb into the lamp socket.