EA20 V1.5 03/04
4
Manual Datalogging
Clearing The Memory
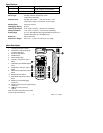
1. Press the button to power off the meter.
2. Press and hold down the MEM key, then press the key to power on the meter. The
display will show “CLr” indicating that the memory has been erased.
Entering A Reading
1. Press the MEM key to enter a reading. The display will momentarily show an “M” and the
memory location number from 1 to 99.
2. When the memory is full, the display will show “FULL”.
Data Recall
1. Press the “READ” key to enter the READ mode. The LCD will show an “R” and the
memory address number.
2. Press the “
” keys to scroll through the memory locations.
3. Press “DEW” or “WET” to view the stored Dew Point or Wet Bulb temperature.
4. Press the “READ” key to exit this mode.
Relative mode
Measurements can be displayed as a difference between actual humidity/temperature and
stored reference values. To store a humidity/temperature reading group as a reference,
press the REL button when the desired reference readings are on the LCD (the triangle
icon will appear steady in the upper left-hand corner of the LCD). All subsequent displayed
readings will be “relative” to the stored reference value. For example, if the reference
values are 50.0% & 100°F and the actual readings are 53.0% & 105°F, the meter will
display 3.0% & 5°F. To exit the Relative mode, press and hold the REL button until the
triangle icon disappears.
Automatic Power OFF
The meter automatically shuts off after a programmed period of time. To program the time
period press and hold the TIME button while turning the meter on. Release the TIME
button after the meter finishes its self-test. Press the TIME button to scroll through the eight
time selections (shown on the smaller digits at the center of the LCD). Select from the
following list: 0 (disabled), 1, 3, 5, 10, 15, 30, or 59 minutes. Press the H button to store the
desired time.
Maintenance
Cleaning and storage
1. The meter should be cleaned with a damp cloth and mild detergent when necessary.
Do not use solvents or abrasives.
2. Store the meter in an area with moderate temperature and humidity (refer to the
operating and storage range in the specifications chart earlier in this manual).
Battery Replacement
When the battery power falls low, the ‘BT’ symbol will appear on the LCD. Replace the six
(6) 1.5 ‘AAA’ batteries by removing the rear (center) battery compartment screw and
accessing the battery compartment. Observe polarity when placing the batteries in the
compartment. Ensure that the compartment cover is securely fastened when finished.


