


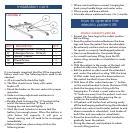

The Drive Deluxe Electric Patient Lift is designed
to transfer a patient from one resting position to
another. It is not a transport device. Use a sling
that is recommended by the individual’s physician.
During transfer, with patient suspended in a sling
to the lift, do not roll caster base over objects such
as raised carpet bindings, door frames, or any
uneven surfaces that would create an imbalance
of the lift. Use steering handles at all times to
maneuver the lift.
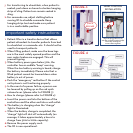
H. Insert the base spreading adjusting handle (#3)
into the socket located behind the mast sleeve.
I. Attach the cradle (#11) to the end of the boom and
make sure the bolts are screwed tightly.
J. The lift is now ready to operate.
instructions
FOLLOWFIGURE(on right)&FIGURE (on next page)
The Electric Patient Lift is packed in one carton
which contains the following components:
A. Mast with boom
B. Base.
C. Base spreading adjustment handle.
D. Battery box, control box and control handset.
E. “C” shaped push bars
F. 4/6 point cradle
Installation Procedure:
(please refer to chart on pg.3)
A. Remove the screws (#16, #17) and washer (#20)
from the base as indicated.
B. With the boom pointed in the same direction as
the base legs, insert the mast (#2) into mast
sleeve and ensure the mast is in place.
C. Install the screw (#16, #17) and washer (#20) on
to the mast (#2) through mast sleeve.
D. Install the push handles (#14,#15) into the mast (#2)
and ensure the screws (#19) on the push handles
are screwed tightly.
Please refer to the following pictures:
E. Unscrew the gold colored screw (#18)
F. Mount the control box (#4) on the bracket (#9)
and screw back the bolts (#18) on the bottom
of the bracket.
G. Place and clip the battery pack (#7) on the top
of the bracket.
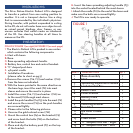
installation
PART DESCRIPTION QTY
1 Base Assembly 1
2 Mast 1
3 Spreading Adjustment Handle 1
4 Linak Control Box 1
5 Power Cord 1
6 Linak Acuator 1
7 Battery Pack 1
8 Fitted Screws 2
9 Mounting Bracket 1
10 Hand Set 1
11 4/6 Point Cradle 1
12 Boom 1
13 Fixed Screw 2
14 “C” Shaped Push Bar - Right 1
15 “C” Shaped Push Bar - Left 1
FIGURE