


LIMITED TWO YEAR WARRANTY
Conair will repair or replace (at our option) your
unit free of charge for 24 months from the date of
purchase if the appliance is defective in
workmanship or materials.
To obtain service under this warranty, return the defec-
tive product to the service center listed below, together
with your purchase receipt and $3.00 for postage and
handling. California residents need only provide proof of
purchase and should call 1-800-366-0937 for
shipping instructions. In the absence of a purchase
receipt, the warranty period shall be 24 months from the
date of manufacture.
ANY IMPLIED WARRANTIES, OBLIGATIONS, OR
LIABILITIES, INCLUDING BUT NOT LIMITED TO THE
IMPLIED WARRANTY OF MERCHANTABILITY AND
FITNESS FOR A PARTICULAR PURPOSE, SHALL BE
LIMITED IN DURATION TO THE 24 MONTH DURATION
OF THIS WRITTEN, LIMITED WARRANTY. Some states
do not allow limitations on how long an implied war-
ranty lasts, so the above limitations may not apply to
you.
IN NO EVENT SHALL CONAIR BE LIABLE FOR
ANY SPECIAL, INCIDENTAL, OR CONSEQUENTIAL
DAMAGES FOR BREACH OF THIS OR ANY
OTHER WARRANTY, EXPRESS OR IMPLIED,
WHATSOEVER. Some states do not allow the exclusion
or limitation of special, incidental, or consequential
damages, so the above limitation may not apply to
you.
Service Center
Conair Corporation
Service Department
7475 N. Glen Harbor Blvd.
Glendale, AZ 85307
For shaving tips and information on Conair appliances
call: 1-800-3-CONAIR or visit us on the web at www.
conair.com
Made in China
©2008 Conair Corporation
7475 N. Glen Harbor Blvd.
Glendale, AZ 85307
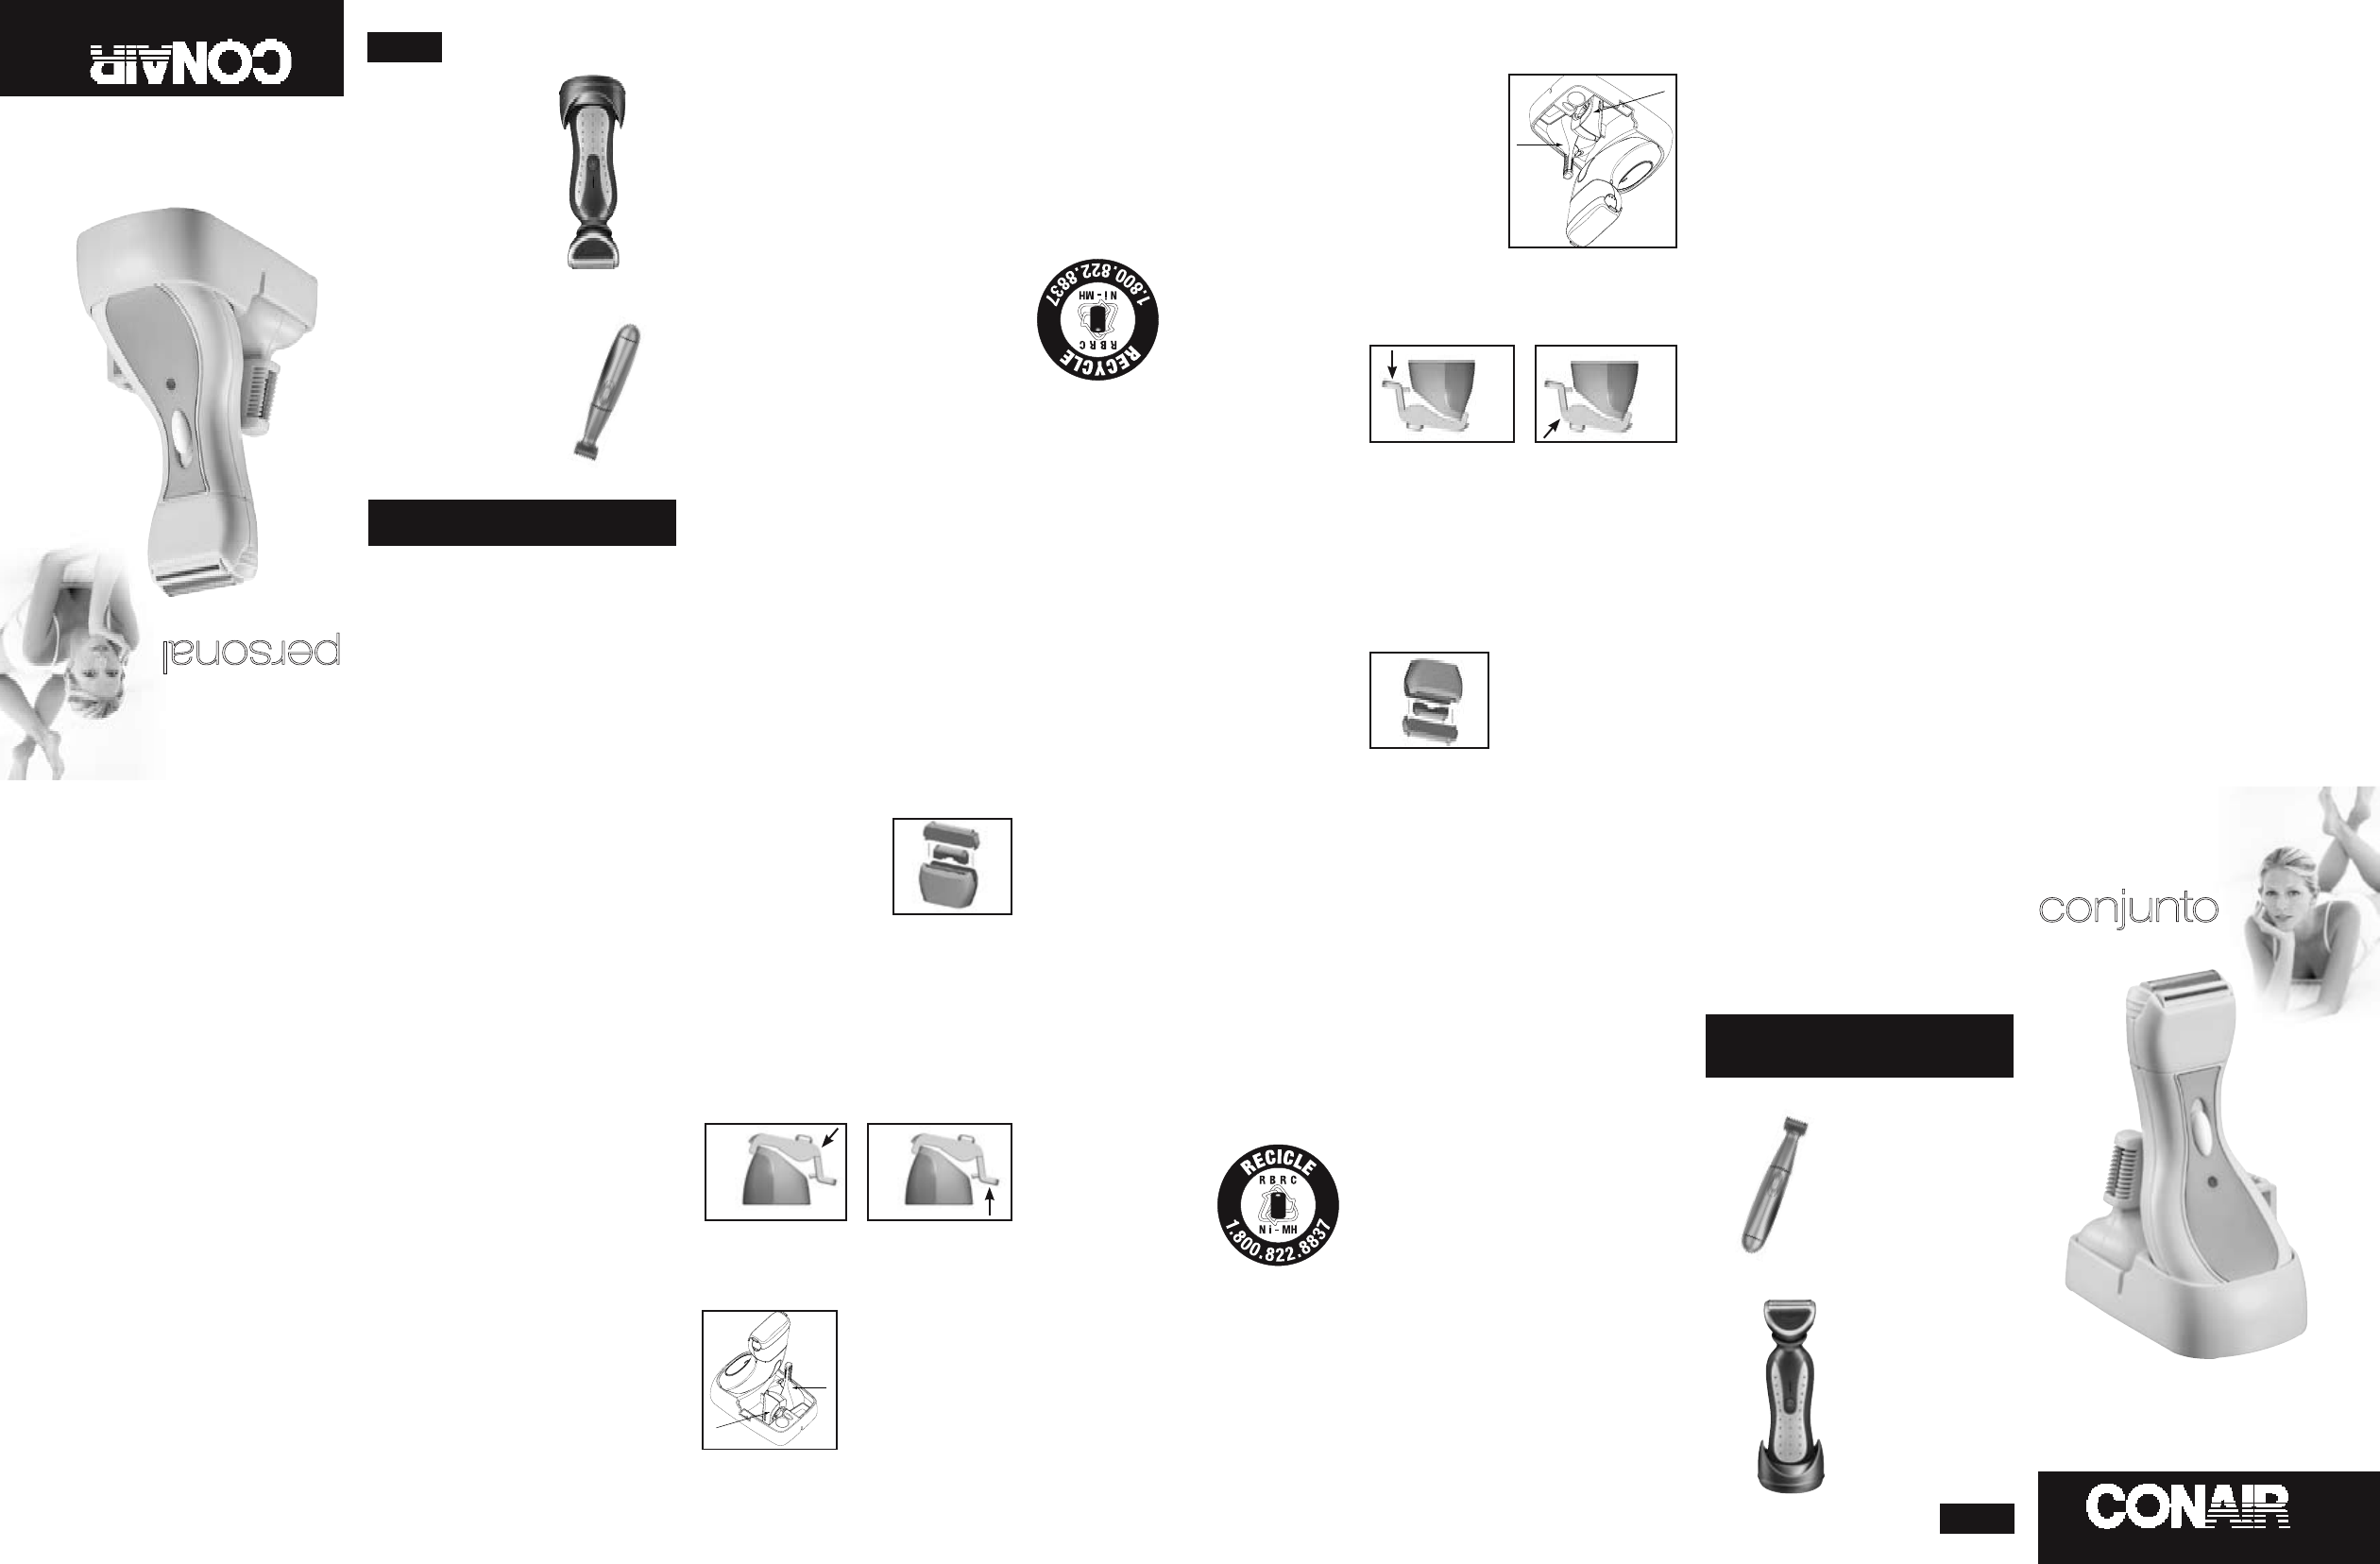
2. Hold both sides of the
inner blades and pull straight
up (Fig. 4).
3. Firmly hold the new inner
blade and gently guide it into
the inner blade mount.
Caution: MAKE SURE YOU DO NOT LOSE THE
SMALL SPRING UNDER THE CUTTERS.
4. Firmly press the inner blades until they snap
into place.
5. Replace the foil frame.
BIKINI TRIMMER
COMB ATTACHMENT
1. Place the comb attachment on the bikini trim-
mer head and press down (see Fig. 5).
2. Push up the comb attachment to release.
(see Fig. 6).
STORAGE
STAND
The storage stand is
designed with cus-
tomized locations
for both the bikini
and eyebrow trim-
mer. After each use
and maintenance,
place the bikini trimmer and eyebrow trimmer
REPLACEMENT PARTS:
These shavers use the following replacement
parts, which can be ordered directly from Conair
by calling customer service at
1-800-3-CONAIR.
Replacement Foil and Cutters - CSP26 – $6.50
Cleaning Brush - BRUSH-180 – $0.50
Charging Base - LTGS40-CB – $6.00
Bikini Trimmer Attachment - Bikini-LTGS40 – $5.00
the larger blade only.
8. Place the comb on the head in the longest posi-
tion by sliding the comb into the groove on the
head closest to the blades.
9. Gently move the comb through the hair. If you
need to remove more hair, move the comb to the
shortest position. If you want to remove the hair
completely, leave the comb off and move the
blades against the direction of growth.
10. When finished, move the on/off switch to the
OFF
position and clean the blades with the sup-
plied cleaning brush.
REPLACING THE FOILS FRAME
1. It is time to replace the foils when you find you
have to push harder on the shaver to get a close
shave, or if you have to go over your leg area more
often to get a smooth result, or if you experience
skin irritation. Replacement time will depend on
how often use your shaver and how quickly your
hair grows.
2. When replacing the foils, press the foil frame
release buttons on the both sides of the shaver
head, remove and then gently insert the new foil
frame into position, being careful not to push on
the foils.
REPLACING THE CUTTER
(INNER BLADES)
CAUTION: NEVER REPLACE THE CUTTERS WITHOUT
REPLACING THE FOILS AS WELL.
1. To remove the shaver head from the unit, press
the release buttons on both sides of the foil frame
and then remove it from shaver head, the cutter
is now in view.
comb on the cutting blades first, and then snap
down on to the back of the trimmer head.
8. Start with the longest setting, by moving the
comb switch away from the back of the trimmer.
9. Gently move the comb through the hair in the
direction of growth.
10. After you have done this with the longest set-
ting, if you want to make the hair shorter, move to
the next lowest position until the desired length of
hair is achieved.
11. After hair removal, run a comb or brush (not
included) through the hair to remove any cut loose
hairs
12. When you have finished, move the switch
to the OFF position. Clean the blades with the
provided brush and then return the handle to the
charging base to ensure it is fully charged for the
next use.
USING THE EYEBROW TRIMMER
1. Be sure the unit is fully charged
2. Attach the trimming head as described in
“Changing the Heads” section
3. This trimmer comes with two trimming blades.
The larger blade can be used to trim body hair and
eyebrows. The smaller blade is ideal for detailing.
4. To outline and shape your eyebrows, use the
trimmer without the attachment comb.
5. Move the power switch to the ON position.
6. Use the blades to define the edge of the eye-
brow
7. Once the shape of your eyebrow has been defined,
you may thin out the hair using the attachment comb
NOTE
: Attachment comb is designed to work with
into the customized locations for storage (see
Fig. 7).
RINSE THE SHAVER HEAD
1. Rinse the shaver cutter and foil frame under
warm or cold running water only; do not use
hot water (you can also use the cleaning brush
which is included).
2. Allow the shaver head and foil frame and
cutters to air-dry before replacing foil frame.
CAUTION
1. When shaking off excess water, hold the
main unit firmly to prevent releasing the head
assembly or dropping the unit.
2. Do not use a dryer or heater to dry the
shaver. This may result in malfunction or
damage to the shaver.
NOTE: Never pull on the
charging stand cord.
Never twist or wrap the
cord around the charging
stand. Lay it flat in the
storage pouch provided
with the cord coiled up
when not in use.
NOTE:
The product you have purchased contains
rechargeable batteries. The batteries are
recyclable. At the end of their useful life, under
various state and local laws, it may be illegal
to dispose of these batteries into the municipal
waste stream. Check with your local solid waste
officials for details in your area for recycling
option or proper disposal.
Fig. 5
Fig. 6
EXCITING ITEMS
FROM CONAIR
07PG10139 IB-7665A
LWD500CS Infiniti by Conair™ Woman's Shaver
• Rechargeable
• Wet/Dry
• Full Swivel 360º Head
LT10PCS Battery Operated Trimmer
• 2 Interchangeable Blades:
• Bikini Trimmer
• Angled Trimmer for eye-
brows and other types of
hair removal
Instruction Booklet
Model LTGS40PCS
For your safety and continued enjoyment
of this product, please read instruction booklet
prior to using.
®
Fig. 4
GARANTÍA LIMITADA POR DOS AÑOS
Conair reparará o remplazará (a su opción) su aparato sin cargo
por un período de 24 meses a partir de la fecha de compra si
presenta defectos de mano de obra o en los materiales.
Para obtener servicio técnico bajo esta garantía, lleve o mande
su aparato al Centro de Servicio indicado a continuación, junto
con su recibo de compra y un cheque de $3,00US por gastos
de envío y manejo. Los residentes de California sólo necesitan
dar una prueba de compra y deben llamar al 1-800-366-0937
para recibir instrucciones de envío. En ausencia del recibo de
compra, el período de garantía será de 24 meses a partir de la
fecha de fabricación.
CUALQUIERA GARANTÍA, OBLIGACIÓN O RESPONSABILIDAD
IMPLÍCITAS, INCLUYENDO PERO NO LIMITADAS A LA
GARANTÍA IMPLÍCITA DE COMERCIABILIDAD Y APTITUD
PARA UN PROPÓSITO ESPECÍFICO, ESTARÁN LIMITADAS
POR LOS 24 MESES DE LA PRESENTE GARANTÍA ESCRITA.
Algunos Estados no permiten limitaciones sobre la duración de
una garantía implícita, de modo que las limitaciones menciona
-
das pueden no regir para usted.
CONAIR NO SERÁ RESPONSABLE EN NINGÚN CASO POR
ALGÚN DAÑO ESPECIAL, INCIDENTAL O CONSECUENTE
DEBIDO AL INCUMPLIMIENTO DE ESTA O DE CUALQUIER
OTRA GARANTÍA, EXPRESA O IMPLÍCITA. Algunos Estados
no permiten la exclusión o limitación de daños especiales,
incidentales o consecuentes, de modo que las limitaciones
mencionadas pueden no regir para usted.
Esta garantía le otorga derechos legales específicos y usted
puede tener otros derechos que varían de un Estado a otro.
CENTRO DE SERVICIO
Conair Corporation
Service Department
7475 N. Glen Harbor Blvd.
Glendale, AZ 85307
Para consejos e información sobre los productos de
Conair, llame al 1-800-3-CONAIR o visite nuestra
página Web www.conair.com
Hecho en la China
©2008 Conair Corporation
7475 N. Glen Harbor Blvd.
Glendale, AZ 85307
2. Coja las cuchillas internas
por las dos extremidades y
levántelas (Fig. 4).
3. Coja las nuevas cuchillas
firmemente por los lados e
insértalas en el cabezal.
IMPORTANTE: Tenga cuidado de no perder el
pequeño resorte que se encuentra bajo las
cuchillas.
4. Engánchelo en su lugar hasta que calce emi
-
tiendo un chasquido.
5. Vuelva a instalar las hojas.
GUÍA PARA LA CORTADORA
PARA EL BIKINI
1. Instale el guía encima de la cortadora y
presione hacia abajo (Fig. 5)
2. Empuje el guía hacia arriba para sacarlo (Fig. 6)
BASE DE
ALMACENAMIENTO
Dos espacios en la base
de almacenamiento fueron
diseñados específicamente
para guardar la cortadora
para el bikini y la cortadora
para las cejas. Guarde el aparato y los accesorios
en la base después de cada uso (Fig. 7).
PARTES DE REPUESTO:
Puede ordenar las partes de repuesto siguientes,
llamando al 1-800-3-CONAIR.
Hoja y cuchillas – Modelo CSP26 ($6.50)
Cepillo de limpieza – Modelo BRUSH-180 ($0.50)
Base de carga – Modelo LTGS40-CB ($6.00)
Cortadora para el bikini – Modelo LTGS40 ($5.00)
9. Mueva la cortadora delicadamente. Si desea
acortar aún más las cejas, use la posición más
corta, deslizando el guía en la ranura más lejana
a las cuchillas. Si desea rasurar las cejas, use la
cortadora sin guía y rasure las cejas en la direc-
ción opuesta al crecimiento del vello.
10. Después de terminar, apague el aparato
(“OFF”) y limpie las cuchillas con el cepillo de
limpieza provisto.
CÓMO CAMBIAR LAS HOJAS
1. Cambie las hojas cada vez que siente que tiene
que forzar la rasuradora o si tiene que rasurar la
misma zona varias veces para lograr un resultado
suave. También cambie las hojas si irritan su piel.
La vida útil de las hojas depende del uso que hace
de su aparato y de la rapidez de crecimiento del
vello.
2. Oprima los botones de despejo que se encuen
-
tran en ambos lados del cabezal. Saque las hojas
usadas e instale nuevas, teniendo cuidado de no
apretarlas.
CÓMO CAMBIAR LAS
CUCHILLAS INTERNAS
PRECAUCIÓN: SIEMPRE REEMPLACE LAS HOJAS Y
LAS CUCHILLAS INTERNAS AL MISMO TIEMPO.
1. Oprima los botones de despejo y saque las
hojas. Las cuchillas internas quedarán al descu-
bierto.
8. Empiece con la posición más larga (mueva el
botón de ajuste del guía lejos de la parte trasera
de la cortadora)
9. Mueva la cortadora delicadamente en la
dirección del crecimiento del vello.
10. Acorte el vello poco a poco, usando ajustes
más y más cortos hasta conseguir el tamaño
deseado.
11. Después de terminar, quite los recortes de pelo
con un peine o un cepillo.
12. Apague el aparato (“OFF”). Limpie las cuchillas
con el cepillo provisto, luego regrese el agarre en
la base hasta el próximo uso.
CÓMO USAR LA CORTADORA
PARA LAS CEJAS
1. Asegúrese que el aparato esté completamente
cargado.
2. Instale la cortadora para las cejas, como se
indicó en la sección “Cómo cambiar las cabezas”.
3. La cortadora para las cejas tiene dos cuchillas:
una cuchilla ancha para el vello del cuerpo y las
cejas, y una cuchilla estrecha para los cortes de
detalle, como el pelo de la nariz.
4. Para dar forma a sus cejas, use la cortadora
sin guía.
5. Encienda el aparato (“ON”).
6. Use las cuchillas para definir la forma de sus
cejas.
7. Después de dar forma a las cejas, use el guía
para adelgazarlas. NOTA: el guía trabaja sola-
mente con la cuchilla ancha.
8. Empiece con la posición más larga, deslizando
el guía en la ranura más cercana a las cuchillas.
CÓMO LIMPIAR LA RASURADORA
1. Enjuague el conjunto de cuchillas bajo agua
corriente fría o tibia. No use agua caliente.
También puede usar el cepillo de limpieza
provisto.
2. Permita que las hojas y la cortadora interna
sequen al aire antes de volverlas a instalar.
PRECAUCIÓN
1. Mantenga el cabezal y el aparato firmemente
al sacudir el exceso de agua para evitar que el
aparato caiga o que el conjunto de cuchillas se
desarme.
2. No seque la rasuradora con secador u otro
aparato. Esto podría lastimarlo.
IMPORTANTE: Nunca
jale, tuerce o enrolle el
cable alrededor de la
base. Cuando no use el
aparato, permita que el
cable repose al lado de
la base.
IMPORTANTE: Su
aparato contiene baterías recargables de níquel
de cadmio, las cuales deben reciclarse al final
de su vida útil, según las leyes vigentes. No
las tire con el resto de la basura. Comuníquese
con las autoridades locales para averiguar las
opciones de reciclaje en su localidad.
Fig. 5
Fig. 6
NOVEDADES FASCINANTES
DE CONAIR
07PG10139 IB-7665A
LT10PCS cotadora de batería
Cortadora personal con 2
cabezales intercambiables:
• Cortadora para el bikini
• Cortadora inclinada para
las cejas
Manual de Instrucciones
Modelo LTGS40PCS
Para su seguridad y para seguir disfrutando de este
producto durante años, siempre lea las instrucciones
cuidadosamente antes de usarlo.
®
Fig. 4
eyebrow
trimmer
bikini trimmer
Fig. 7
Cortadora
para las
cejas
Cortadora para
el bikini
Fig. 7
LWD500CS Rasuradora Infiniti by Conair™
• Recargable
• Para uso en seco/mojado
• Cabezal giratorio 360°
beauty groomer
personal
de belleza personal
conjunto