10
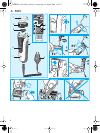
Replacing the shaving parts
To maintain 100% shaving performance,
replace your foil and cutter block every 18
months or when worn. Change both parts at
the same time for a closer shave with less skin
irritation.
(Shaver foil and cutter block:
part no. 5000/6000)
Preserving the batteries
In order to maintain the optimum capacity of
the rechargeable batteries, the shaver has to
be fully discharged (through normal use) every
6 months approximately. Then recharge the
shaver to full capacity. Do not expose the
shaver to temperatures higher than 50°C for
extended periods of time.
Environmental notice
This appliance is provided with nickel-
cadmium rechargeable batteries. To protect
the environment, do not dispose of the appli-
ance in the household waste at the end of its
useful life. Open the housing as shown on page
45, remove and dispose of the batteries at your
retail store or at appropriate collection sites
according to national or local regulations.
B Clean&Charge
Braun Clean&Charge has been developed for
cleaning, charging and storing your shaver.
Clean your shaver daily in the Clean&Charge.
During the automated cleaning process, the
shaver is switched on and off at intervals to
obtain best cleaning results. Since the spe-
cially formulated cleaning fluid contains a
small amount of oil, the cleaning procedure
also fulfills the lubrication needs of the shaver.
Important
• Only use the special cord set supplied with
the shaver.
• In order to avoid any leakage of the cleaning
fluid, place the appliance on a flat, stable
surface. Do not tip, move suddenly or trans-
port in any way if a cleaning cartridge is
installed.
• Do not place the appliance in a mirror cabi-
net, nor store it over radiators, nor place it
on polished or laquered surfaces. Do not
expose to direct sunlight.
• The appliance contains highly flamma-
ble liquid. Keep it away from sources
of ignition. No smoking. Keep out of reach
of children. Do not refill cartridge. Use only
original Braun refill cartridge.
• When cleaning the shaver, its protection
cap should be removed.
Description
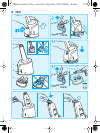
1 Lift button for cartridge exchange
2 Contact bow
3 Start/release button
4 Level indicator
5 Cleaning cartridge
Before using Clean&Charge
Installing the cartridge
• Press the lift button (1) to open the housing.
• Hold the cartridge down on a flat, stable
surface (e.g. table). Carefully remove the lid
5722459_5691_MN Seite 10 Mittwoch, 18. August 2004 2:54 14


