


recortadora dejan manchas o si reducen su velocidad, es un
indicio certero de que las mismas necesitan aceite. La
recortadora debe sujetarse en la posición mostrada en el
Figura B para evitar que el aceite penetre en el motor.
Coloque unas pocas gotas de Aceite Andis para recortadoras
en las partes frontal y lateral de las hojas cortadoras (Figura
C). Limpie el exceso de aceite de las hojas usando un paño
suave seco. Los lubricantes en aerosol contienen una
cantidad insuficiente de aceite para lograr una buena
lubricación. Siempre reemplace las hojas rotas o melladas
para evitar lesiones. Puede limpiar el exceso de cabello de
sus hojas usando un cepillo pequeño o un cepillo de dientes
gastado. Para limpiar las hojas, sugerimos sumergir sólo
las hojas en una bandeja poco profunda con Aceite Andis,
mientras la recortadora esté en funcionamiento. Debiera
eliminarse así todo exceso de cabello o suciedad que se
hubiera acumulado entre las hojas. Después de limpiar,
apague la recortadora y seque las hojas con un paño seco y
comience a recortar una vez más.
SERVICIO DE REPARACIÓN EN FÁBRICA
Cuando las hojas de su Recortadora Andis pierdan el filo
después de un uso repetido, se aconseja comprar un conjunto
nuevo de hojas, disponible por medio de su Proveedor Andis o
por medio de una de las Estaciones de Reparación Autorizada
de Andis. Si desea que su recortadora también reciba servicio
técnico, deberá empacarla cuidadosamente y enviarla ya sea
por correo asegurado o por U. P. S. a cualquiera de los Centros
de Servicio.
REEMPLAZO (DESMONTAJE) DEL JUEGO DE HOJAS
Para desmontar las hojas, primero desenchufe la recortadora
del tomacorriente eléctrico. Coloque la recortadora boca
abajo, de modo que los dientes de la hoja queden orientados
hacia abajo. Le recomendamos que coloque la recortadora
sobre una superficie plana para hacer esto. Afloje los tornillos
de la hoja (Figura D). Desmonte las hojas. Para reemplazar
las hojas, coloque la hoja superior más pequeña nuevamente
en posición (Figura E). Alinee los orificios de los tornillos en
la hoja inferior con los dos orificios en el soporte de la hoja,
y vuelva a colocar los tornillos. No apriete los tornillos
completamente. Vuelva a voltear la recortadora y alinee la
hoja inferior de modo que los dientes en ambas hojas queden
paralelos, pero con los dientes de la hoja inferior ligeramente
por encima de los dientes de la hoja superior. Si no hace esto, puede pellizcar la piel
al cortar el cabello.
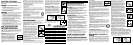
CONEXIÓN DE LOS PEINES DE LA RECORTADORA
rtadora son fáciles de montar. Simplemente debe engancharlos. Desengánchelos.
Siempre puede fijar las hojas para lograr un corte más grueso conectando cualquiera
de los accesorios enganchables de las hojas fabricadas para su recortadora Andis.
Para usar el accesorio de las hojas, deslice los dientes de las hojas de la recortadora
en elaccesorio de la hoja. Enganche el accesorio, presionando hacia abajo; se pueden
enganchar y desenganchar con suma facilidad. Estos accesorios ayudan a guiar el
cabello hacia las hojas de la recortadora y le brindan un control preciso de las
longitudes del cabello. La longitud del recorte se indica en el accesorio de la hoja:
1/16", 1/8", 1/4", 3/8" y 1/2". Utilice el cuadro para encontrar las longitudes
aproximadas de corte. Al variar el ángulo de la hoja en relación con la piel, el grosor y
la textura del cabello, variará la longitud del corte.
CARGA DE LA UNIDAD
LEA LO SIGUIENTE ANTES DE CARGAR ESTA RECORTADORA
Retire la recortadora inalámbrica de Andis de la caja y
enchúfela en un tomacorriente de 120V o 230V, según se
indique en el adaptador de CA, o en la cara externa de la caja.
Observe que el interruptor ON/OFF (de encendido y apagado)
de la recortadora debe estar en la posición OFF (de apagado)
para que la batería pueda cargarse. Enchufe el cable del
adaptador directamente en la recortadora (Diagrama A). Se encenderá la luz de la
recortadora. La recortadora no se carga en la fábrica. Cargue la recortadora durante
12 horas (durante toda la noche) antes del primer uso, a fin de lograr un
rendimiento máximo.
Puede mantener la recortadora enchufada en el adaptador cuando no esté en uso. El
adaptador mantendrá la batería a plena carga y la luz roja permanecerá encendida. La
unidad tiene una batería de hidruro metálico y níquel que no puede ser dañada por
sobrecarga. No obstante, recomendamos desenchufar el adaptador si la recortadora
no se va a usar durante siete días o más.
NOTA: Las pilas de níquel-hidruro metálico tienen menos “efecto de memoria” que las
pilas de níquel-cadmio. El efecto de memoria se produce cuando la maquinilla se usa
repetidamente durante periodos cortos y se carga entre dichos usos. La pila nunca se
llega a descargar por completo y, por lo tanto, se “olvida” de cuánta energía puede
almacenar. Para obtener el mejor rendimiento de la pila de níquel-hidruro metálico,
haga lo siguiente:
1. Lubrique la cuchilla. Encienda la maquinilla y déjela prendida hasta que su velocidad
baje significativamente. No es necesario que se llegue a detener por completo.
2. Apague la maquinilla. Cárguela durante toda la noche.
3. Haga esto cada dos meses.
SI NO SE CARGA:
1. Asegúrese de que haya tensión eléctrica en el tomacorriente de pared (confirme
esto usando un artefacto que sepa que está funcionando).
2. Compruebe que el cable del adaptador esté firmemente enchufado en la recortadora.
Retuerza ligeramente el conector del adaptador para asegurar una buena conexión
eléctrica. Si aún no logra cargarse, devuelva la recortadora a Andis o a una de las
Estaciones de Servicio Autorizado de Andis listadas en este manual para su
verificación y reparación o reemplazo.
ATENCIÓN: El producto que ha adquirido contiene una pila recargable
y reciclable. Al final de su vida útil, de acuerdo a varias leyes estatales
y locales, puede ser ilegal desecharla en los tiraderos de basura
municipales. Póngase en contacto con las autoridades locales (o llame
al 1-800-822-8837) para obtener detalles acerca de las opciones de
reciclado o desecho apropiado en su área.
ELIMINACIÓN ADECUADA DE LAS BATERÍAS
Las baterías pueden contener metales pesados como mercurio, plomo, cadmio y
níquel, que pueden perjudicar el medio ambiente cuando se eliminan de manera
inadecuada. Saque las baterías agotadas de la unidad y elimínelas adecuadamente.
Algunas comunidades ofrecen el reciclaje o la recolección de baterías, comuníquese
con el gobierno de su localidad para informarse sobre las prácticas de desecho de
su área.
MANTENIMIENTO POR PARTE DEL
USUARIO
El mecanismo interno de su recortadora ha sido lubricado de manera permanente en la
fábrica. No debe realizarse ningún tipo de mantenimiento que no sea el mantenimiento
recomendado en este manual, salvo por Andis Company o por una Estación de
Servicio de Reparación Autorizada de Andis. Para encontrar una Estación de Servicio
Autorizado cercana a su localidad, visite www.andis.com o póngase en contacto con
nuestro departamento de servicio al cliente: 1-800-558-9441 (EE.UU.) o 1-800-335-
4093 (Canadá).
CUIDADO Y MANTENIMIENTO DE LAS HOJAS DE SU RECORTADORA ANDIS
Las hojas deben engrasarse antes, durante y después de cada uso. Si las hojas de su
Remove the blades. To replace the blades, put the smaller upper
blade back into position (Diagram E). Line up the screw holes in
the bottom blade with the two holes in the blade bracket, and
replace screws. Do not tighten down screws completely. Turn
clipper over and align lower blade so teeth on both blades are
parallel, but with lower blade’s teeth slightly above the upper
blade teeth. Failure to do this may result in nipping the skin
when cutting the hair.
ATTACHING THE CLIPPER COMBS
The clipper comb blade attachments mount easily. Just snap
them on. Snap them off. You can always set the blades for a
coarser cut by attaching any of the snap-on blade attachments
made for your Andis clipper. To use a blade attachment, slip
the cutter blade teeth into the blade attachment. Snap the
blade attachment down; they snap on and off easily. These
attachments guide hair into the clipper blades and give you
precise control of hair lengths. The length of trim is indicated
on the blade attachment: 1/16", 1/8", 1/4", 3/8" & 1/2". Use the
chart to find the approximate lengths of cut. Different blade
angles in relation to the skin, thickness and texture of the hair
will vary the cutting length.
CLIPPER BLADE ADJUSTMENT
Your Andis adjustable clipper blade set is easy to adjust.
From coarse to fine cuts, all that’s needed is a flick of the
adjustment lever with your thumb. In the upright position,
blades are set for the finest, or shortest cuts.
IMPORTANT SAFEGUARDS
When using an electrical appliance, basic precautions should always be
followed, including the following: Read all instructions before using
this Andis clipper.
DANGER: To reduce the risk of electric shock:
1. Do not reach for an appliance that has fallen into water. Unplug
immediately.
2. Do not use while bathing or in a shower.
3. Do not place or store appliance where it can fall or be pulled into a
tub or sink. Do not place in or drop into water or other liquid.
4. Except when charging, always unplug this appliance from the
electric outlet immediately after using.
5. Unplug this appliance before cleaning.
WARNING: To reduce the risk of burns, fire, electric shock,
or injury to persons:
1. Close supervision is necessary when this appliance is used by, on
or near children or individuals with certain disabilities.
2. Use this appliance only for its intended use as described in this
manual. Do not use attachments not recommended by manufacturer.
3. Never operate this appliance if it has a damaged cord or plug, if it
is not working properly, if it has been dropped or damaged, or
dropped into water. Return the appliance to an Andis Authorized
Service Station for examination and repair.
4. Keep the cord away from heated surfaces.
5. Never drop or insert any object into any opening. Insert only
recharging transformer plug into clipper receptacle.
6. Do not use outdoors or operate when aerosol (spray) products are
being used or where oxygen is being administered.
7. Do not use this appliance with a damaged or broken blade or comb,
as injury to the skin may occur.
8. Always attach plug to appliance first, then to outlet. To disconnect,
turn all controls to “off” then remove plug from outlet.
SAVE THESE INSTRUCTIONS
THIS PRODUCT IS INTENDED FOR PROFESSIONAL USE
OPERATING INSTRUCTIONS
Please read the following instructions before using your new Andis clipper. Give it the
care that a fine precision built instrument deserves and it will give you years of service.
Before starting your clipper, make sure the battery has been fully charged. Remove
blade guard. To start clipper move switch button to “on” position, to stop, move
switch button back to original position.
CHARGING UNIT
READ THE FOLLOWING BEFORE CHARGING THIS CLIPPER/TRIMMER
Remove Andis cordless clipper from carton and plug into
120V or 230V outlet as identified on the AC adapter, or on the
outside of the carton. Note that the clipper ON/OFF switch
must be in the OFF position for the battery to charge. Plug
adapter cord directly into the clipper (see Diagram A). The
light on the clipper will turn on. The clipper is not charged
at the factory. Please recharge clipper for 12 hours
(overnight) before first use for maximum performance.
You can keep the clipper plugged into the adapter when not in use. The adapter will
maintain the battery at full charge and the red light will stay on. The unit has a Nickel
Metal Hydride battery that cannot be damaged by overcharging. However, we
recommend that the adapter be unplugged if the clipper won't be used for seven or
more days.
PLEASE NOTE: Nickel Metal Hydride batteries have less "Memory Effect" than Nickel
Cadmium batteries. Memory Effect is caused by repeated short uses of the clipper,
followed by charging. The battery never fully discharges and, therefore, "forgets" how
much energy it can store. In order to maximize the performance of your Nickel Metal
Hydride battery, please follow these steps:
1. Oil blade. Turn clipper on and allow it run until the blade slows significantly. It is not
necessary to let the blade stop completely.
2. Turn clipper off. Charge overnight.
3. Conduct the above exercise every sixty days.
FAILURE TO CHARGE:
1. Make sure voltage is present at the wall outlet (confirm with an appliance you know
is working).
2. Check to make sure adapter cord is plugged firmly into clipper. Twist the adapter
connector slightly to insure good electrical conection. If failure to charge still exists,
return clipper to Andis or an Andis Authorized Service Station listed in this manual
for examination and repair or replacement.
ATTENTION: The product you have purchased contains a rechargeable
battery. The battery is recyclable. At the end of its useful life, under
various state and local laws, it may be illegal to dispose of this battery
into the municipal waste stream. Check with your local solid waste
officials (or call 1-800-822-8837) for details in your area for recycling
options or proper disposal.
PROPER BATTERY DISPOSAL
Batteries may contain heavy metals such as mercury, lead, cadmium, and nickel, which
can be harmful to the environment when improperly disposed of. Remove dead batteries
from the unit and dispose of properly. Some communities offer recycling or collection
of batteries – contact your local government for disposal practices in your area.
USER MAINTENANCE
The internal mechanism of your clipper has been permanently lubricated at the factory.
Other than the recommended maintenance described in this manual, no other
maintenance should be performed, except by Andis Company or an Andis Authorized
Service Station. To find an Andis Authorized Service Station near you log on to
www.andis.com or contact our customer service department: 1-800-558-9441 (U.S.)
or 1-800-335-4093 (Canada).
CARE AND SERVICING OF YOUR ANDIS CLIPPER
BLADES
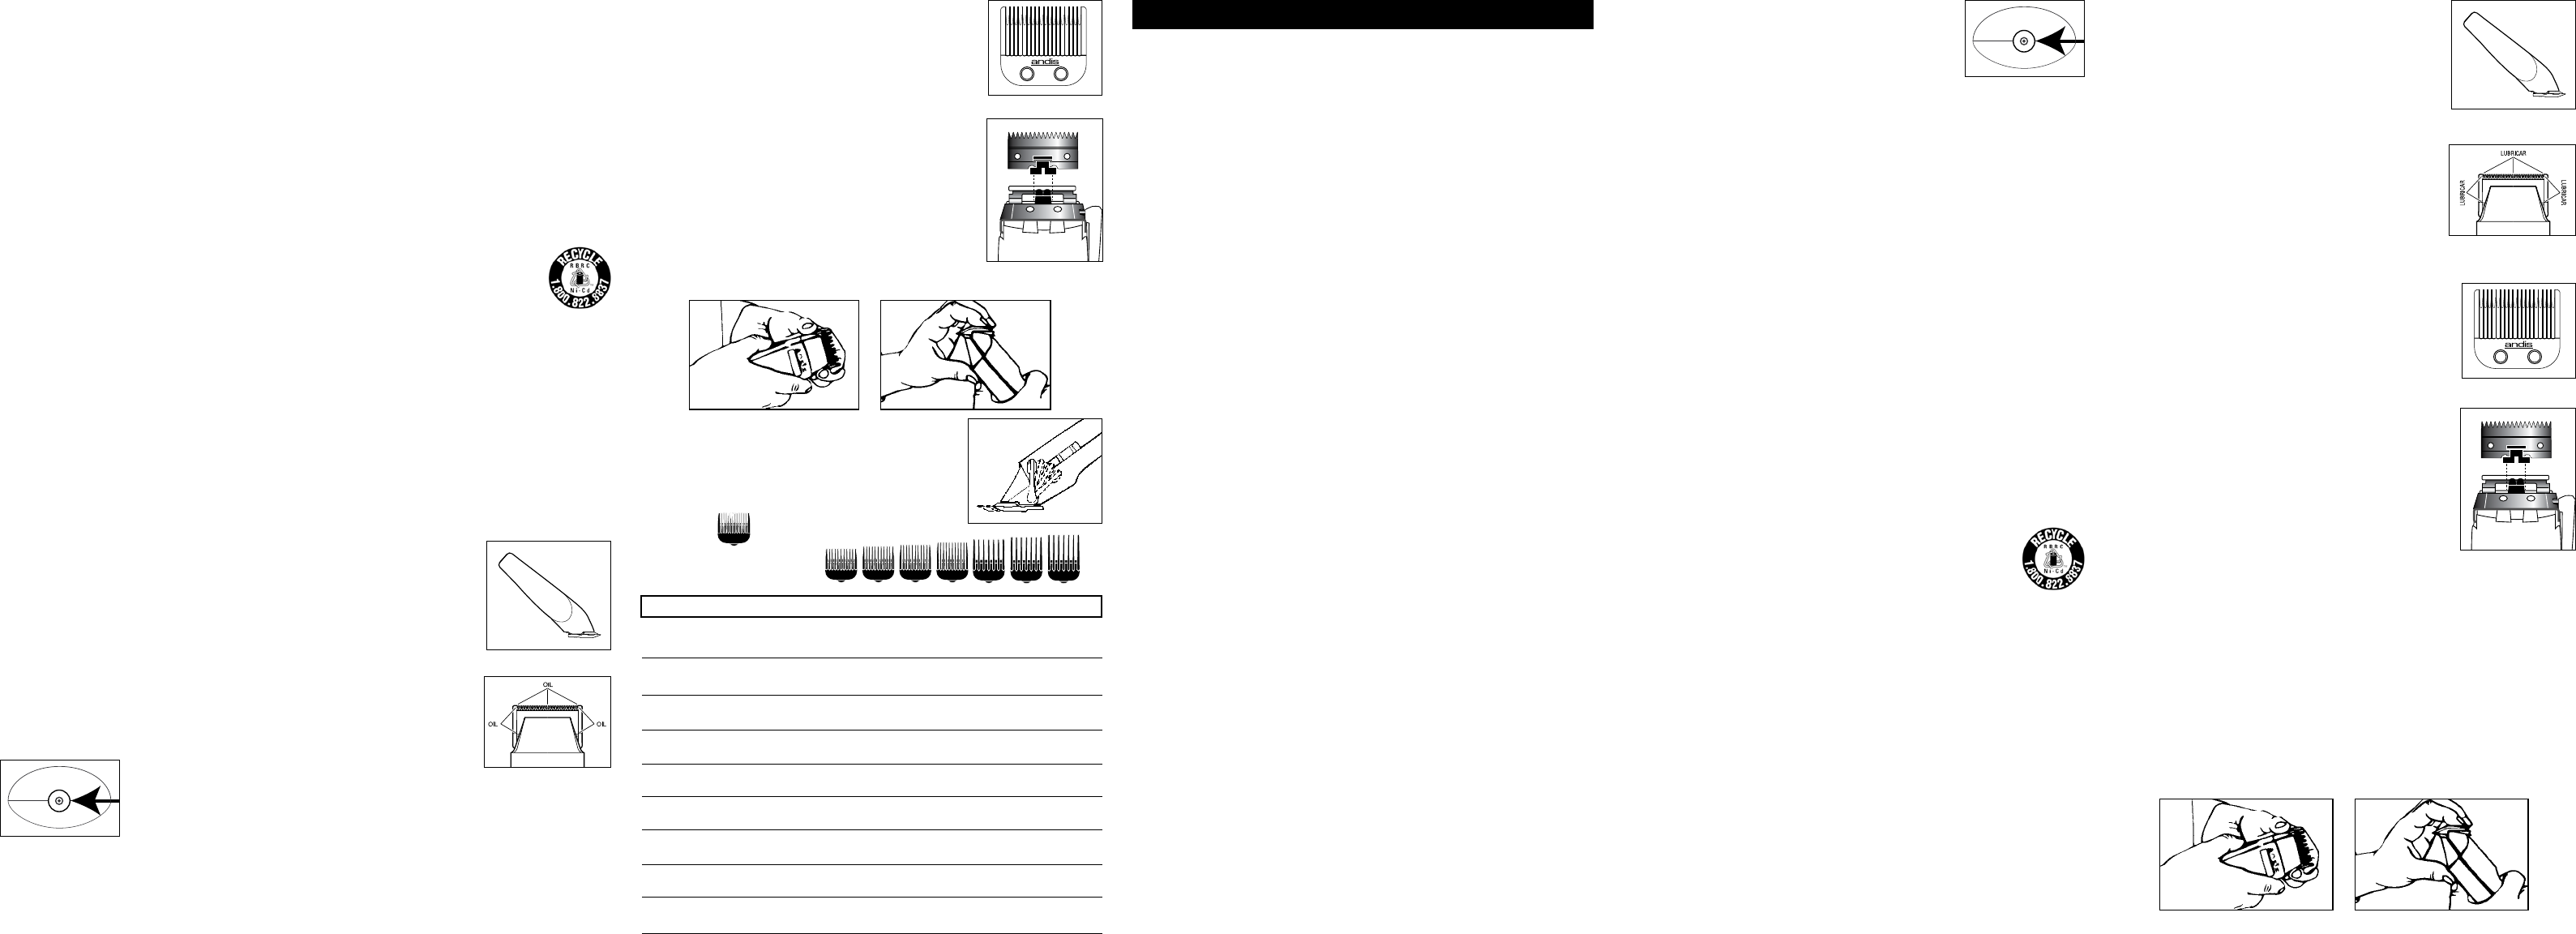
Blades should be oiled before, during, and after each use. If
your clipper blades leave streaks or slow down, it’s a sure
sign blades need oil. The clipper should be held in a position
shown in Diagram B to prevent oil from getting into motor.
Place a few drops of Andis Clipper Oil on the front and side
of the cutter blades (Diagram C). Wipe excess oil off blades
with a soft dry cloth. Spray lubricants contain insufficient oil
for good lubrication, but are an excellent clipper coolant.
Always replace broken or nicked blades to prevent injury.
You can clean the excess hair from your blades by using a
small brush or worn out tooth brush. To clean the blades we
suggest to immerse the blades only into a shallow pan of
Andis Clipper Oil, while the clipper is running. Any excess
hair and dirt that has accumulated between the blades
should come out. After cleaning, turn your clipper off and
dry blades with a dry cloth and start clipping again.
FACTORY REPAIR SERVICE
When the blades of your Andis clipper become dull after repeated use, it is advised to
purchase a new set of blades available through your Andis Supplier or through an
Andis Authorized Service Station. If you wish your clipper to be serviced as well, it
should be carefully packed and mailed either Parcel Post Insured, or U.P.S. to any
Andis Authorized Service Station.
REPLACEMENT (REMOVAL) OF BLADE SET
To remove the blades, first unplug the clipper from the electrical outlet. Turn the
clipper upside down, so that the blade teeth are pointing down. You may want to place
the clipper on a flat surface to do this. Unscrew the screws on the blade (Diagram D).
SPANISH
PRECAUCIONES IMPORTANTES
Al usar un artefacto eléctrico, siempre deben seguirse ciertas
precauciones básicas, que incluyen la siguiente:
Lea todas las instrucciones antes de usar esta recortadora Andis.
PELIGRO: Para reducir el riesgo de descarga eléctrica:
1. Si un artefacto se ha caído al agua, no trate de sacarlo.
Desenchúfelo inmediatamente.
2. No lo utilice al bañarse en tina o bajo la regadera.
3. No coloque ni almacene el artefacto donde pueda caerse en una
bañera o un lavabo, o ser halado dentro de éstos. No lo coloque ni
lo deje caer en agua u otro líquido.
4. Salvo cuando lo esté cargando, siempre desenchufe este aparato
del tomacorriente eléctrico inmediatamente después de usarlo.
5. Desenchufe este aparato antes de limpiarlo.
ADVERTENCIA: Para reducir el riesgo de quemaduras,
incendio, descarga eléctrica o lesiones a las personas:
1. Es necesaria una supervisión muy de cerca cuando este artefacto
sea usado por, en o cerca de niños o personas con ciertas
discapacidades.
2. Utilice este artefacto exclusivamente para su uso propuesto, tal
como se describe en este manual. No utilice accesorios no
recomendados por el fabricante.
3. Nunca opere este artefacto si su cable eléctrico o enchufe están
dañados, si no está funcionando correctamente o si se ha dejado
caer, si se ha dañado o si se ha caído en el agua. Devuelva el
artefacto a un centro de servicio para su examen y reparación.
4. Mantenga el cable lejos de superficies calientes.
5. Nunca deje caer el aparato ni inserte ningún objeto en ninguna de
sus aberturas. Inserte únicamente el enchufe del transformador de
recarga en el receptáculo de la recortadora de acabado.
6. No lo utilice al aire libre, ni lo opere cuando se estén usando
productos en aerosol (nebulizados) o donde se esté administrando
oxígeno.
7. No utilice este artefacto con una hoja o peine dañado o roto, ya que
se podrían ocasionar lesiones en la piel.
8. Siempre conecte primero el enchufe al artefacto, luego al
tomacorriente. Para desconectar, coloque todos los controles en la
posición “off” y luego desconecte el enchufe del tomacorriente.
GUARDE ESTAS INSTRUCCIONES
ESTE PRODUCTO HA SIDO DISEÑADO PARA USO PROFESIONAL
INSTRUCCIONES DE OPERACIÓN
Sírvase leer las instrucciones siguientes antes de usar su nueva recortadora Andis.
Al brindar el cuidado que se merece un instrumento fino construido con precisión,
obtendrá muchos años de servicio. Antes de arrancar la recortadora, asegúrese de que
la batería esté completamente cargada. Desmonte el protector de la hoja. Para arrancar
la recortadora, mueva el botón interruptor a la posición de encendido; para detenerla,
vuelva a poner el botón interruptor en la posición original.
Diagram C
Figura C
Diagram B
Figura B
Diagram D
Figura D
Diagram E
Figura E
Diagram A
Figura A
CLIPPING GUIDE
Approximate Length of Cut
Description Clipping Direction Fine Coarse
Standard Andis Blade With hair grain 1/16" to 3/16"
Against hair grain 1/32" to 1/8"
1/16" Blade Attachment With hair grain 3/16" to 5/16"
Against hair grain 3/32" to 5/32"
1/8" Blade Attachment With hair grain 1/4" to 3/8"
Against hair grain 1/8" to 1/4"
1/4" Blade Attachment With hair grain 3/8" to 1/2"
Against hair grain 1/4" to 3/8"
3/8" Blade Attachment With hair grain 1/2' to 5/8"
Against hair grain 3/8" to 1/2"
1/2" Blade Attachment With hair grain 5/8" to 7/8"
Against hair grain 1/2" to 5/8"
3/4" Blade Attachment With hair grain 7/8" to 1-1/8"
Against hair grain 3/4" to 1"
1" Blade Attachment With hair grain 1-1/8" to 1-3/8"
Against hair grain 1" to 1-1/4"
Blending Comb
Used for blending areas from one
hair length to another.