


IMPORTANT SAFEGUARDS
When using an electrical appliance, basic precautions
should always be followed, including the following:
Read all instructions before using the Andis Clipper.
DANGER: To reduce the risk of electric shock:
1. Do not reach for an appliance that has fallen into
water. Unplug immediately.
2. Do not use while bathing or in a shower.
3. Do not place or store appliance where it can fall or be
pulled into a tub or sink. Do not place in or drop into
water or other liquid.
4. Always unplug this appliance from the electrical outlet
immediately after using.
5. Unplug this appliance before cleaning, removing or
assembling parts.
WARNING: To reduce the risk of burns, fire
electric shock, or injury to persons:
1. An appliance should never be left unattended when
plugged in.
2. Close supervision is necessary when this appliance is
used by, on or near children or individuals with certain
disabilities.
3. Use this appliance only for its intended use as
described in this manual. Do not use attachments not
recommended by Andis.
4. Never operate this appliance if it has a damaged cord
or plug, if it is not working properly, if it has been
dropped or damaged, or dropped into water. Return the
appliance to an Andis Service Center for examination
and repair.
5. Keep the cord away from heated surfaces.
6. Never drop or insert any object into any opening.
7. Do not use outdoors or operate with aerosol (spray)
products are being used or where
oxygen is being administered.
8. Do not use this appliance with a damaged comb or
broken blade, as injury to the skin may occur.
9. To disconnect turn control to “off” then remove plug
from outlet.
10. WARNING: During use, do not place or leave appliance
where it may be (1) damaged by an animal or (2)
exposed to weather.
SAVE THESE INSTRUCTIONS
This product is intended for Commercial Use
SERVICING OF A DOUBLE-INSULATED CLIPPER
In a double-insulated clipper, two systems of insulation are
provided instead of grounding. No grounding means is pro-
vided on a double-insulated clipper, nor should a means for
grounding be added. Servicing a double-insulated clipper
requires extreme care and knowledge of the system, and
should be done only by an Andis Authorized Service Station.
Replacement parts must be identical to those parts being
replaced. A double-insulated clipper is marked by the words
“DOUBLE INSULATION” or “DOUBLE INSULATED”. The
symbol may also be marked on the appliance.
OPERATING INSTRUCTIONS
Please read the following instructions before using your new
Andis Trimmer. Give it the care that a fine precision built instru-
ment deserves and it will give you years of service. Before
starting your clipper remove the blade guard (some models
may not have a blade guard). Plug cord into electrical outlet,
operate 120 volt, 60 cycle AC electrical current or as noted on
unit. To start clipper move switch button to on position, to
stop, move switch button back to original position. After using
your Andis Clipper, rewrap cord, and store in a safe place.
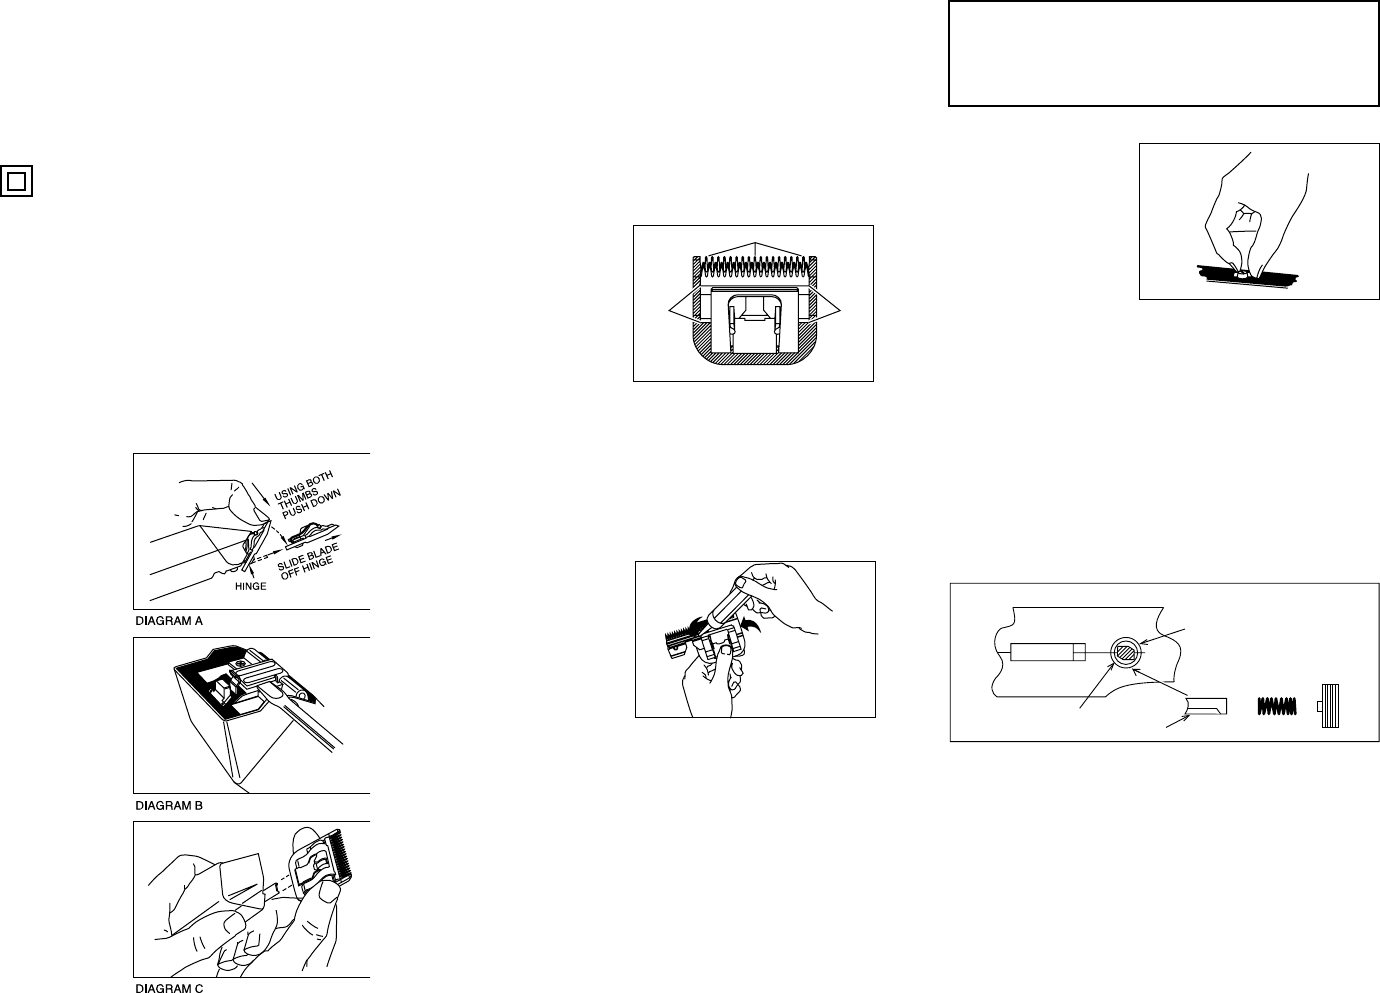
REMOVING BLADE SET
To remove blade set, first
make sure your clipper
motor is switched off,
then push down on blade
with both thumbs
(Diagram A) and slide
blade off blade hinge. If
your blade hinge should
snap closed and is flush
with the clipper, use a
small standard screw-
driver to pry the tongue
of the hinge out
(Diagram B).
NOTE: Hair may accumu-
late in the front cavity of
the housing under the
blade. If this happens,
you can clean out the
hair by brushing out the
cavity with a small brush
or an old toothbrush
while the blade is off the
clipper (See Diagram B
for location of cavity
being referenced).
REPLACING OR CHANGING BLADE SET
To replace or change your blade set, slide the blade bracket
onto the hinge of the clipper (Diagram C) and with the clip-
per turned on, push the blade towards the clipper to lock
into position.
USER MAINTENANCE
The internal mechanism of your motor clipper has been
permanently lubricated at the factory. Other than the recom-
mended maintenance described in this manual, no other
maintenance should be performed, except by Andis
Company or an Andis Authorized Repair Service Station.
CARE AND SERVICING OF YOUR ANDIS CLIPPER BLADES
Blades should be oiled
before, during, and after
use. If your clipper
blades leave streaks or
slow down, it’s a sure
sign blades need oil.
Place a few drops of
Andis Clipper Oil on
the front and side of
the cutter blades
(Diagram D). Wipe excess oil off blades with a soft dry
cloth. Spray lubricants contain insufficient oil for good lubri-
cation, but are an excellent clipper blade coolant. Always
replace broken or nicked blades to prevent injury. You can
clean the excess hair from your blades by using a small
brush or worn out toothbrush.
To clean the blades we
suggest to immerse the
blades only into a
shallow pan of Andis
Clipper Oil, while the
clipper is running. Any
excess hair and dirt that
has accumulated between
the blades should come
out. After cleaning, turn
your clipper off and dry blades with a clean dry cloth and
start clipping again. If upon cleaning your blades you find
that the blades will still not cut, there may be a few fine
pieces of hair trapped between the upper and lower blade. If
this happens, you will need to snap the blade off the clipper.
Proceed to slide the upper blade to one side, without loos-
ening the tension spring or moving the upper blade com-
pletely out from under the tension spring (See Diagram E
for position of blade). Wipe the surface between the blades
clean with a dry cloth, then place a drop of clipper oil where
the upper and lower blades meet and also in the guide slot
of the tension spring (Diagram E). Now slide the upper
blade to the opposite side of the lower blade and repeat this
process. After completing this cleaning procedure, slide the
upper blade centering it over the lower blade. Handle or
store your Andis Clipper with the blades down so excess oil
will not run into the clipper case.
CAUTION: Never handle your Andis clipper while you are
operating a water faucet or in water. There is danger of
electrical shock and damage to your clipper. ANDIS
COMPANY will not be responsible in case of injury due
to this carelessness.
REPLACEMENT OF CARBON BRUSHES
WARNING: Clipper must
be unplugged before
removing carbon brush
caps or performing any
maintenance, as electri-
cal shock may occur.
The carbon brushes of
your clipper should be
checked every three to
six months. Carbon brush replacement should be performed
when the carbon brushes reach no less than 1/16” in length.
To replace the carbon brushes, unscrew brush caps with a
standard screwdriver. Do one side at a time.
Caution: The carbon brushes are spring loaded. Take pre-
caution when unscrewing the brush caps from the unit
(Diagram F). The brush spring should be in plain view upon
removing the cap. Pull out the spring and brush from its
canal, then remove old carbon brush. Tip the clipper to one
side so the carbon brush slides out. Be sure to note the way
the brush is inserted so that if it does not need replacing, it
may be re-inserted in exactly the same position.
When placing a new carbon brush into the carbon brush
canal, make sure to align the curvature on the end of the
carbon brush with the curve of the commutator seen at the
bottom of the canal (Diagram G). When aligned properly, the
two beveled edges of the carbon brush will be located in the
upper right and lower left corners. Be sure to insert the bev-
eled end of the carbon brush into the canal first. Failure to
perform this procedure correctly may cause the carbon
brushes to not seat themselves properly against the com-
mutator. Replace the carbon brush spring into the brush
cavity after the carbon brush has been installed, then
replace carbon brush cap with a standard size screwdriver.
Turn clockwise only until you feel the brush cap stop. If the
brush cap is tightened too tightly, it will force the brush
spring past the carbon brush and will cause damage to the
commutator.
DIAGRAM D
OIL
OILOIL
DIAGRAM E
DIAGRAM F
CARBON BRUSH
CARBON BRUSH CANAL
BEVEL
INSERT BEVEL SIDE FIRST
SPRING
CAP
TOP OF CLIPPER
DIAGRAM G