


MAINTENANCE
Your Digital Infrared Thermometer should always be stored in the protective carrying case provided.
This helps keep the lens clean and free of debris which ensure temperature reading accuracy. If the
lens is soiled, use low pressure compressed air to remove any debris or soil. If the debris cannot be
removed with air, use a soft, slightly damp cotton swab. Only very light pressure should be applied to
the lens. Do NOT use any solvents or cleaning agents.
CE CERTIFICATION
Your Digital Infrared Thermometer conforms to the following standards:
EN 50081-1/1992 : EN 55022
EN 50082-1/1997 : EN 55024
(EN 6100-4-2/-3/-8, ENV 50204)
The meter complies with the essential protection requirements of Council Directive 89/336/EEC
on the approximation of the laws of the Member States relating to electromagnetic compatibility.
6
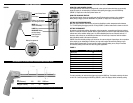
TAKING A TEMPERATURE READING
1. Hold the device by its handle and pull the trigger. There will be a one second delay, and then the LCD
will come on.
2. While continuing to pull the trigger, point the IR sensor at the object you are attempting to measure
for at least 1 second. Using the laser pointer feature discussed above (confirm location after layout
complete) will help ensure accuracy of the reading.
3. Be sure the measured object fills the “spot” seen by the aperture.
4. Note the temperature on the LCD.
5. The device will automatically retain the last temperature reading on the LCD for 5 seconds after the
trigger is released.
TROUBLESHOOTING
Problem: The Infrared Thermometer display does not turn on.
The time delay feature means the data appears on the display after 1 second – make sure you provide
enough time for this feature. Alternatively, check the battery voltage and replace battery if necessary.
Problem: Dashes appear on the display.
Check the battery voltage and replace battery if necessary.
Problem: Laser comes on, but no data appears on the display.
Measure the surrounding area to your subject to determine if subject exceeds the temperature limit.
BATTERY REPLACEMENT
If the battery voltage falls between 6.5V to 7.5V, a flashing display will indicate that a new battery should
be inserted. While reliable readings can still be obtained within the first few hours of the flashing display,
it is recommended that you replace the battery as soon as possible.
To replace the battery, open the battery compartment (FIGURE 3A). Remove the old battery and install a
new battery (FIGURE 3B). Replace the cover when done.
5
DISPOSE OF ALL BATTERIES IN ACCORDANCE
WITH ALL LAWS AND REGULATIONS OF THE CITY YOU LIVE IN.
FIGURE 3A FIGURE 3B