


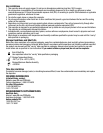

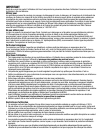

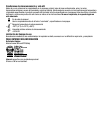

THESE RESPIRATORS ARE APPROVED ONLY IN THE FOLLOWING CONFIGURATIONS:
TC- PROTECTION
1
8211 8511 8515 8516
CAUTIONS AND
LIMITATIONS
2
84A-1299
N95 XXXX ABCJMNOP
1. PROTECTION
2. CAUTIONS AND LIMITATIONS
RESPIRATOR COMPONENTS
FILTERING FACEPIECE
3M
St. Paul, Minnesota, USA
1-800-243-4630
8511 Series Respirators
A - Not for use in atmospheres containing less than 19.5 percent oxygen.
B - Not for use in atmospheres immediately dangerous to life or health.
C - Do not exceed maximum use concentrations established by regulatory standards.
J
-
Failure to properly use and maintain this product could result in injury or death
N95 - Particulate Filter (95% filter efficiency level) effective against
particulate aerosols free of oil; time use restrictions may apply.
Rev. D: 03-27-08
J
-
Failure
to properly use
and
maintain
this
product could
result
in injury
or death
.
M - All approved respirators shall be selected, fitted, used and maintained in accordance
with MSHA, OSHA and other applicable regulations.
N - Never substitute, modify, add, or omit parts. Use only exact replacement parts in the
configuration as specified by the manufacturer.
O - Refer to User's Instructions, and/or maintenance manuals for information on use and
maintenance of these respirators.
P - NIOSH does not evaluate respirators for use as surgical masks.
NIOSH Approved: N95
At least 95% ltration efciency against solid and liquid
aerosols that do not contain oil.
This respirator contains no components made from natural rubber latex.
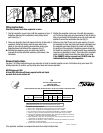
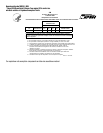
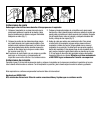
Fitting Instructions
Must be followed each time respirator is worn.
1. Cup the respirator in your hand, with the nosepiece at your
ngertips, allowing the headbands to hang freely below
your hand (Fig. 1).
2. Position the respirator under your chin with the nosepiece
up. Pull the top strap over your head resting it high at the top
back of your head. Pull the bottom strap over your head and
position it around the neck below the ears (Fig. 2).
3. Place your ngertips from both hands at the top of the metal
nosepiece. Using two hands, mold the nose area to the
shape of your nose by pushing inward while moving your
ngertips down both sides of the nosepiece (Fig. 3).
W Pinching the nosepiece using one hand may result in
improper t and less effective respirator performance. Use
two hands.
4. Perform a User Seal Check prior to each wearing. To check
the respirator-to-face seal, place both hands completely over
the respirator and inhale sharply. Be careful not to disturb
the position of the respirator. A negative pressure should be
felt inside the respirator. If air leaks around nose, readjust the
nosepiece as described in step 3. If air leaks at the respirator
edges, work the straps back along the sides of your head.
If you CANNOT achieve a proper seal, DO NOT enter the
contaminated area. See your supervisor.
Removal Instructions
See step 2 of Fitting Instructions and cup respirator in hand to maintain position on face. Pull bottom strap over head. Still
holding respirator in position, pull top strap over head and remove respirator.
Fig. 1 Fig. 2 Fig. 3 Fig. 4