


la brosse á dents sonic
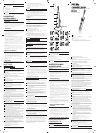
Sonicare For Kids (Fig. 1)
A Hygienictravelcap
B Brushhead
C Handlewithsoftgrip
D Poweron/offbuttonwithbatterychargeindicator
E Interchangeablepanel
F Brushingmodebuttonwithmodelights
G Chargerwithbrushheadholder
Introduction
CongratulationsonyourpurchaseandwelcometoPhilips!Tofullybenet
fromthesupportthatPhilipsoffers,registeryourproductatwww.philips.
com/welcome.
IMPORTANT
SAFEGUARDS
READ ALL INSTRUCTIONS BEFORE USE
DANGERS
Toreducetheriskofelectrocution:
1 Donotplaceorstoretheproductwhereitcanfallorbepulledintoa
tuborsink.
2 Donotplacetheproductinordropitintowateroranyotherliquid.
3 Donotreachforaproductthathasfallenintowater.Unplug
immediately.
4 Donotusetheproductwhilebathing.
WARNINGS
Toreducetheriskofburns,electrocution,retopersons:
1 Discontinueuseifthisproductappearsdamagedinanyway(brush
head,handle,charger).Thisproductcontainsnoserviceableparts.Refer
tochapter‘Guaranteeandservice’ifyourSonicarenolongerworks
properlyorneedsrepair.
2 Neverusethechargerifithasadamagedcordorplug.
3 Keepthecordawayfromheatedsurfaces.
4 Donotusethechargeroutdoors.
5 Donotusethechargerifdroppedintowater.
6 Thisproductisdesignedtocleanyourteeth,gumsandtongueonly.
Usethisproductonlyforitsintendeduseasdescribedinthisbooklet.
Discontinueuseofthisproductandcontactaphysician/dentistif
discomfortorpainisexperienced.
7 Thisapplianceisnotintendedforusebypersons(includingchildren)
withreducedphysical,sensoryormentalcapabilities,orlackof
experienceandknowledge,unlesstheyhavebeengivensupervisionor
instructionconcerninguseoftheappliancebyapersonresponsiblefor
theirsafety.
8 Childrenshouldbesupervisedtoensurethattheydonotplaywiththe
appliance.
9 Donotuseattachmentsotherthanthoserecommendedbythe
manufacturer.
10 Ifyourtoothpastecontainsperoxide,bakingsodaorotherbicarbonate
(commoninwhiteningtoothpastes),thoroughlycleanthebrushhead
andthehandlewithsoapandwateraftereachuse.Otherwisethe
plasticmaycrack.
MEDICAL WARNINGS
1 Consultyourdentalprofessionalbeforeyouusethisproductifyouhave
hadoralorgumsurgeryintheprevious2months.
2 Contactyourdentalprofessionalifexcessivebleedingoccursafterusing
thisproductorbleedingcontinuestooccurafter1weekofuse.
3 Ifyouhaveapacemakerorotherimplanteddevicecontactyour
physicianorthedevicemanufacturerpriortouse.
4 Sonicarehasbeentestedandiscompliantwithsafetystandardsfor
electromagneticdevices.
5 ConsultyourphysicianpriortousingtheSonicareifyouhavemedical
concerns.
NOT A TOY
CHECK BRUSH HEADS REGULARLY, CRACKS FROM
DROPPING CAN LEAD TO CHOKE HAZARD
SAVE THESE
INSTRUCTIONS
Getting started
Applying the interchangeable panel
TheSonicareForKidscomeswith3differentinterchangeablepanels.
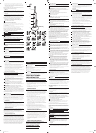
1 Remove the adhesive backing from the panel.
2 Apply the panel to the white section on the front of the
handle (Fig. 2).
Note: Make sure you line up the cut-out areas on the panel with the buttons on
the front of the handle.
Reapplying a panel that has been removed
1 Rinse the panel in warm water; you may also use a mild detergent to
clean it.
2 Let the panel air dry.
3 Reapply the panel to the white section on the front of the handle.
Attaching the brush head
1 Align the brush head so the bristles point in the same direction as
the front of the handle (Fig. 3).
2 Firmly press the brush head onto the metal shaft until it stops.
Note: There is a small gap between the brush head and the handle.
Charging your Sonicare
1 Plug the charger into a live electrical outlet.
2 Place the handle on the charger (Fig. 4).
, The battery charge indicator in the power on/off button ashes to
indicate that the toothbrush is charging.
, When the Sonicare is fully charged, the battery charge indicator stops
ashing and remains on.
Note: If the battery charge of your Sonicare is low, you hear 3 beeps and the
battery charge indicator ashes rapidly for 30 seconds after the brushing cycle.
Note: To keep the battery fully charged at all times, you may keep your Sonicare
on the charger when not in use. When the battery is fully charged, the charger
draws minimal energy from the electrical outlet. It takes at least 24 hours to
fully charge the battery.
Tip: For extra convenience during travel, you can remove the travel charger and
use it without the charger cover.
Using the Sonicare For Kids
Brushing instructions
Forchildrenunderage8,itisrecommendedthataparentoradultcaregiver
performtoothbrushing.
1 Wet the bristles and apply a small amount of toothpaste.
2 Place the toothbrush bristles against the teeth at a slight angle
towards the gumline (Fig. 5).
3 Press the power on/off button to turn on the Sonicare.
4 Apply light pressure to maximize Sonicare’s effectiveness and let the
Sonicare toothbrush do the brushing for you.
5 Gently move the brush head slowly across the teeth in a small back
and forth motion so the longer bristles reach between the teeth.
Continue this motion throughout the brushing cycle.
Note: To make sure you brush evenly throughout the mouth, divide the mouth
into 4 sections using the KidPacer feature (see chapter ‘Features’).
6 Begin brushing in section 1 (outside top teeth) a series of musical
notes indicate it is time to move to section 2 (inside top teeth). At
the next series of notes move to section 3 (outside bottom teeth).
The next series of notes indicate it is time to move to section 4
(inside bottom teeth). The toothbrush will automatically turn off at
end of the brushing cycle (Fig. 6).
7 After you have completed the brushing cycle, you can spend
additional time brushing the chewing surfaces of your teeth and areas
where staining occurs. You may also brush your tongue, with the
toothbrush turned on or off, as you prefer (Fig. 7).
YourSonicareissafetouseon:
- Braces(brushheadswearoutsoonerwhenusedonbraces)
- Dentalrestorations(llings,crowns,veneers)
Brushing modes
Thetoothbrushautomaticallystartsinthedefaulthighmode.
1 Press the brushing mode button to toggle between modes (Fig. 8).
, The green mode light indicates the selected mode.
- Highmode:Full-strengthmodedesignedforolder/independent
brushers.
- Lowmode:Reducedpowermodeusedfortrainingandintroducing
youngerchildrentothesonicexperience.
Features
KidTimer
- TheKidTimerplaysacongratulatorysoundsequenceattheendofthe
pre-determinedbrushingtime.Additionally,theKidTimerautomatically
turnsoffthehandlewhenthebrushingcycleiscomplete.
- Wheninhighmode,theKidTimerissetat2minutes.
- WheninlowmodetheKidTimerissetat1minuteandslowlyincreases
overtime.Theprogressionoftimehelpsyoungchildrenreachthe
dentistrecommended2minutesofbrushing.
Note: Instruct your child to brush until they hear the congratulatory tune and
the toothbrush turns off.
KidPacer
TheKidPacerusesashortseriesofmusicalnotestoalertthebrusherto
movetothenextbrushingquadrantofthemouth.Thisensuresthatthe
childgetsathorough,overallclean(see‘Brushinginstructions’).
Easy-start
- TheSonicareForKidscomeswiththeEasy-startfeatureactivated.
- TheEasy-startfeaturegentlyincreasesthepowerovertherst14
brushings.
Note: Each of the rst 14 brushings must be at least 1 minute in length to
properly advance through the Easy-start ramp-up cycle.
Deactivating or activating the Easy-start feature
1 Attach the brush head to the handle.
2 Place the handle in the plugged-in charger.
- TodeactivateEasy-start:
Pressandholdthepoweron/offbuttonfor2seconds.Youhear1beepto
indicatethattheEasy-startfeaturehasbeendeactivated.
- ToactivateEasy-start:
Pressandholdthepoweron/offbuttonfor2seconds.Youhear2beepsto
indicatethattheEasy-startfeaturehasbeenactivated.
Note: Using the Easy-start feature beyond the initial ramp-up period is not
recommended and reduces Sonicare’s effectiveness in removing plaque.
Cleaning
Do not clean brush heads, handle, charger, charger
cover or interchangeable panels in the dishwasher.
Toothbrush handle
1 Remove the brush head and rinse the metal shaft area with warm
water (Fig. 9).
Do not push on the rubber seal on the metal shaft with sharp objects, as
this may cause damage.
2 Use a damp cloth to wipe the entire surface of the handle.
Brush head
1 Rinse the brush head and bristles after each use (Fig. 10).
2 Remove the brush head from the handle and rinse the brush head
connection at least once a week with warm water (Fig. 10).
Charger
1 Unplug the charger before cleaning.
2 Use a damp cloth to wipe the surface of the charger.
Storage
- IfyouarenotgoingtousetheSonicareforanextendedperiodof
time,unplugthechargerfromtheelectricaloutlet,cleanitandstoreit
inacoolanddryplaceawayfromdirectsunlight.
- Youcanstoreabrushheadonthebrushingheadholderatthebackof
thecharger.
Replacement
Brush head
- ReplaceSonicarebrushheadsevery3monthstoachieveoptimal
results.
- UseonlySonicareForKidsreplacementbrushheads.
Disposal
- TherechargeablebatteryinsideyourSonicarecannotbereplaced,but
itiseasytoremoveforrecycling.Attheendofthetoothbrush’slife
andpriortodisposal,pleaseremovetherechargeablebatteryfromthe
handlebyfollowingtheinstructionsbelow.
- Donotthrowawaytheappliancewiththenormalhouseholdwaste
attheendofitslife,buthanditinatanofcialcollectionpointfor
recycling.Bydoingthis,youhelptopreservetheenvironment(Fig.11).
- Thebuilt-inrechargeablebatterycontainssubstancesthatmaypollute
theenvironment.Alwaysremovethebatterybeforeyoudiscardthe
appliance,andrecycleordisposeofthebatteryaccordingtolocalwaste
managementrequirements.
- Ifyouhaveanyrecyclingquestions,contactyourlocalwaste
managementofce.
Removing the rechargeable battery
Please note that this process is not reversible.
- Toremovetherechargeablebattery,youneedaat-head(standard)
screwdriver.Observebasicsafetyprecautionswhenyoufollowthe
procedureoutlinedbelow.Besuretoprotectyoureyes,hands,ngers,
andthesurfaceonwhichyouwork.
1 To deplete the rechargeable battery of any charge, remove the handle
from the charger, turn on the Sonicare and let it run until it stops.
Repeat this step until you can no longer turn on the Sonicare.
2 Insert a screwdriver into the slot located in the bottom of the handle
and turn counterclockwise until you see a gap between the bottom
cap and the handle (Fig. 12).
3 Insert the screwdriver into the gap and pry the bottom cap out of the
handle (Fig. 13).
4 Hold the handle upside down and push down on the shaft to release
the internal components of the handle (Fig. 14).
5 Insert the screwdriver under the circuit board, next to the battery
connections, and twist to break the connections. Remove the circuit
board and pry the battery from the plastic carrier (Fig. 15).
Therechargeablebatterycannowberecycledordisposedofandtherest
oftheproductdiscardedappropriately.
Guarantee and service
Philipsguaranteesitsproductsfortwoyearsafterthedateofpurchase.
Defectsduetofaultymaterialsandworkmanshipwillberepairedor
replacedatPhilipsexpenseprovidedthatconvincingproofofpurchasein
thequalifyingperiodisprovided.
ContactourConsumerCareCenterat1-800-682-7664(NorthAmerica),
outsideNorthAmericacontactyourlocalPhilipsConsumerCareCenter.
WARRANTY EXCLUSIONS
Whatisnotcoveredunderwarranty:
- Brushheads
- Interchangeablepanels
- Damagecausedbymisuse,abuse,neglect,alterationsorunauthorized
repair.
- Normalwearandtear,includingchips,scratches,abrasions,discoloration
orfading.
IMPLIED WARRANTIES
ANYIMPLIEDWARRANTIES,INCLUDINGIMPLIEDWARRANTIES
OFMERCHANTABILITYANDFITNESSFORAPARTICULAR
PURPOSE,SHALLBELIMITEDTOTHEDURATIONOFTHEEXPRESS
WARRANTIESSETFORTHABOVE.INSOMESTATESLIMITATIONSON
DURATIONOFIMPLIEDWARRANTIESDONOTAPPLY.
LIMITATION OF REMEDIES
INNOEVENTSHALLPHILIPSORANYOFITSAFFILIATEDOR
SUBSIDIARYCOMPANIESBELIABLEFORANYSPECIAL,INCIDENTAL
ORCONSEQUENTIALDAMAGESBASEDUPONBREACHOF
WARRANTY,BREACHOFCONTRACT,NEGLIGENCE,TORT,ORANY
OTHERLEGALTHEORY.SUCHDAMAGESINCLUDE,WITHOUT
LIMITATION,LOSSOFSAVINGSORREVENUE;LOSSOFPROFIT;LOSS
OFUSE;THECLAIMSOFTHIRDPARTIESINCLUDING,WITHOUT
LIMITATION,DENTISTSANDDENTALHYGIENISTS;ANDCOSTOF
ANYSUBSTITUTEEQUIPMENTORSERVICES.SOMESTATESDO
NOTALLOWTHEEXCLUSIONORLIMITATIONOFINCIDENTALOR
CONSEQUENTIALDAMAGES.
ENGLISH
4235.020.3183.2
www.philips.com
Printed in U.S.A.
Printed on 100% recycled paper
Protected by U.S. and international patents. Other patents pending. Reg. U.S. Pat. & Tm. Off.
©2009 Koninklijke Philips Electronics NV (KPENV). All rights reserved. PHILIPS and the Philips shield are registered
trademarks of KPENV. Quadpacer and Sonicare are trademarks of Philips Oral Healthcare, Inc. and/or KPENV.
300 series
Rechargeable sonic toothbrush
1
FRANçAIS (CANADA)
Sonicare pour enfants (fig. 1)
A Capuchondevoyagehygiénique
B Têtedebrossage
C Manchefacileàtenir
D Boutonmarche-arrêtetindicateurdecharge
E Panneauinterchangeable
F Boutonetvoyantsdemodedebrossage
G Chargeuravecsupportpourtêtedebrosse
Introduction
Félicitationspourvotreachatetbienvenuedansl’universPhilips!Pour
proterpleinementdusoutiendePhilips,enregistrezvotreproduità
l’adresse:www.philips.com/welcome.
MISES EN GARDE
IMPORTANTES
LISEZ TOUTES LES INSTRUCTIONS AVANT D’UTILISER
L’APPAREIL
DANGERS
Pourévitertoutrisqued’électrocution:
1 Neplacezpasetnerangezpasleproduitàunendroitoùilpeut
tomberdansunebaignoireouunévier.
2 Neplacezpasetn’échappezpasleproduitdansdel’eauoutoutautre
liquide.
3 Netouchezpasleproduits’ilesttombédansl’eau.Débranchez-le
immédiatement.
4 N’utilisezpasl’appareilenprenantunbain.
AVERTISSEMENTS
Pourévitertoutrisquedebrûlure,d’électrocution,d’incendieoud’accident:
1 Cessezd’utilisercetappareils’ilvoussembleendommagédequelque
façonquecesoit(têtedebrossage,manche,chargeur).Ceproduitne
contientpasdepiècesremplaçables.Consultezlechapitre«Garantieet
service»sivotreappareilSonicarenefonctionnepluscorrectementou
doitêtreréparé.
2 N’utilisezjamaislechargeursilecordond’alimentationoulachesont
endommagés.
3 Tenezlecordond’alimentationàl’écartdessurfaceschauffantes.
4 N’utilisezpaslechargeuràl’extérieur.
5 N’utilisezpaslechargeurs’ilesttombédansl’eau.
6 Ceproduitn’estconçuquepourlenettoyagedesdents,desgenciveset
delalangue.Nevousenservezquepoursonutilisationprévue,telque
décritdanscettebrochure.Cessezd’utiliserceproduitetcommuniquez
avecunmédecinouundentistesivousressentezdeladouleurouun
certaininconfort.
7 Cetappareilnedoitpasêtreutilisépardespersonnes(incluantdes
enfants)avecdescapacitésphysiques,sensoriellesoumentalesréduites,
ouquin’ontpasl’expérienceetlesconnaissancesnécessaires,àmoins
qu’ellesnesoientsouslasurveillanced’unepersonneresponsablede
leursécuritéouqu’ellesaientreçudecettepersonnedesdirectives
concernantl’utilisationdel’appareil.
8 Lesenfantsdoiventêtresurveilléspours’assurerqu’ilsnes’amusentpas
avecl’appareil.
9 N’utilisezpasd’autresaccessoiresqueceuxrecommandésparle
fabricant.
10 Sivotredentifricecontientduperoxyde,dubicarbonatedesoudeou
unautretypedebicarbonate(courammentutilisésdanslesdentifrices
blanchissants),veillezàbiennettoyerlatêtedebrosseetlemanche
avecdel’eausavonneuseaprèschaqueutilisation.Danslecascontraire,
leplastiquepourraitsessurer.
MISES EN GARDE D’ORDRE
MÉDICAL
1 Consultezvotredentisteavantd’utiliserceproduitsivousavezsubiune
chirurgiebuccaleougingivaleaucoursdes2derniersmois.
2 Consultezvotredentistesivosgencivessaignentanormalementaprès
vousêtrebrossélesdentsaveccetappareilousilesaignementpersiste
aprèsunesemained’utilisation.
3 Sivousavezunstimulateurcardiaqueoutoutautredispositifimplanté,
consultezvotremédecinoulefabricantdudispositifimplantéavant
d’utilisercetappareil.
4 Sonicareafaitl’objetdetestsetestconformeauxnormesdesécurité
concernantlesdispositifsélectromagnétiques.
5 Consultezvotremédecinavantd’utiliservotreSonicarepourtoutes
préoccupationsd’ordremédical.
CE PRODUIT N’EST PAS UN JOUET.
VÉRIFIEZ RÉGULIÈREMENT LA TÊTE DE BROSSAGE. DES
FISSURES CAUSÉES PAR UNE CHUTE POURRAIENT
ENTRAÎNER UN RISQUE D’ÉTOUFFEMENT.
CONSERVEZ CES
INSTRUCTIONS
Préparation
Installation du panneau interchangeable
LabrosseSonicarepourenfantsestlivréeavec3panneaux
interchangeables.
1 Retirez l’endos adhésif du panneau.
2 Appliquez le panneau sur la section blanche à l’avant du
manche (g. 2).
Remarque : Alignez les trous du panneau avec les boutons situés à l’avant du
manche.
Pour réappliquer un panneau qui a été enlevé
1 Rincez le panneau dans l’eau tiède. Au besoin, lavez-le avec un
détergent doux.
2 Laisser sécher le panneau.
3 Appliquez le panneau sur la section blanche à l’avant du manche.
Fixation de la tête de brossage
1 Alignez la tête de brosse de façon que les soies pointent dans la
même direction que l’avant du manche (g. 3).
2 Pressez fermement la tête de brossage sur la tige de métal jusqu’à ce
qu’elle s’arrête.
Remarque : Le léger espace entre la tête de brosse et le manche est normal.
Charge de la brosse à dents Sonicare
1 Branchez le chargeur sur une prise.
2 Placez le manche dans le chargeur (g. 4).
, L’indicateur de charge du bouton marche-arrêt clignote pour indiquer
que la brosse à dents est en cours de charge.
, Lorsque la brosse Sonicare est complètement chargée, le voyant
arrête de clignoter et demeure allumé.
Remarque : Lorsque le niveau de charge de la batterie est faible, la brosse
Sonicare émet 3 signaux sonores, et l’indicateur de charge clignote rapidement
pendant 30 secondes après le cycle de brossage.
Remarque : Lorsque vous n’utilisez pas la brosse à dents Sonicare, placez-la sur
le chargeur pour que la batterie soit toujours entièrement chargée. Une fois la
batterie complètement chargée, la consommation d’électricité est minime. Il
faut au moins 24 heures pour charger entièrement la batterie.
Conseil : Pour plus de commodité pendant les voyages, vous pouvez retirer le
chargeur de voyage et l’utiliser sans étui.
Mode d’emploi de la Sonicare pour enfants
Directives de brossage
Lasupervisiond’unadulteestrecommandéepourlesenfantsdemoinsde
8ans.
1 Mouillez les soies et appliquez une petite quantité de dentifrice
dessus.
2 Placez les soies de la tête de brossage sur les dents, légèrement de
biais vers la gencive. (g. 5)
3 Appuyez sur le bouton marche/arrêt pour mettre l’appareil Sonicare
en marche.
4 Appliquez une légère pression pour maximiser l’efcacité de la brosse
à dents Sonicare et laissez-la faire le brossage pour vous.
5 Déplacez lentement la tête de brosse le long de vos dents avec
un léger mouvement de va-et-vient, de sorte que les soies les plus
longues atteignent les espaces interdentaires. Continuez ainsi jusqu’à
la n du cycle de brossage.
Remarque : Pour vous assurer que vous brossez uniformément toutes les dents,
divisez votre bouche en quatre sections en vous servant de la fonction KidPacer
(voir la section Caractéristiques).
6 Commencez par la section 1 (dents de la mâchoire supérieure
à l’extérieur). Des notes musicales indiquent quand passer à la
section 2 (dents de la mâchoire supérieure à l’intérieur). Les notes
musicales suivantes indiquent quand passer à la section 3 (dents de
la mâchoire inférieure à l’extérieur). Les notes musicales suivantes
indiquent quand passer à la section 4 (dents de la mâchoire inférieure
à l’intérieur). La brosse s’éteint automatiquement à la n du cycle de
brossage (g. 6).
7 À la n du cycle de brossage, vous pouvez brosser la surface des
molaires et les endroits qui sont portés à devenir tachés. Vous pouvez
aussi brosser votre langue, la brosse à dents en marche ou non, au
choix (g. 7).
LabrosseàdentsSonicareestsansdangerpourles:
- lesappareilsorthodontiques(lestêtesdebrossages’userontplus
rapidementdanscecas)
- lesrestaurationsdentaires(obturations,couronnes,facettes)
Modes de brossage
Labrossedémarreautomatiquementenmodemaximum.
1 Appuyez sur le bouton marche/arrêt pour alterner entre les
modes (g. 8).
, Le voyant de mode vert indique le mode sélectionné.
- Modemaximum:brossagepleinepuissancepouradolescentsetadultes.
- Modeminimum:brossagedouxpourl’apprentissageetlesenfants.
Caractéristiques
KidTimer
- LafonctionKidTimerémetunsignalsonoreàlandelapériodede
brossageetéteintlabrosseàlanducycledebrossage.
2 3 4 5
1
2
4
3
6
7 8 9
10 11 12 13
14 15
F
or kids
For kids
B
A
C
D
E
F
G
4235.020.3183.2.indd 1 02-10-09 10:35