


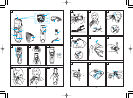

raise the moving blade, and brush
the cut hairs out from between the
blades. (see fig. 18)
4. Apply a few drops of the oil to the
points indicated by the arrows.
(see fig. 16)
5. Remount the blade on the trim-
mer body.
Blade life
Blade life will vary according to the
frequency and length of use. For ex-
ample, using the unit for 10 minutes
every 3 days, the life expectancy is
approximately 3 years. If cutting effi-
ciency is reduced substantially de-
spite proper maintenance, the blades
have exceeded their service life and
should be changed.
The replacement part no. is
WER9602.
Battery life
Battery life will vary according to the
frequency and length of use. If the
battery is charged 3 times a month,
the service life will be approximately
6 years. If the unit is left without be-
ing charged for more than 6 months,
the charge will drain from the battery
and their service life may be short-
ened. Therefore, even when not us-
ing regularly, it is recommended that
the unit be recharged at least once
every 6 months.
How to remove the built-in re-
chargeable battery before dis-
posal of the trimmer
The battery in this trimmer is not in-
center. The procedure described be-
low is intended only for removal of
the rechargeable battery for the pur-
pose of proper disposal.
Always make sure that the battery
have been removed from the trimmer
before disposing of it.
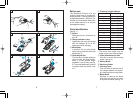
1. Disconnect the adaptor from the
AC outlet, and remove the power
cord from the trimmer.
2. Remove the blade from the trim-
mer.
Remove the screw (a) and detach
the bottom cover (b). (see fig. 19)
3. Detach the dial cover (c), remove
the screw (d) and disconnect the
dial (e).
4. Remove the two screws (f).
5. Detach the housing (g), front
panel (h) and side panel (i), then
remove the trimmer drive rod (j)
(see fig. 20).
6. Remove the two screws (k).
ATTENTION:
A nickel cadmium battery that
is recyclable powers the product
you have purchased. Please call
1-800-8-BATTERY for information
on how to recycle this battery.
()
replaced at an authorized service
mers. However, the battery may be
tended to be replaced by consu-
7. Remove the two screws (l) and
disconnect the rubber push plate
(m). (see fig. 21)
8. Remove the screws (n) and dis-
connect housing (o).
9. Disconnect the battery chamber
(p) and remove the battery (q).
(see fig. 22)
Attention
• Do not charge the trimmer at tem-
peratures below 0°C (32°F) or
above 40°C (104°F), or where it will
be exposed to direct sunlight, or
other heat sources.
• Do not continue charging for more
than 48 hours. Doing so may dam-
age the battery.
• Clean the housing only with a soft
cloth slightly dampened with water
or soapy water. Never use a caus-
tic cleaner such as benzene or
bleach.
• The trimmer may become warm
during operation and normal re-
charging. This is normal.
Caution
1. Keep out of reach of children.
2. Never tamper with the moving
parts.
3. Do not pick up the trimmer by the
cord. It may become detached,
causing damage or injury.
4. Do not use on animals.
5. Never disassemble the trimmer.
Take it to a qualified serviceperson
when service or repair is required.
6. Do not attempt to use any power
cord or adaptor other than one
specifically designed for this
model. Use only the included AC
adaptor.
7. Do not pull, twist or severely bend
the power cord.
8. Do not wrap the power cord tightly
around the appliance.
9. Dry the trimmer completely be-
fore charging it.
10.Keep the adaptor away from wa-
ter and handle it only with dry
hands.
11.Store the adaptor in a dry area
where it will be protected from
damage.
12.Wash the trimmer in tap water. Do
not use salt water or boiling wa-
ter. Also, do not use cleaning
products that are designed for
toilets, bathrooms or kitchen ap-
pliances. Do not submerge the
trimmer for a long time.
13.Do not take the housing apart as
this can affect the watertight con-
struction.
14.Do not clean with water when the
trimmer is connected to the power
cord.
This product is intended for house-
hold use only.
Specifications
Power source: 120 V AC, 60 Hz
Motor voltage: 1.2 V DC
Charging time: 8 hours
15. This power unit is intended to be
correctly oriented in a vertical
position or floor mount position.
1110