


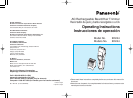

K Finishing blade of Mini Trimmer
Use this when finishing the edges
(see fig. 8) and trimming the
moustache.
L Trimmer guide of Mini Trimmer
Slide it up when finishing blade is
used.
M Adaptor
Use this to connect the trimmer
to an AC power source for re-
charging or for AC operation.
N Oil
Lubricate the space between the
stationary and moving blade with
2 or 3 drops of oil after use. (see
fig. 16)
O Cleaning Brush
READ ALL INSTRUCTIONS BE-
FORE USE.
Operation
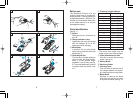
Charging and cordless trimming
When charging the beard/hair trim-
mer for the first time or when it has
not been in use for more than 6
months, charge it for the activation
for at least 16 hours before use.
Connect the power cord to the beard/
hair trimmer, and plug the adaptor to
an AC outlet.
In some areas, a special plug adap-
tor may be required.
The charge indicator lamp lights up
when the trimmer is being charged.
(see fig. 4)
You can fully charge the trimmer in 8
hours if it seems to be losing speed.
A full charge will supply enough
power for approx. 6 trims (5 minutes
per trim for a normal beard).
AC operation
Connect the AC adaptor to the body
in the same way as for charging, and
set the switch to “1” to use the trim-
mer.
If the trimmer does not operate after
connection as mentioned above, re-
turn switch to “0•charge” position for
1 minute and then set switch back to
“1” position.
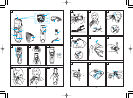
Trimming of beard
Place the angled face of the comb
against the skin and cut the beard
by moving the trimmer in all direc-
tions to obtain a uniform cut. (see fig.
5)
With curly facial hair, the comb at-
tachment may not cut all of the hair.
In this case, remove the comb attach-
ment and use a conventional comb
to draw out the remaining uncut, hair.
(see fig. 6)
When shaping the beard, remove the
comb attachment. Place the angled
edge against the skin and make the
border of the beard even.
When finishing the edges (see fig.
8) and trimming the moustache
(see fig. 9)
Use the finishing blade of mini trim-
mer.
Slide the trimmer guide up and then
turn the trimmer on (see fig. 7).
To smooth off a beard surface, run
this blade lightly over the surface.
Cutting of hair
Cut hair to the correct height by mov-
ing the trimmer back against the flow
of the hair.
Cutting around the ears
Cut a little, and then gently separate
the trimmer from the hair (see fig. 10).
Cutting the nape of the neck
Bring the trimmer gently away from
the hair to finish (see fig. 11).
(Do not use the trimmer in an in-
verted position. This can cut hair too
deeply.)
Turn off the trimmer (“0•charge”) be-
fore changing the trim height or re-
moving the attachment.
Hold body of the trimmer with
Panasonic mark upwards, place the
thumb against the blades, and push
them away from the main body. (see
fig. 12)
• If washing in water
1. Rinse off any hairs that are stick-
ing to the blade in running water.
(see fig. 13)
2. Rinse out any hairs that are in-
side the trimmer with running wa-
ter. (see fig. 14)
3. Shake the trimmer 4-5 times gen-
tly, wipe off any water drops from
the trimmer and blade, and then
place it onto a towel with the
“Washable” indicator facing
downward to let it fully dry. (see
fig. 15)
4. Apply a few drops of the oil to the
points indicated by the arrows.
(see fig. 16)
5. Remount the blade on the trim-
mer body.
WARNING: Detach the trimmer from
the AC adaptor before cleaning it in
water.
• If cleaning with brush
1. Remove the blade and brush off
the cut hairs from the blade edge.
2. Use the cleaning brush to brush
off the cut hairs from the trimmer
body and from around the blade.
(see fig. 17)
3. Brush the cut hairs out from be-
tween the stationary blade and
the moving blade. Press down on
the lever for cleaning in order to
Blade Maintenance
The following is the symbol of
washable trimmer. The symbol
means that hand-held part may be
cleaned under water. The trimmer
shall not be used until it has dried.
98