


ENGLISH
INTRODUCTION
Congratulations on your purchase of the RM983/ RM983U Radio-controlled
Clock with thermometer.
Features of RM983/ RM983U include:
- RF controlled Clock and Calendar
- Indoor temperature display
- Backlight for night viewing
- Dual Alarm (Single and Weekday Alarm) with Snooze function
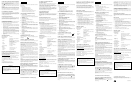
MAIN FEATURE [FIG. 1]
A. SNOOZE BUTTON
-Press to turn on the backlight for 5 seconds
-Press to activate the 8-minute Snooze function when alarm goes off
B. CLOCK WINDOW
-Displays clock function
C. CALENDAR/ ALARM WINDOW
-Displays Calendar and Alarm functions
D. TEMPERATURE WINDOW
-Displays indoor temperature in degree Celsius (°C )
E. ALARM BUTTON
-Press to toggle among Weekday Alarm, Single Alarm and Calendar mode
-Press and hold for 3 seconds to enter the alarm time setting mode when
the respective alarm mode is in display
F. MODE BUTTON
-Press to toggle among the following displays:
Clock with Second ➝ Clock with Weekday ➝ Clock with offset hour ➝ …
-Press and hold for 3 seconds to enter the clock setting mode
G. UP & DOWN BUTTONS
-Press to increase or decrease the value of a setting
-Press to activate or deactivate the alarm when the respective alarm time is
shown
H. BATTERY COMPARTMENT
-Uses 1 piece of UM-3 or "AA" alkaline battery
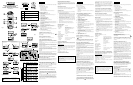
BATTERY INSTALLATION [Fig. 2a]
Remark: Replace with new batteries when the low battery indicator [ ] is
displayed [Fig. 2b]
HOW TO USE THE BACKLIGHT
Press the SNOOZE button to turn on the backlight for 5 seconds.
ABOUT RADIO RECEPTION [FIG. 3]
RM983/ RM983U is designed to synchronize its calendar clock automatically
once it is brought within range of the Frankfurt DCF77 radio signal (MSF60 for
UK version).
When RM983/ RM983U is within range, the radio-controlled mechanism will
override all manual setting.
When the unit is receiving signal, the Radio Reception symbol will start to blink.
Generally, complete reception takes around 2 to 10 minutes depending on the
strength of the radio signal.
To disable the reception of RF signal manually, press and hold the DOWN button
for 3 seconds until the Radio Reception symbol disappear.
To enable the reception again, press and hold the UP button for 3 seconds. The
Radio Reception symbol will blink and the unit will search for RF signal
automatically.
Interference
Reception can be affected by a number of factors. For best reception, place the
device away from metal objects and electrical appliances.
Note: Interference from sources such as TV sets can affect the signal. If, after
batteries have been inserted for ten minutes, the signal is not received, then set
the time manually (see section: How To Set The Clock & Calendar Manually).
HOW TO SET THE CLOCK AND CALENDAR
MANUALLY [Fig. 4] & [Fig. 5]
Please note that in order to use the clock in different time-zone [FIG. 6], 2nd
time-zone offset hour has to be set. When an offset hour has been set (e.g. +1),
the time displayed will be the RF clock time plus 1 hour.
HOW TO SET AND ACTIVATE THE ALARM
This unit is equipped with 2 alarms: Single Alarm [ ] and Weekday Alarm
[
]. For the Single Alarm, it will go off only once at the preset time. For the
Weekday Alarm, it will be enabled from Monday to Friday and disabled
automatically during weekend (i.e., Saturday and Sunday).
To set and activate the alarm, see [FIG. 7]
Follow the same procedures to set and activate the Single and/or Weekday Alarm.
HOW TO DEACTIVATE THE ALARM [FIG. 8]
CRESCENDO ALARM AND SNOOZE FUNCTION
When the alarm goes off at the preset time, the backlight will be turned on for 8
seconds. The ALARM ON icon [
] flashing and the alarm sound will be
turned on.
The crescendo alarm function allows the alarm sound to start off gently with
step-up intensity. Without interruption, the alarm will go off for 2 minutes.
To stop the alarm, press ALARM or SNOOZE. If SNOOZE button is pressed,
the alarm sound will be turned off temporarily and the snooze function will be
activated. The alarm will go off again after approx. 8 minutes until other key is
pressed to turn off the alarm.
INDOOR TEMPERATURE DISPLAY
The indoor temperature is shown in degree Celsius (°C). RM983/ RM983U is
capable to measure temperature ranging from –5°C (+23°F) to +50°C (+122°F).
Display will show either "HHH" or "LLL" when the temperature measured is
out of range.
RESETTING THE UNIT
In case of malfunction or abnormal display, take out and re-install the batteries
again. All settings will be cleared and reset to their default values.
MAINTENANCE
When handled properly, this unit is engineered to give you years of satisfactory
service. Here are a few product care instructions:
1. Do not immerse the unit in water. If the unit comes in contact with water,
dry it immediately with a soft lint-free cloth.
2. Do not clean the unit with abrasive or corrosive materials. Abrasive cleaning
agents may scratch the plastic parts and corrode the electronic circuit.
3. Do not subject the unit to excessive: force, shock, dust, temperature, or
humidity. Such treatment may result in malfunction, a shorter electronic
life span, damaged batteries, or distorted parts.
4. Do not tamper with the unit’s internal components. Doing so will terminate
the unit’s warranty and may cause damage. The unit contains no user-
serviceable parts.
5. Only use new batteries as specified in this instruction manual.
6. Read this instruction manual thoroughly before operating the unit.
SPECIFICATIONS
Operating Temperature :-5°C to 50°C
Clock Functions
Radio Control : By Radio signal generated from Germany
DCF77 (MSF60 for UK)
Calendar : Weekday in English, German, French,
Italian and Spanish
Day / Month
Clock Time : 12 / 24 hour format
Accuracy : +/-0.5 second/day (when RF is disabled)
Hour Offset : +/- 9 hours
Temperature Measurement
Indoor Measurement : -5°C to 50°C
General Specification
Battery Type :
1 piece of UM3 or "AA" size 1.5V alkaline battery
Unit Dimension : 110 x 85 x 50 mm (H x W x D)
Unit Weight : 158 g (without battery)
NOTE ON COMPLIANCE
Warning: Changes or modifications to this unit not expressly approved by the
party responsible for compliance could void the user’s authority to operate the
equipment.
R&TTE Compliance Note
This device complies with the essential requirements of Article 3 of the R&TTE
1999/5/EC Directive, if used for its intended use and that the following standard(s)
has been applied:
Electromagnetic compatibility (Article 3.1.b of the R&TTE Directive)
Applied standards ETS 300 683 : 1997
Efficient use of the radio frequency spectrum (Article 3.2 of the R&TTE
Directive)
Applied standards EN300 220 –1 : 1997
INTENDED USE OF THE DEVICE
CAUTION
- The content of this manual is subject to change without further notice.
- Due to printing limitation, the displays shown in this manual may differ
from the actual display.
- The contents of this manual may not be reproduced without the
permission of the manufacturer.
RADIO CONTROLLED CLOCK
WITH THERMOMETER
MODEL : RM983/ 983U (UK Version)
USER MANUAL
Strong, Forte, Stark, Buona, Fuerte, Forte
Weak, Faible, Schwach, Debole, Devil, Fraco
No Reception, Pas de réception, Kein Empfang,
Ricezione nulla, No Hay Recepcion, Sem sinal
Receiving, Recevant, Empfang,
Ricezione, Recibiendo, A receber
FRENCH
INTRODUCTION
Nous vous félicitons d’avoir fait l’acquisition d’une pendule radio pilotée RM983/
RM983U avec thermomètre.
Caractéristiques du RM983/ RM983U :
- Horloge et calendrier radio pilotée
- Affichage de la température intérieure
- Rétro-éclairage
- Double alarme: alarme simple et alarme des jours de la semaine avec
fonction snooze
CARACTÉRISTIQUE PRINCIPALE [FIG. 1]
A. COMMANDE DE REPETITION DE REVEIL
- Appuyer pour activer le rétro-éclairage pendant 5 secondes
- Appuyer pour activer la répétition de réveil 8 minutes quand l'alarme se
déclenche.
B. FENETRE DE LA PENDULE
- Affiche la pendule
C. FENETRE CALENDRIER / ALARME
- Affiche les fonctions de calendrier et d'alarme
D. FENETRE DE TEMPERATURE
- Affiche la température intérieure en degrés Celsius (°C)
E. COMMANDE D'ALARME
- Appuyer pour alterner entre alarme de jour de semaine, alarme simple et
mode de calendrier
- Appuyer pendant 3 secondes pour entrer le mode de réglage de l'heure
d'alarme quand le mode d'alarme respectif est affiché.
F. COMMANDE DE MODE
- Appuyer pour faire alterner les affichages suivants :
Pendule avec secondes / Pendule avec jour de semaine / Pendule avec
heure compensée
- Appuyer pendant 3 secondes pour entrer le mode de réglage de la pendule.
G. COMMANDES HAUT ET BAS
- Appuyer pour augmenter ou diminuer la valeur d'un réglage.
- Appuyer pour activer ou annuler l'alarme quand l'heure d'alarme respective
est affichée.
H. LOGEMENT DE LA PILE
- Utilise 1 pile UM-3 ou AA/R6 alcaline
INSTALLATION DE LA PILE [Fig. 2a]
Remarque : Remplacer la pile par une neuve quand l'indicateur de pile faible
[
] s'affiche [Fig. 2b]
COMMENT UTILISER LE RETRO-ECLAIRAGE
Appuyer sur SNOOZE pour allumer le rétro-éclairage pendant 5 secondes.
SUR LA RECEPTION RADIO [FIG. 3]
Le RM983/ RM983U est conçu pour synchroniser automatiquement sa pendule-
calendrier dès que celle-ci se trouve à portée du signal radio DCF-77 de Francfort
(MSF60 pour la version Royaume-Uni).
Quand le RM983/ RM983U est dans ce rayon d'émission, le mécanisme radio-
commandé supplante tous les réglages manuels.
Quand l'appareil reçoit le signal, le symbole de réception radio se met à clignoter.
Une réception complète prend généralement 2 à 10 minutes, en fonction de la
force du signal.
Pour désactiver manuellement la réception du signal RF, appuyer sur la
commande DOWN pendant 3 secondes jusqu'à ce que le symbole de réception
radio disparaisse.
Pour réactiver la réception, appuyer sur la commande UP pendant 3 secondes.
Le symbole de réception radio se mettra à clignoter et l'appareil recherchera
automatiquement le signal RF.
Interférences
La réception peut être gênée par un certain nombre de facteurs. Pour une meilleure
réception, placer l’appareil à l’écart de tous objets métalliques et appareils
électriques.
Note: Les interférences de sources telles que les téléviseurs peuvent gêner les
signaux. En cas de non-réception de signaux DCF77 dix minutes après que les
piles ont été mises en place, régler l’heure manuellement (voir la section :
Comment règler manuellement la pendule et le calendrier).
COMMENT REGLER MANUELLEMENT LA
PENDULE ET LE CALENDRIER
[Fig. 4] ET [Fig. 5]
Noter que pour utiliser la pendule sur un autre fuseau horaire [Fig. 6], il est
nécessaire de règler une deuxième heure compensée sur la pendule. Quand celle-
ci est règlée (par ex. +1), l'heure affichée est l'heure RF + 1 heure.
COMMENT REGLER ET ACTIVER L'ALARME
Cet appareil est équipé de deux alarmes : alarme simple [ ] et alarme de jour
de semaine [ ]. L'alarme simple se déclenche une fois à l'heure programmée.
L'alarme hebdomadaire est activée du lundi au vendredi et désactivée
automatiquement pendant le week-end (samedi et dimanche).
Pour règler et activer l'alarme, voir [FIG.7]
Suivre la même procédure pour règler et activer l'alarme simple et/ou de jour de
semaine.
COMMENT DESACTIVER L'ALARME [FIG. 8]
ALARME CRESCENDO ET REPETITION DE REVEIL
Quand l'alarme se déclenche à l'heure prévue, le rétro-éclairage s'allume pendant
8 secondes. L'icône d'alarme activée [
] clignote et la sonnerie de l'alarme est
activée.
H
B
D
C
A
E
F
G
Day-of-the-week Affichage du jour Wochentaganzeige
Giorno della settimana
Día de la semana Dia de Semana
Monday
Tuesday Wednesday Thursday
Friday
Saturday
Sunday
Lundi Mardi
Mercredi
Jeudi
Vendredi
Samedi
Dimanche
Montag
Dienstag Mittwoch
Donnerstag
Freitag
Samstag Sonntag
Lunedí
Martedí Mercoledí Glovedí Venerdí
Sabato
Domenica
Lunes Martes
Miércoles Jueves Viernes Sábado Domingo
Segunda Terça Quarta Quinta Sexta Sábado
Domingo
Language
Langues
Sprache
Lingue
Idiomas
Lingua
English
Anglais
Englisch
Inglese
Inglés
Inglês
German
Allemand
Deutsch
Tedesco
Alemán
Alemão
French
Français
Französisch
Francese
Francés
Francês
Italian
Italian
Italienisch
Italiano
Italiano
Italíano
Spanish
Espagnol
Spanisch
Spagnolo
Español
Espanhol
La fonction de l'alarme crescendo permet à l'alarme de se déclencher doucement
avant d'augmenter en intensité. Si l'alarme n'est pas interrompue, elle sonne
pendant 2 minute.
Pour arrêter l'alarme, appuyer sur la touche ALARM ou SNOOZE. Si la
commande SNOOZE est enfoncée, l'alarme s'arrête momentanément et la
fonction de répétition de réveil est activée. L'alarme se redéclenche
approximativement 8 minutes plus tard, jusqu'à ce qu'on appuie sur une
commande pour l'éteindre.
AFFICHAGE DE LA TEMPERATURE INTERIEURE
La température intérieure s'affiche en degrés Celsius (ºC). Le RM983/ RM983U
peut relever les températures dans un rayon de -5ºC (+23ºF) à +50ºC (+122ºF).
L'affichage indique "HHH" (Haut) ou "LLL" (Bas) si la température relevée est
en-dehors de ce rayon.
RE-INITIALISATION DE L’APPAREIL
En case de mauvais fonctionnement de l’affichage, enlever les piles et les
ré-installer. Tous les réglages seront effacés et remis à leur valeur par défaut.
PRECAUTIONS
Ce produit a été conçu pour assurer un bon fonctionnement pendant plusieurs
années à condition d’en prendre soin. Certaines précautions s’imposent:
1. Ne pas immerger l’appareil.
2. Ne pas nettoyer l’appareil à l’aide de produits abrasifs ou corrosifs. Ces
produits peuvent rayer les parties en plastique et attaquer les circuits
électroniques.
3. Ne pas exposer l’appareil aux chocs excessifs, ni aux excès de force,
poussière, chaleur, froid ou humidité qui pourraient résulter en un mauvais
fonctionnement, le raccourcissement de la vie de l’appareil,
l’endommagement des piles et la déformation des composants.
4. Ne pas toucher les composants internes de l’appareil. Ceci rendra nul la
garantie et peut causer des dommages. L’appareil ne contient aucun
composant pouvant être réparé par l’utilisateur.
5. Utiliser uniquement des piles neuves du type préconisé dans le manuel
d’utilisation.
6. Lire soigneusement le manuel d’instructions avant de faire fonctionner
l’appareil.
SPÉCIFICATIONS
Température de fonctionnement :-5°C à 50°C
Fonctions de réveil
Radio pilotage :
Par signal radio DCF-77 généré depuis
l'Allemagne (MSF60 pour le Royaume-Uni)
Calendrier : Jour de semaine en anglais, allemand,
français, italian, eapagnol
Mois / Date
Format horaire : Format 12 / 24 heures
Précision : +/- 0,5 seconde/jour
(quand le RF est désactivé)
Horaire Compensation : +/- 9 heures
Relevés de température
Relevés intérieurs : -5°C à 50°C
Spécifications générales
Type de pile : 1 pile UM3 ou "AA/R6", 1,5, alcaline
Dimensions de l'appareil : 110 x 85 x 50 mm (H x l x L)
Poids de l'appareil : 158 g (sans piles)
REMARQUE CONCERNANT LA CONFORMITE
Attention : Tout changement ou modification apporté à cet appareil sans
l’approbation expresse de la partie responsable de sa conformité risque d’annuler
le droit de l’utilisateur à se servir de cet équipement.
Note de conformité R&TTE
Lors d’une utilisation adéquate et si les standards suivants ont été respectés, cet
appareil est conforme aux spécifications de l’article 3 de la directive R&TTE
1999/5/EC.
Compatibilité électromagnétique: (article 3.1.b de la directive R&TTE)
Standards appliqués: ETS 300 683 : 1997
Utilisation efficace du spectre de fréquences radio (article 3.2 de la directive
R&TTE)
Standards appliqués: EN 300 220-1 : 1997
UTILISATION CONFORME DU PRODUIT
ATTENTION
- Le contenu de ce livret est susceptible de modifications sans avis
préalable.
- En raison des restrictions imposées par l’impression, les affichages
figurant dans ce livret peuvent différer de ceux du produit.
- Le contenu de ce livret ne peut être reproduit sans l’autorisation du
fabricant.
Fig. 1
Fig. 7
Fig. 3
AA
Fig. 2a Fig. 2b
Fig. 5
Set 2nd time-zone offset hour Imposta l'ora di offset del 2º fuso orario
Règle la compensation du deuxième fuseau horaire. hora de compensación de 2a hora/zona horaria
Zeitzonenversatz einstellen Ajustar a diferença horária da 2a. zona de fuso horário
Fig. 4
Fig. 5
Fig. 8
Press & Hold 3 seconds Pulse y sostenga 3 segundos
Tenere premuto per 3 secondi 3 Sekunden lang drücken und festhalten
Appuyer dessus pendant 3 secondes.
Prima durante 3 segundos
Fig. 6
DEUTSCH
EINFÜHRUNG
Wir beglückwünschen Sie zum Kauf des funkgesteuerten RM983/ RM983U
Weckers mit Thermometer.
Merkmale des RM983/ RM983U:
- Funkgesteuerte Uhr und Kalender
- Raumtemperaturanzeige
- Hintergrundbeleuchutung für das Lesen im Dunkeln
- Zweifacher Alarm (Einfach Alarm und Wochentagalarm) mit
Schlummerfunktion
HAUPTMERKMAL [FIG. 1]
A. SNOOZE-TASTE
-Schaltet die Hintergrundbeleuchtung für 5 Sekunden ein
-Aktiviert die 8-Minuten-Schlummerfunktion, wenn der Alarm ertönt
B. UHRENFENSTER
-Zeigt die Uhrfunktion
C. KALENDER/ ALARMFENSTER
-Zeigt die Kalender- und Alarmfunktionen
D. TEMPERATURFENSTER
-Zeigt die Raumtemperatur in Grad Celsius (°C)
E. ALARMTASTE
-Dient zum Umschalten zwischen Wochentagalarm, dem einmaligem Alarm
und Kalendermodus
-Drücken und 3 Sekunden lang festhalten, um den Alarmzeiteinstellmodus
für den jeweils angezeigten Alarmmodus aufzurufen
F. MODE TASTE
-Dient zum Umschalten zwischen folgenden Anzeigen:
Uhr mit Sekunde / Uhr mit Wochentag / Uhr mit Stundenversatz
-Drücken und 3 Sekunden lang festhalten, um den Uhrzeiteinstellmodus
aufzurufen
G. (+)-AUF und (-) Ab- TASTEN
-Dient zum Erhöhen/Vermindern eines eingestellten Wertes
-Dient zum Aktivieren oder Deaktivieren des Alarms, wenn die
entsprechende Alarmzeit angezeigt wird
H. BATTERIEFACH
-Platz für eine UM-3 Batterie oder "AA".
BATTERIE EINLEGEN [Fig. 2a]
Hinweis: Neue Batterien einlegen, wenn die Batterie-Schwach-Anzeige[ ]
erscheint [Fig. 2b]
EINSCHALTEN DER HINTERGRUNDBELEUCHTUNG
Drücken Sie die SNOOZE-Taste, um die Beleuchtung für 5 Sekunden
einzuschalten.
ÜBER DEN FUNKEMPFANG [FIG. 3]
Bei Eintritt in den Sendebereich 1500 km um Frankfurt, DCF-77 (MSF60 für
die britische Version), wird die RM983/ RM983U Kalenderuhr automatisch
synchronisiert.
Wenn die RM983/ RM983U in dem Bereich betrieben wird, setzt die
funkgesteuerte Synchronisation alle manuellen Einstellungen außer Kraft.
Sobald das Gerät das Signal, nach dem aktivieren, empfängt, beginnt das
Empfangssymbol zu blinken. Je nach Stärke des Signals dauert es ca. 2 - 10
Minuten, bis der Empfang abgeschlossen ist.
Um den Empfang des Signals manuell zu deaktivieren, drücken und halten Sie
die (-)-Taste 3 Sekunden lang, bis das Empfangssymbol verschwindet.
Um den Empfang wieder zu aktivieren, drücken und halten Sie die (+)-Taste 3
Sekunden lang. Das Empfangssymbol beginnt zu blinken, wobei das Gerät
automatisch nach dem Funksignal sucht.
Interferenzen
Der Empfang kann durch verschiedene Faktoren beeinträchtigt werden. Um einen
optimalen Empfang zu gewährleisten, sollten Sie das Gerät nicht in der Nähe
von metallischen Gegenständen und elektrischen Geräten aufstellen.
Anmerkung: Störungen durch Interferenzquellen, wie z.B. durch TV-Geräte,
können den Empfang des Signals beeinträchtigen. Wenn zehn Minuten nach
dem Einlegen der Batterien noch kein DCF77 Zeitsignal empfangen wurde,
sollten Sie die Uhr manuell einstellen. (siehe Abschnitt: Wie Uhrzeit und
Kalender manuell eingestellt werden).
WIE UHRZEIT UND KALENDER MANUELL
EINGESTELLT WERDEN [Fig. 4] UND [Fig. 5]
Wenn Sie die Uhr in einer anderen Zeitzone verwenden wollen [FIG. 6], müssen
Sie den Zeitzonenversatz verwenden. Wenn ein Stundenversatz eingestellt wurde
(z.B. +1), ist die angezeigte Zeit gleich Funkzeit plus 1 Stunde.
WIE DER ALARM EINGESTELLT UND
AKTIVIERT WIRD
Dieses Gerät ist mit 2 Alarmen ausgerüstet: Einmaliger Alarm [ ] und
Wochenendalarm [
].
Der einmalige Alarm ertönt nur einmal zur eingestellten Alarmzeit. Der
Wochentagalarm bleibt von Montag bis Freitag aktiviert, und die Alarmfunktion
wird automatisch während der Wochenenden (d.h. Samstag und Sonntag)
abgeschaltet.
Einstellen und Aktivieren des Alarms, siehe [FIG. 7]
Einstellen und Aktivieren des einmaligen und/oder Wochentagalarms erfolgt
nach dem gleichen Verfahren.
WIE DER ALARM DEAKTIVIERT WIRD [FIG. 8]