


Part No. 1090132 Rev F 47 Invacare Scooters
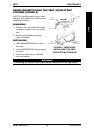
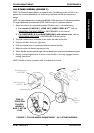
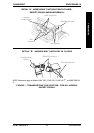
REMOVING/INSTALLING THE REAR WHEELS (FIGURE 2)
REMOVING
WARNING
Turn Power OFF and remove key from ignition.
1. Turn Power OFF and remove key from ignition.
2. Remove the seat. Refer to REMOVING/INSTALLING THE SEAT in PROCEDURE 5
of this manual.
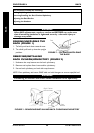
3. Remove the rear shroud. Refer to REMOVING/INSTALLING THE REAR SHROUD
in this procedure of the manual.
4. Place the rear sub-frame up on blocks so that the rear tires are OFF the ground.
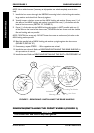
5. Flatten the tab on the locking tab washer that is bent against the hex head screw
(FIGURE 2, DETAIL "B").
6. Remove the hex screw that secures the rear wheel to the drive shaft.
7. Use a wheel puller if necessary to remove the EXISTING rear wheel assembly from
the drive shaft.
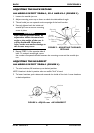
INSTALLING
NOTE: The keystock in the drive shaft MUST lineup with the cutout in the wheel hub.
1. Place keystock in cutout on drive shaft (FIGURE 2, DETAIL "A").
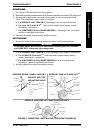
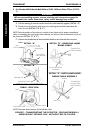
2. Align the three (3) mounting holes in the large washer with the three (3) mounting
holes in the wheel hub.
WARNING
NEVER use a locking tab washer more than once. ALWAYS use a NEW
locking tab washer when installing the rear wheels.
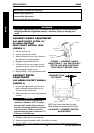
3. Align the NEW locking tab washer with the center mounting hole AND one (1) of
the outer mounting holes in the large washer.
4. Install one (1) mounting screw through the lockwasher, OUTER mounting hole in
NEW locking tab washer, large washer and wheel hub. Securely tighten.
5. Install one (1) mounting screw through the lockwasher, remaining OUTER mounting
hole in large washer and wheel hub. Securely tighten.
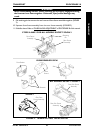
6. Install the rear wheel onto the drive shaft.
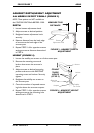
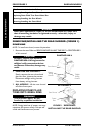
TILLER ADJUSTMENT
PROCEDURE 9SHROUD/WHEELS