Garantía Limitada de por Vida
Calidad es el sello de todos de los productos de
Lumex
®
. De confianza por profesionales de cuido de
salu d y usuarios por más de 50 anos, Lumex tiene una
línea completa de asistencia para pacientes y asientos
especializada de asistencia sanitaria.
Los productos de Lumex son diseñados y hechos a
estándares precisos y son revisados cuidadosamente
antes de envió. La Garantía Limitada de por Vida es un
expresión de nuestro confianza en los materiales y
factura de nuestros productos. Somos dedicados a
proveer productos que pueden dar anos de servicio
fiable a nuestros clientes.
GF Health Products, Inc. garantía las partes
específicos de estos modelos de Lumex escritos en el
forro de este “hangtag” para la vida del producto sobre
ser libre de defectos en materiales y factura cuando
usado por el propósito entendido, sobre condiciones
normales, y próvido que el producto reciba cuido
apropiado.
Partes cubiertos debajo de esta garantía incluye:
marco, soldadura, tornillos, componentes de
posicionar el marco. Artículos específicos “excluidos”
de esta garantía de cual quiere tipo: “TODAS” otras
partes no mencionados específicamente arriba. La
garantía no se extenderá a componentes no durables
como accesorios punta, cuales son sujetos a desgasto
normal y requieren remplace periódico. Esta garantía
no incluye cargos de labor incurridos con instalación
de partes de reemplazo o cargos de transporte o carga
asociados al fabricante.
Si hay un defecto en el producto que se cubra por la
garantía, nosotros, a nuestra opción, podemos reparar
o reemplazar el producto.
Para información adicional de este producto de Lumex
o esta garantía, por favor de llamar a su distribuidor
autorizado de GF Health Products, Inc.
© 2009, GF Health Products, Inc., 2935 Northeast Parkway, Atlanta, Georgia 30360.
Made in China. www.grahamfield.com
GF0500029RevB09
Specifications subject to change without notice
Especificaciones son sujetas a cambio sin aviso
Features:
• Provides assistance to those who have difficulty
stepping over the bathtub walls
• Anodized aluminum frame is lightweight, durable, and
rust resistant
• Drainage holes in seat minimizes water build up
• Reversible backrest to accommodate any bathroom.
• Support Arm support aids in lateral transfer
• Seat height is adjustable in ½" increments
• 350lbs maximum weight capacity – 7927A
• 400lbs maximum weight capacity – 7929
• Designed to meet the requirements of HCPCS code:
E0247/E0248 (for 7929A)
• Lifetime Limited Warranty
Características:
• Provee asistencia para quienes tienen dificultad pisar
sobre las paredes de la bañera
• Marco de aluminio anodizado es ligero, durable y
resistente a oxido
• Huecos de drenaje en el asiento reduce la acumulación
de agua
• Respaldo es reversible para acomodar cual quiere baño.
• Apoyabrazos de soporte ayudan en transferir lateral
• Altura de asiento es ajustable en incrementos de ½"
• Capacidad de peso máximo de 350 lbs – 7927A
• Capacidad de peso máximo de 400 lbs - 7929
• Diseñado a reunir los requisitos de código de HCPCS:
E0247/E0248 (para 7929A)
• Garantía limitada de por Vida
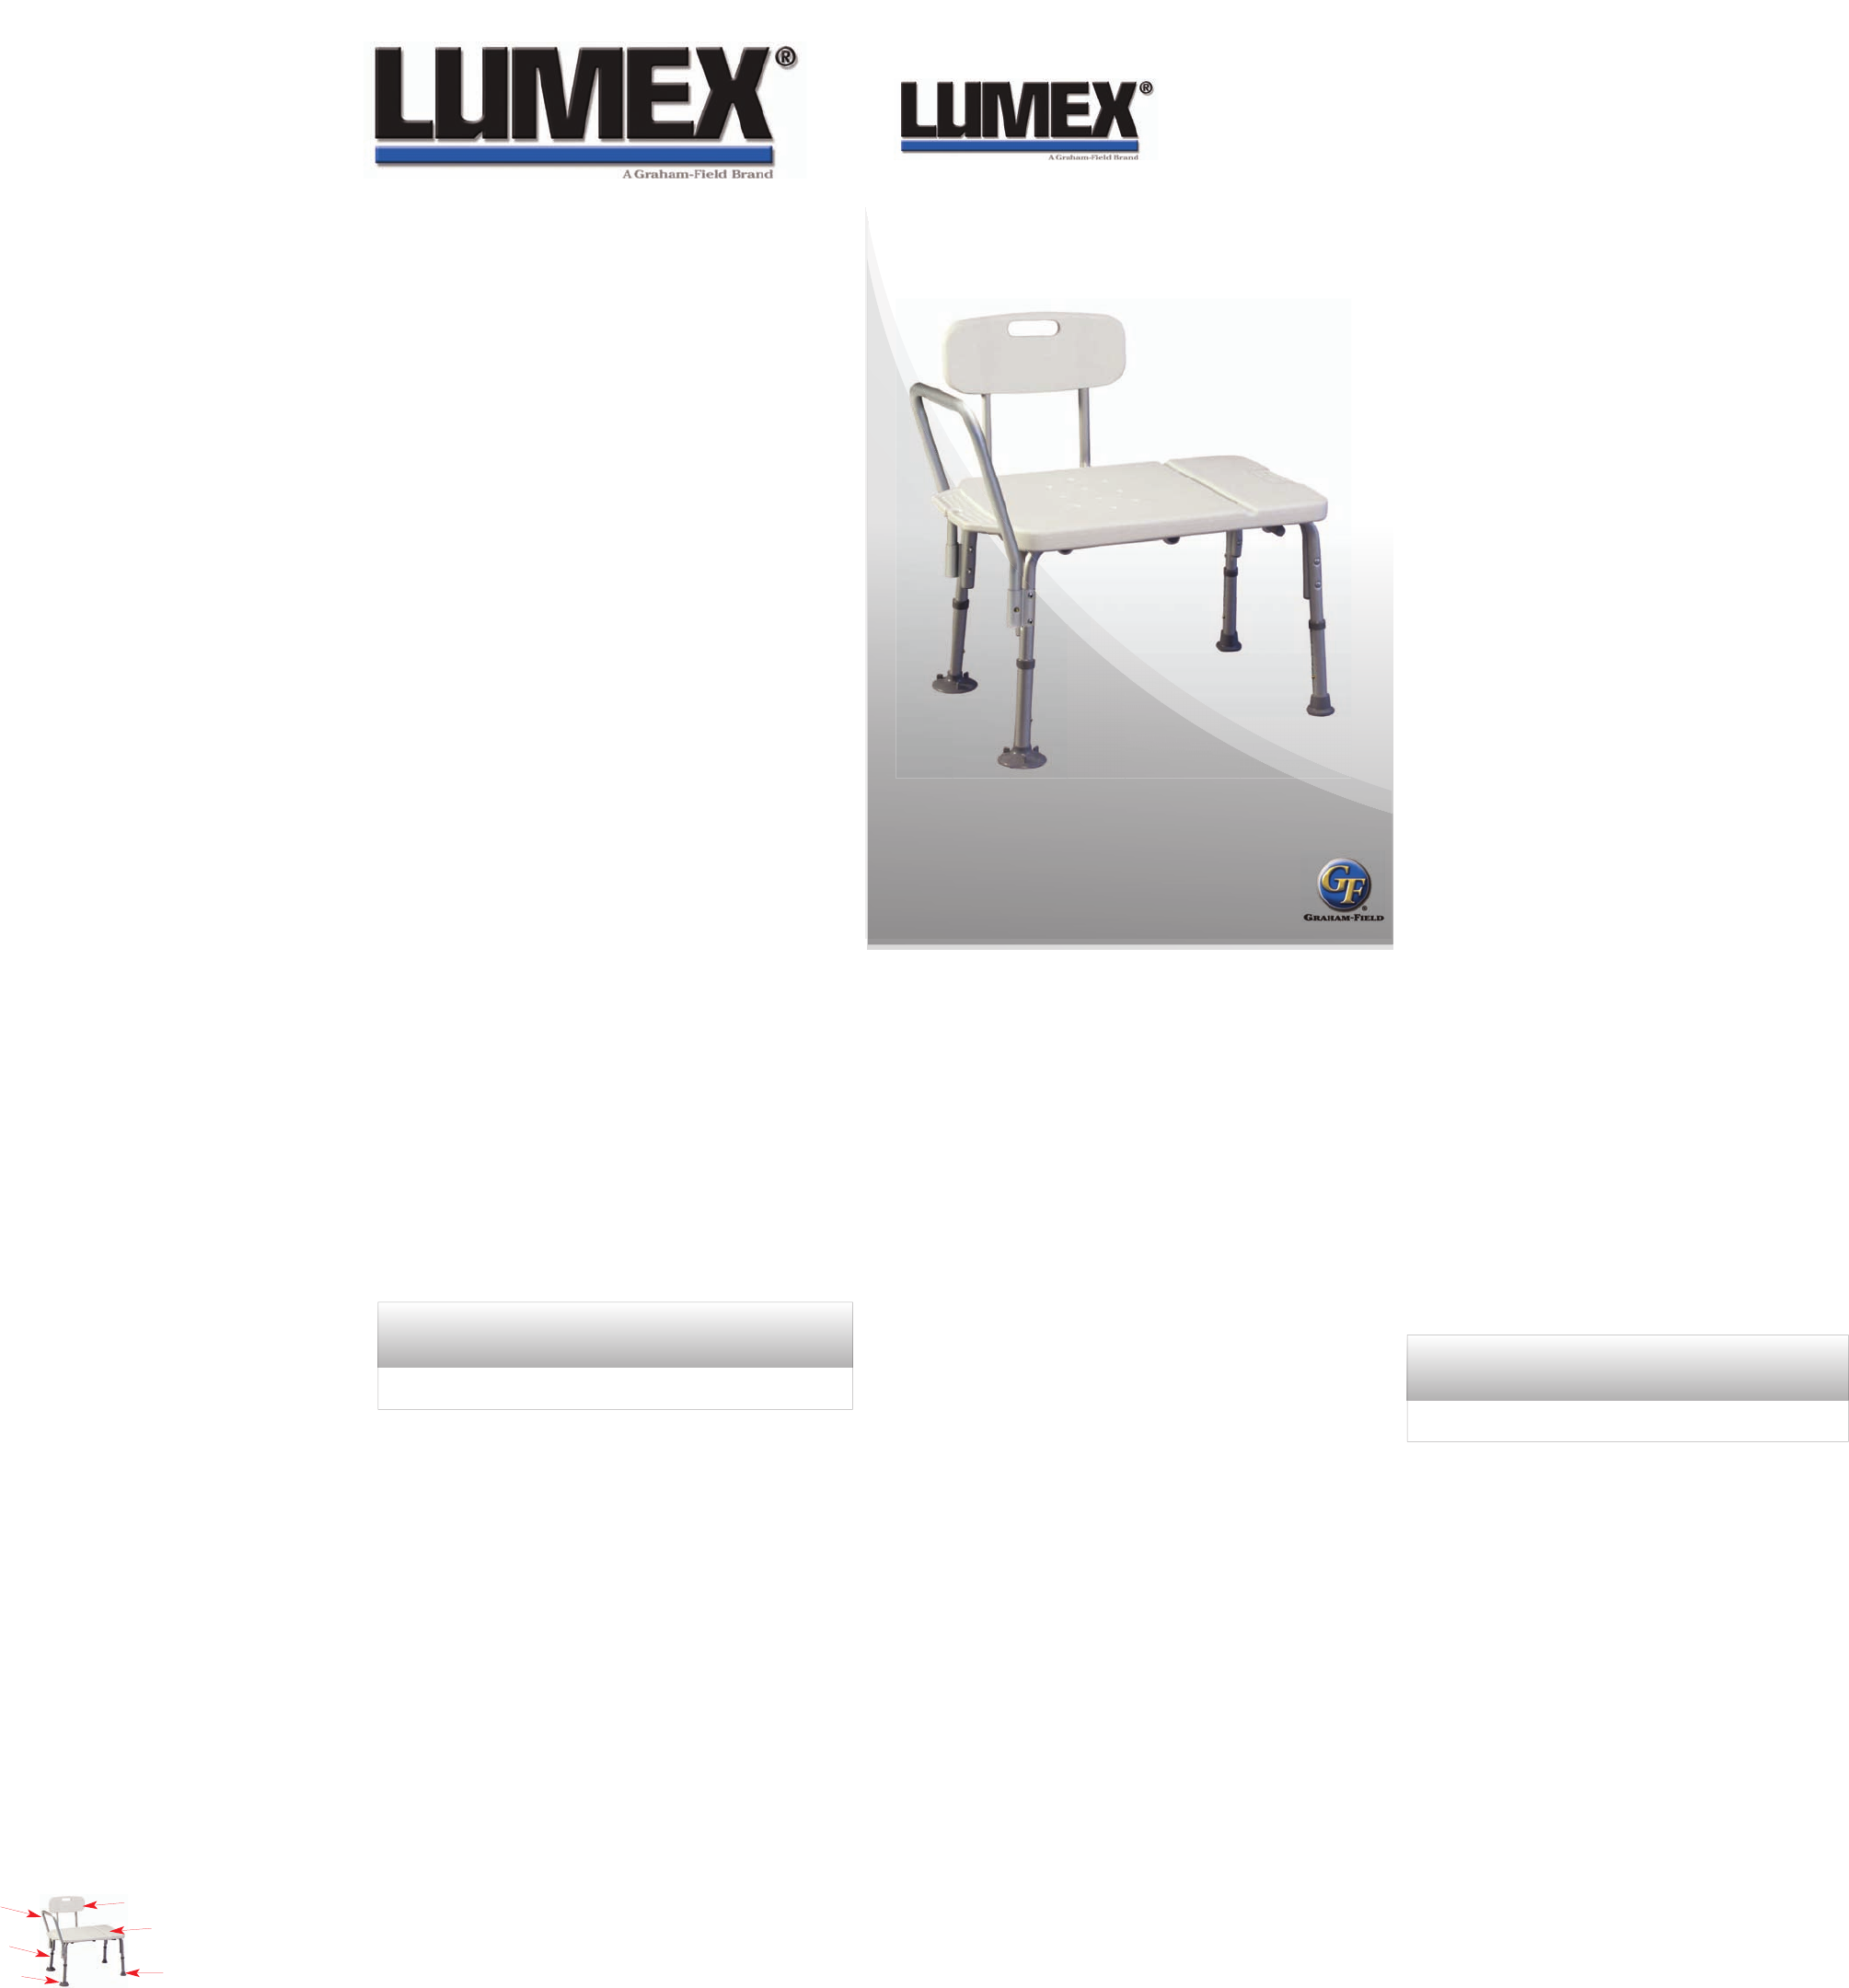
Transfer Bench
Items 7927A and 7929
de Banco de Transferir
Important: Read Before Use
Importante: Lea Antes de Uso
User Instructions
and Warranty Information
Instrucciones e Informacion de la Garantia
Lifetime Limited Warranty
Quality is the hallmark of all Lumex
®
products.
Trusted by healthcare professionals and end-users
for over 50 years, Lumex features a full line of patient
aids and specialty healthcare seating.
Lumex products are designed and built to precise
standards and are carefully inspected prior to shipment.
This Lifetime Limited Warranty is an expression of our
confidence in the materials and workmanship of our
products. We are dedicated to providing products that
will give our customers years of dependable service.
GF Health Products, Inc. hereby warrants specific parts
of the Lumex products listed on the cover of this
manual for the lifetime of the product against defective
workmanship and/or material defects when used for the
purpose intended, under normal conditions, and
provided the product receives proper care
Parts covered under the lifetime warranty include:
(frame, welding, screws, frame locking components).
Specific items "excluded" from this warranty of any
kind are: "ALL" other parts not specifically listed above.
The warranty does not extend to non-durable
components, which are subject to normal wear and
require periodic replacement.
Should a product defect that is covered by this
warranty arise, we will, at our option, repair or replace
the product.
For additional information on this Lumex product or this
warranty, please contact an authorized GF Health
Products, Inc. Distributor.
Instructions for Use –
Please Read All Instructions Before Use.
Attaching the Leg Extensions
(if not attached already)
1. Place frame on its side on a level surface.
2. Attach leg extensions with suction feet to the frame on the same side as where the
support arm will be. Attach leg extensions with flange tips to frame on opposite side
of frame.
3. The transfer bench legs with suction feet should be the two legs that are to be
placed inside the tub.
Attaching the Backrest
1. Determine which direction the user will face when sitting on the bench in the tub.
2. Position the bench on a level surface.
3. Locate the channel guides (4 each) on underside of seat. Align backrest support
tubes with channel guides.
4. Slide backrest seat support tubes through channel guides until seat support tube
push buttons protrude fully through channel guide holes.
NOTE: Ensure seat support tubes buttons protrude fully through channel guide holes.
CAUTION: Backrest is not designed to support the full weight of the user.
CAUTION: Ensure backrest is facing down correctly before inserting to avoid improper
installation.
Attaching the Support Arm
1. To attach the support arm, position the seat arm against the leg frame and slide the
armrest tubing into the tube openings. Make sure that the push buttons fully
protrude through the holes in the bracket.
NOTE: An audible “click” will be heard.
2. To remove the seat arm, depress the push buttons and pull up.
NOTE: The end with the Support Arm and Suction Feet is the side that should be inside
the tub.
Adjusting Leg Height
1. Depress the height adjustment button and slide the lower leg upward or downward
until the height adjustment button is fully engaged in the desired hole.
NOTE: An audible “click” will be heard.
2. Repeat for other 3 legs.
CAUTION: Ensure that all four legs are adjusted to the same height, and that all height
adjustment buttons protrude fully through adjustment holes before use.
Using Your Transfer Bench
NOTE: Be sure to move slowly throughout use to prevent injuries.
NOTE: Children or those who need assistance should NOT be left unattended during
use of this product.
From a seated position (such as a wheelchair):
1. Place your wheelchair next to the bench, facing the front of the bathtub.
2. Engage wheelchair locks.
3. Transfer your torso to the transfer bench first, and then lift your legs into the tub.
Move slowly to prevent injuries.
4. After bathing, lift your legs out of the tub first, then your torso.
From a standing position:
1. Sit on the side of the transfer bench that is outside of the tub.
2. Extend your arms to grab the support arm of the bench and slide your body over
onto the bench. Lift each leg over the tub slowly.
3. Position yourself to a comfortable position in center of bench.
4. After bathing, lift your legs out of the tub first, then your torso slowly.
Sujetando Las Extensiones de Pata
(si no vienen sujetadas)
1. Ponga el marco en su lado en un superficie nivel.
2. Sujeta las extensiones de pata con puntas de succión en el marco en el mismo lado
donde se va sujetar el soporte de brazo. Sujeta las puntas de flange en el marco en
el lado opuesto del marco.
3. Las patas del banco de transferir con las puntas de succión deben ser las dos patas
que deben ir adentro de la tina.
Sujetando el Resplado
1. Determina in que direccion el usuario va estar cuando este sentado en el banco en
la tina.
2. Posicione el banco en un superficie nivel.
3. Localice las guías de canal (4) abajo del asiento. Alinea los tubos de soporte del
respaldo con las guías de canal.
4. Deslice los tubos de soporte del respaldo dentro de las guías de canal hasta que los
botones de apretar sobresalen completamente por los huecos de las guías de
canal.
NOTA: Asegure que los botones del tubo de suporte del respaldo sobresalen
completamente por las huecos de las guías de canal.
CAUCION
: El respaldo no es diseñado soportar todo el peso del usuario.
CAUCION
: Asegure que el respaldo esta hacia abajo antes de insertar para evitar
instalacion incorrecto.
Sujetando el Brazo de Lado
1. Para sujetar el brazo del asiento, posicione el brazo del asiento sobre la pata del
marco y deslice los tubos por los huecos de los tubos. Asegure que los botones de
apretar sobresalen completamente en la abradezera.
NOTA: Se oye un “clic” cuando esta puesto.
2. Para remover el brazo de lado, apreté los botones de apretar y jale hacia arriba.
NOTA: El lado con el brazo de lado y Punta de Succion es el lado que debe estar en la
tina.
Ajustando la Altura del Inodoro
1. Apriete el botón de ajustamiento de altura y deslice la parta inferior de la pata hacia
arriba y abajo hasta que el botón de ajustamiento esta asegurado en el hueco deseado.
NOTA: Se oye un “clic” cuando esta puesto.
2. Repita para las otras 3 patas.
CAUCION: Asegure que todas cuatros patas están ajustados a la misma altura y que todos
los botones de ajustamiento sobresalen por los huecos de ajustamiento antes de uso.
Utilizando su Banco de Transferir
NOTA: Asegure moverse despacio durante uso para prevenir heridas.
NOTA: Niños y los quienes necesitan asistencia NO deben estar desatendidos durante
uso de este producto.
De la posición sentado (como una silla de rudas):
1. Ponga su silla de rueda al lado al banco hacia la parte de frente de la tina.
2. Pisa las cerraduras de la silla de rueda.
3. Transfiere su torso al banco de transferir primero, y levante sus piernas en la tina.
Mueve despacio para prevenir heridas.
4. Después de bañarse, levante sus piernas afuera de la tina primero y después su torso.
De la posición parado:
1. Siéntese en el lado del banco de transferor que esta fuera de la tina.
2. Extiende sus brazos para agarrar el brazo de lado del banco y deslice su cuerpo
sobre el banco. Levante cada pierna despacio sobre la tina.
3. Posicione su miso en una posición confortable en el centro del banco.
4. Después de bañarse, levante sus piernas afuera de la tina primero y después su torso.
Instrucciones Para Uso –
Lea y Entiende Todas Las Instrucciones
Antes de Uso.
WARNING
WARNING:
DO NOT use this product without first completely reading and understanding
these instructions and any additional instructional material such as owner’s manuals,
service manuals or instruction sheets supplied with this product. If you are unable to
understand the warnings, cautions or instructions, contact a healthcare professional,
dealer or technical personnel before attempting to use this equipment - otherwise, injury
or damage may occur.
WARNING:
Users with limited physical capabilities should be supervised or assisted
when using the transfer bench.
WARNING:
Item 7927A has a maximum weight capacity of 350 lbs
Item 7929 has a maximum weight capacity of 400lbs
WARNING:
GF Health Products Inc. assumes no responsibility for any damage or injury
caused by improper installation, assembly, or use of this product.
WARNING:
Leg extensions with rubber tips MUST be in contact with the floor at all times.
WARNING:
Ensure that the push buttons fully protrude through the same height
adjustment hole of each leg extension. This ensures that the leg extensions are securely
locked in position and that an even height adjustment is achieved.
WARNING:
Make sure that all attaching hardware, screws, nuts and/or bolts are tight at
all times.
WARNING:
Inspect rubber tips on the leg extensions for rips, tears, cracks or wear or if
they are missing. Replace them IMMEDIATELY if any of these conditions exist.
WARNING:
The transfer bench seat MUST be installed before sitting on the transfer bench.
WARNING:
If components are damaged or missing, contact your GF Health Products Inc.
distributor immediately.
Maintenance
• Use a mild soap and water solution, rinse with clear water, then dry with a soft cloth.
Ensure that product is well rinsed before using.
• Never use organic solvents, abrasive cleaners, or scouring pads on any part of the product.
• Check fit and tightness of all nuts, bolts and knobs weekly to ensure that product
is safe to use.
• To guarantee the best service from your product, always specifiy Lumex replacement parts,
available from your GF Health Products, Inc authorized distributor.
NOTE: Check ALL parts for shipping damage. If shipping damage is noted, DO NOT
use. Contact carrier/dealer for further instruction.
Safety Guidelines –
Please Read Before Use
For more information regarding GF Health Products, Inc. products, parts and
services, please contact your distributor or visit us online at
www.grahamfield.com.
ADVERTENCIAS
ADVERTENCIA:
NO DEBE UTILIZAR este producto sin primero leer y entender estas
instrucciones y cual quiere otro material como el manual de usuario, manual de
servicio hoja de instrucción suministrado con este producto. Si no puedes entender
las advertencias, cauciones o instrucciones, llame a su profesional de cuido de salud,
distribuidor o personal técnica antes de tratar de usar este equipo – o si no, herida o
daño puede ocurrir.
ADVERTENCIA:
Usuarios con capacidades físicos puede ser supervisados o
asistidos cuando utilizar el banco de transferir.
ADVERTENCIA:
7927A – Capacidad de peso máximo de 350 lbs
7929 – Capacidad de peso máximo de 400 lbs
ADVERTENCIA:
GF Health Products, Inc. no asume ninguna responsabilidad por
daño o herida causado por instalación, ensamblaje o uso impropio de este producto.
ADVERTENCIA:
Extensiones de patas con puntas de goma TIENEN que estar en
contacto con el piso todo el tiempo.
ADVERTENCIA:
Asegure que los botones de apretar sobresalen completamente por
los mismos huecos de ajustamiento de altura de cada extensión de pata. Esto
asegura que las extensiones de pata están asegurados en posición y que el
ajustamiento de altura esta uniforme.
ADVERTENCIA:
Asegure que la ferretería, tornillos y perillos están apretados todo el
tiempo.
ADVERTENCIA:
Examine las puntas de goma en las extensiones de patas para
grietas o desgasto o si faltan. Reemplace IMMEDIAMENTE si estas condiciones
existen.
ADVERTENCIA:
El asiento del banco de transferir TIENEN que estar instalado antes
de sentarse en el banco de transferir.
ADVERTENCIA:
Si los componentes están dañados o si faltan, llame a su distribuidor
de GF Health Products, Inc. inmediatamente.
NOTA: Examine to das las partes por daño en transporte. Si hay daño en transporte,
NO UTILICE. Llame a su empresa de transporte para instrucciones.
Directriz de Seguridad –
Por Favor De Leer Antes de Uso
Para mas información sobre su producto, partes o servicio de GF Health
Products, Inc, por favor de llamar a su distribuidor o visítenos online en
www.grahamfield.com.
MANTENIMIENTO
• Utilice una solución de jabón suave y agua, enjuague con agua limpia y seca con
una toalla suave. Asegure que el banco de transferir esta enjuagado bien antes de
uso.
• Nunca utilice solventes orgánicos, limpiadores abrasivos en cual quiere parte de
este banco de transferir.
• Cheque seminalmente que los tornillos y perillas están apretados para asegurar
que el banco de transferir esta bueno para utilizar.
• Para garantizar el servicio mejor de su banco de transferir, siempre pide partes de
reemplace de Lumex si son disponible por so distribuidor de GF Health Products, Inc.
Support Arm
Back Support
Platform
Tip
Suction Tip
Adjustable leg
Brazo de Lado
Suporte de Espalda
Plataforma
Punta
Punta de Succión
Pata Ajustable


