


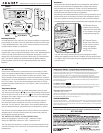
The Main Display
Each sensors’ temperature is represented on the main display in three
ways. The largest numbers displayed represent the current temperature
of each remote sensor. The two smaller numbers to the right in each
sensors’ display window represent the minimum and maximum recorded
temperatures. The recorded MIN/MAX numbers can be cleared by pushing
the “CLR” button. You may also choose between Fahrenheit or Celsius
temperature display mode using the “ºF/ºC Select” switch on the back of
the main unit.
Temperature Alarms
The main unit is equipped with an audible temperature alarm for each
unit. Press the alarm button ( ) for the corresponding remote sensor
to turn the alarm function on or off. The “ ” icon on the main display
will appear if the alarm function is on. If the alarm icon is not displayed,
the alarm WILL NOT SOUND.
If the temperatures for each sensor fall below the minimum preset or
rise above the maximum preset for more than 15 minutes, the alarm
will sound. This is to prevent “False alarms” from sounding because the
door was opened to load or unload items from a refrigerator or freezer
The alarms are preset by default with the FDA’s minimum and maximum
temperatures for a freezer (remote sensor #2) and are also preset for
the refrigerator (remote sensor #1).
THE DEFAULT FDA PRESET ALARM TEMPERATURES:
Sensor #1 (refrigerator): minimum is 33ºF / maximum is 40ºF.
Sensor #2 (FREEZER): minimum is -22ºF / maximum is 0ºF
You may customize the alarm to sound at your desired temperatures for
each unit. See page 4 for instructions on programming the alarm preset
temperatures.
Installing Batteries-
To install batteries in the main unit, first remove the battery compartment
cover located on the back of the unit underneath the fold-out stand. Insert
2 “AAA” alkaline batteries in the correct manner according to the polarity
symbols inside the battery compartment.
To install batteries in the two remote sensor units, remove the battery
compartment cover by sliding it downwards. Insert 2 “AA” alkaline batteries
into the unit that will be placed in the refrigerator (#1 remote). For the
remote that is to be placed in the freezer (#2 remote), it is recommended
that 2 “AA” lithium batteries be installed instead of alkaline batteries.
Lithium batteries function at lower temperatures better than alkaline
batteries.
00985 Wireless refrigerator & Freezer Thermometer
FRONT
BACK
1
3
40
26
18
3
SENSOR 1
MAX
MIN
F
26
18
SENSOR 2
MAX
MIN
F
CLR
BATTERY
COMPARTMENT
2
BATTERY
COMPARTMENT
ALARM
ALARM
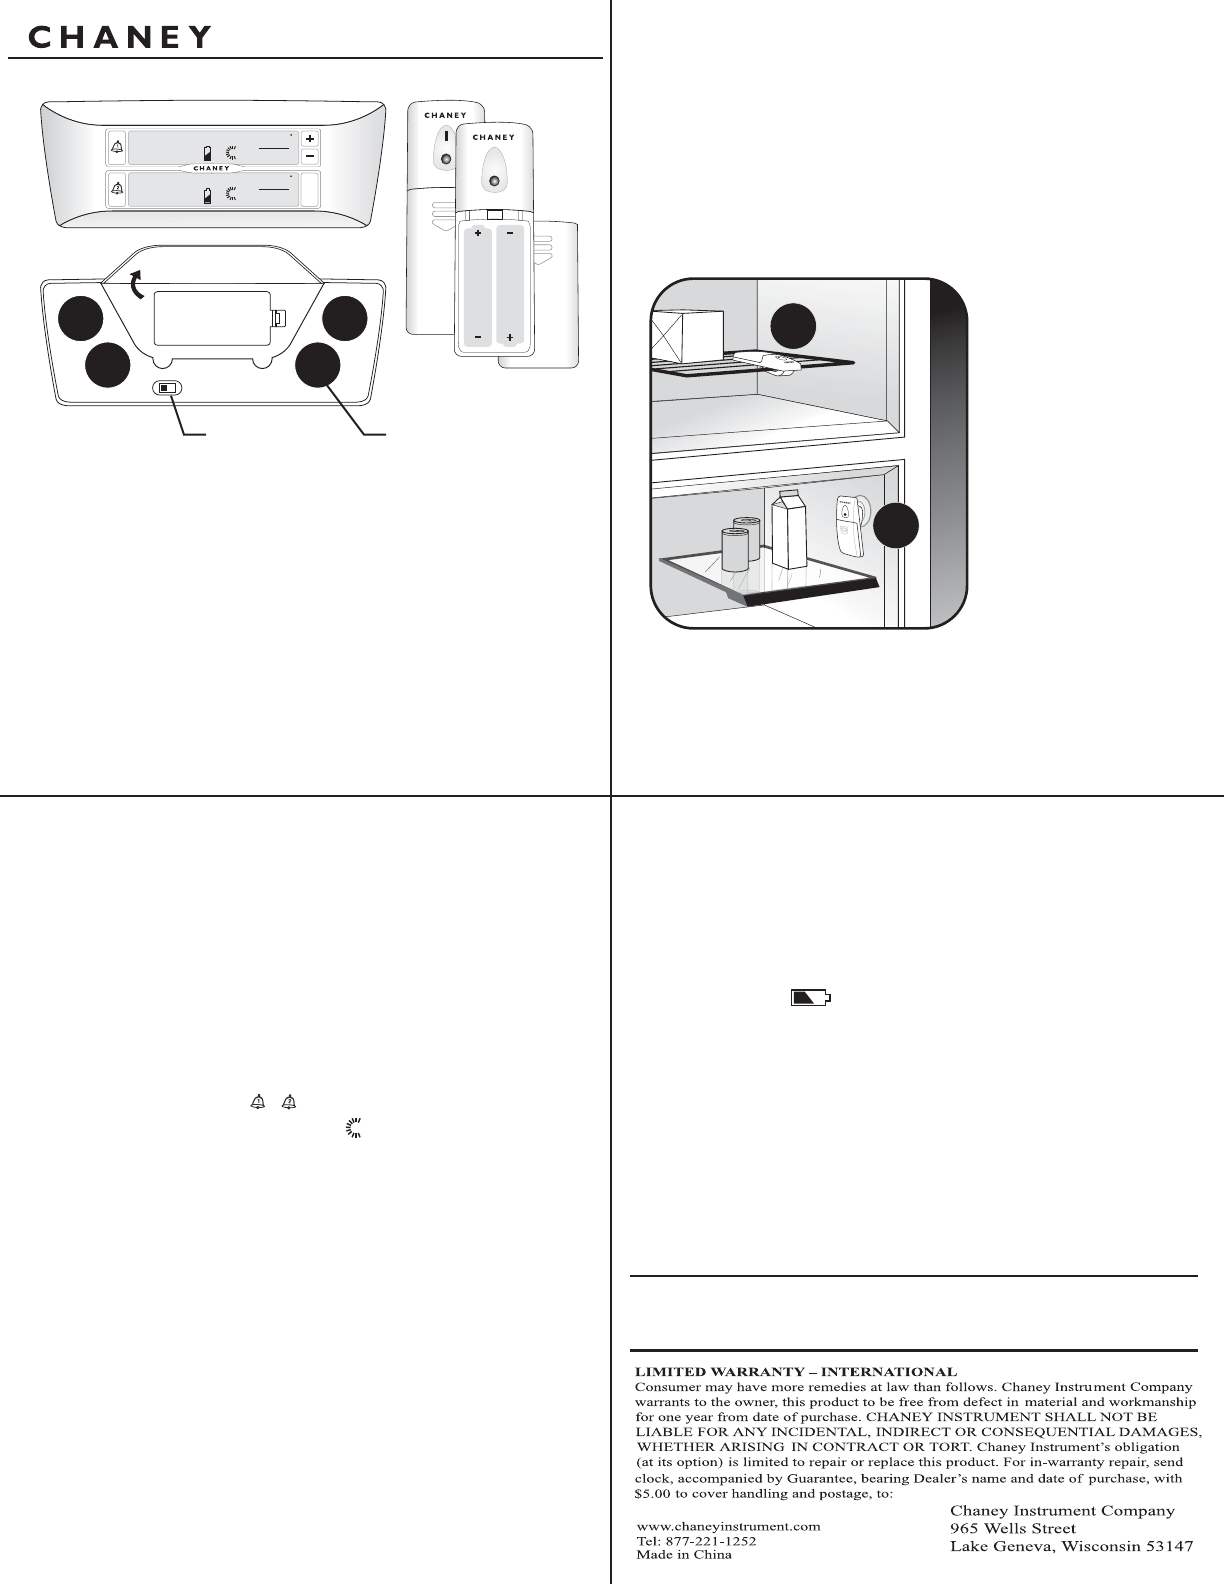
Magnets
Placement -
The remote units should be placed into the refrigerator and freezer at
this point. Each remote unit is equipped with a spring-action clip for
securing inside the refrigerator or freezer. The clip is designed with
rubber grips to securely hold the remote unit to the edge of a glass or
wire shelf commonly found in modern refrigerators.
Alternatively, the included detachable suction cup may be used to secure
the #1 remote sensor to the interior surface of the refrigerator. Suction
cups do not adhere to freezing surfaces very well, a remote unit kept in
a freezing temperature should be secured using the integrated spring-clip.
2
1
#
2
#
#1 Remote Sensor
shown here mounted
to the interior surface
of the refrigerator
using the included
suction cup.
#2 Remote Sensor
shown here mounted
to the interior wire shelf
of the freezer using the
integrated spring-clip.
The main unit may be mounted directly to the refrigerator surface
utilizing the magnetic back of the unit. The Main unit may also be placed
on a table or other flat surface using the integrated fold-out stand on the
back of the unit.
ºF/ºC Select
ALARM
or
FLIP-OUT
TABLE STAND
4
Temperature Alarms - Programming Customized Presets
To customize the preset alarm temperatures, press and hold the desired alarm button
(sensor #1 or sensor #2). You are now in the MAX temp. alarm set mode and may adjust the
maximum temperature by using the “+” or “-” buttons. Press the alarm button again to
confirm your setting and move on to setting the minimum temperature. Adjust the
temperature by pressing the “+” or “-” buttons. Press the alarm button again to confirm your
setting for the minimum alarm temperature and to exit the entire alarm preset temperature
mode. Repeat this process to set the other minimum and maximum alarm temperatures for
the other remote sensor.
Temperature measurement range:
- MAIN UNIT: -22ºF to 104ºF
NOTE: If the remote sensor units are measuring temperatures above the temperature range
the main unit will display “-H-”. If the remote sensor units are measuring temperatures below
the temperature range, the main unit will display “-L-”.
TROUBLESHOOTING:
The main unit will display “--” once batteries are installed until it acquires the wireless signals
from the remote sensor units. If the unit still displays “--” the remote units’ batteries may be
dead or the main and remote units cannot synchronize wireless signals. Try moving the main
unit to a different location.
Low Battery Indicator:
A low battery indicator is shown in the display window for the remote sensors. When the low
battery indicator displays, replace the batteries with fresh ones. Be sure to never mix old and
new batteries, and never mix battery types such as alkaline and lithium together.
Do not return product to retail store. For Technical Assistance and
product return information, please call Chaney Instrument Co. direct at:
877-221-1252
00985 INST1219-05