Certified to comply with ANSI A112.18.1
1
18" TOWEL BAR, 24" TOWEL BAR, GLASS SHELF AND TOILET TISSUE HOLDER
MOUNTING BRACKET INSTALLATION
The 18" TOWEL BAR, 24" TOWEL BAR, GLASS SHELF and TOILET TISSUE HOLDER work best if secured to a wall stud or cross brace
within the wall, using the SCREWS (4) supplied.
If the 18" TOWEL BAR, 24" TOWEL BAR, GLASS SHELF and TOILET TISSUE HOLDER are to be installed on a tile or plaster wall the
ANCHORS and SCREWS should be used.
ACCESSORIES
Installation
Instructions
6090
6091
6092
6093
6028.230
6028.180
6028.244
6028.024
Thank you for selecting American-Standard...the benchmark
of fine quality for over 100 years.
To ensure that your installation proceeds smoothly--please
read instructions carefully before you begin.
INSTALL 18" TOWEL BAR, AND 24" TOWEL BAR
2
TOILET TISSUE HOLDER
18"TOWEL BAR
24"TOWEL BAR
GLASS SHELF
Regular Screwdriver
Level
Recommended Tools
Phillips Screwdriver
Drill
10'
Tape Measure
CARE INSTRUCTIONS:
DO: SIMPLY RINSE THE PRODUCT CLEAN WITH CLEAR
WATER. DRY WITH A SOFT COTTON FLANNEL CLOTH.
DO NOT: CLEAN THE PRODUCT WITH SOAPS, ACID,
POLISH, ABRASIVES, HARSH CLEANERS, OR A CLOTH
WITH A COARSE SURFACE.
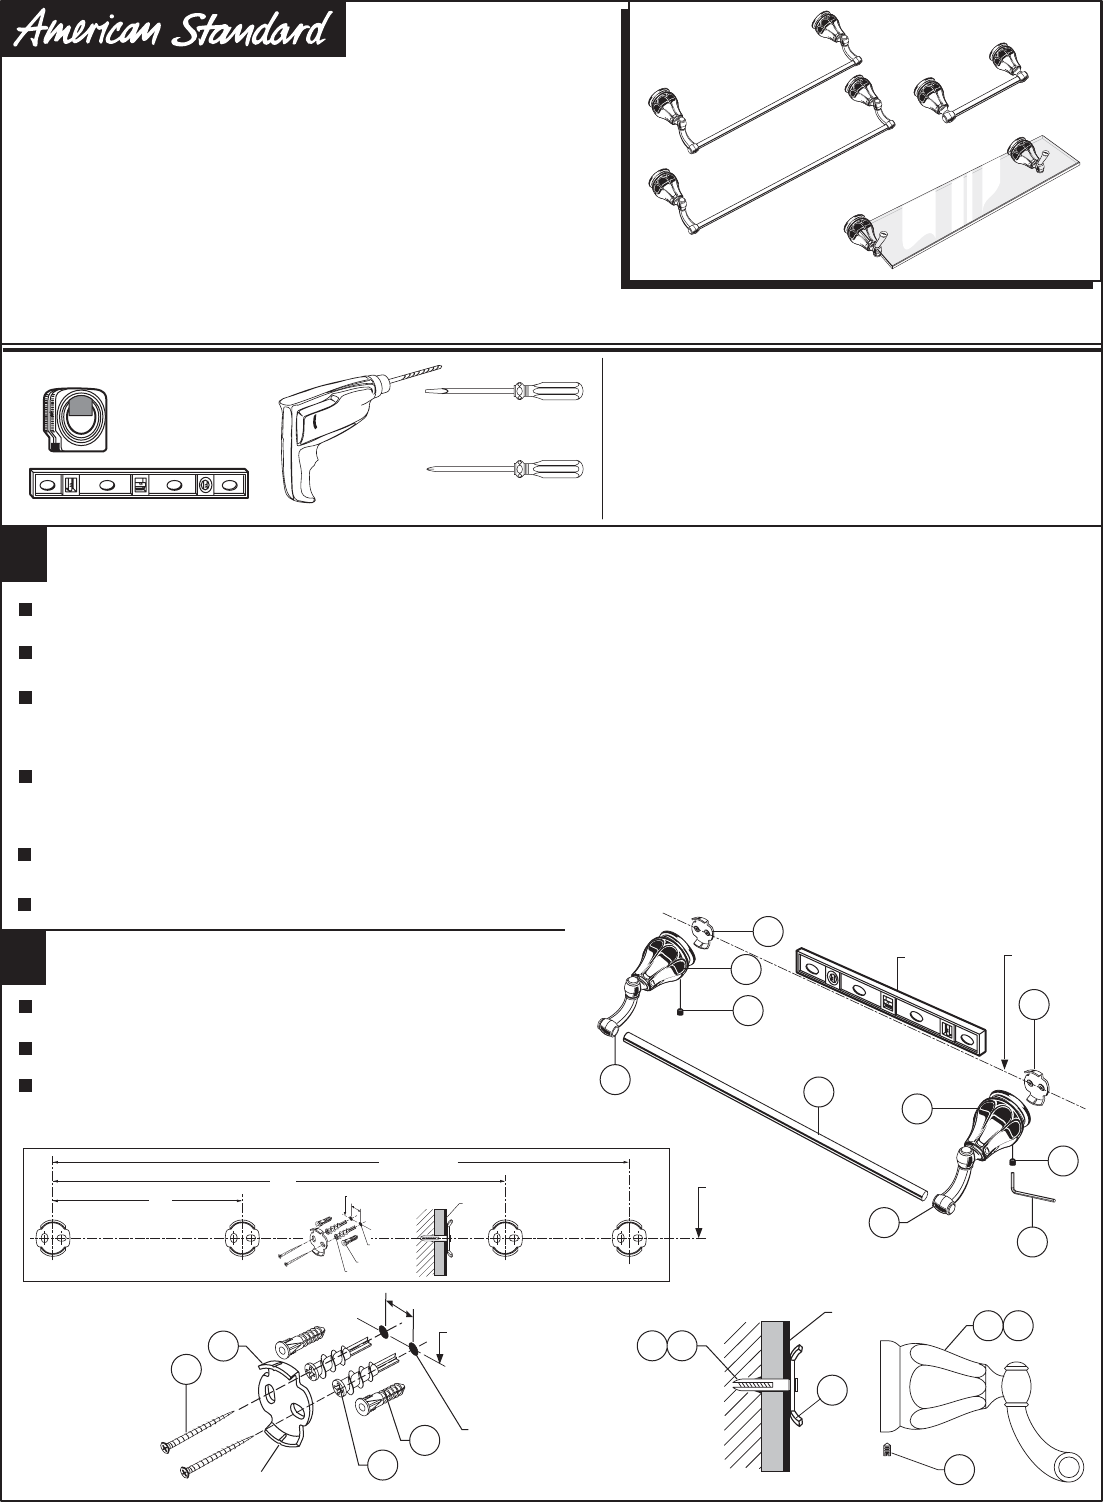
Secure MOUNTING PLATES (1) to wall with SCREWS (2).
For installations on tiled walls, If TILE ANCHORS (4) and SCREWS (2) are used for securing MOUNTING BRACKET (1), then
drill two 1/4" diameter holes a minimum of 1-1/4" deep. Insert the two TILE ANCHORS (4) flush with face of the finished wall.
Determine desired height and location (optional) for the accessory and mark a center line. Use the full size template supplied to mark
hole locations for the mounting brackets. For the 24" TOWEL BAR and GLASS SHELF use 24” template. For 18” TOWEL BAR use 18”
template. For the TOILET TISSUE HOLDER use the 7” template. If MOUNTING BRACKET (1) is secured to a stud or cross brace drill
small pilot holes for SCREWS (2).
For installations on drywall, use DRYWALL ANCHOR (3) and SCREWS (2) for securing MOUNTING BRACKETS (1) to wall. Place #2 Phillips
screwdriver or cordless screwdriver into recess of anchor. Press into drywall while turning the anchor clockwise until it is seated flush with
the wall. Place MOUNTING BRACKET (1) over DRYWALL ANCHORS (3) and insert screws provided with #2 Phillips screwdriver. See
illustration below. Secure MOUNTING BRACKETS (1) to wall with SCREWS (2).
Place right ESCUTCHEON (5) onto MOUNTING BRACKET (1), and secure
with SET SCREW (6) using 2.5 mm HEX WRENCH (7) supplied.
Insert each end of TOWEL BAR (8) into the CRANKS (9).
Place LEFT ESCUTCHEON (5a) onto MOUNTING BRACKET (1a) and
secure with SET SCREW (6) using 2.5 mm HEX WRENCH (7) supplied.
M968860 REV. 1.1
5
5
8
1a
1
6
6
6
5a
5a
3
4
FINISHED WALL
1
3
4
1
2
DRILL PILOT HOLE FOR
WOOD SCREW (1) OR
1/4" DIA. HOLE FOR
ANCHOR (4)
CENTER
LINE
SLOT
CENTER LINE
(OPTIONAL TO
FINISHED FLOOR)
CENTER
LINE
LEVEL
TEMPLATE
FINISHED WALL
DRILL PILOT HOLE FOR
WOOD SCREW OR
1/4" DIA. HOLE FOR
ANCHOR
CENTER LINE
ANCHORS (FOR TILED WALLS)
DRYWALL ANCHORS
7"
24"
18"
18" TOWEL BAR
24" TOWEL BAR
TOILET TISSUE HOLDER
GLASS SHELF
6090
6091
60936092
7
9
9


