


4 - Running the Test
28
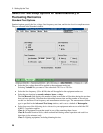
3. It is also possible to increase the duration of the pre-test. One purpose of running a longer pre-
test is to obtain more data over which the test results are averaged. Additional data more
accurately characterizes the worst-case operation of the equipment under test (see “Pre-test
Measurements” for more information).
4. Press the Run Pre-test button to run the pre-test.
Note Running a pre-test from a file that already contains data will not only overwrite the pre-
test data, but will also delete the existing test data.
5. Use the Print Screen command located in the File menu to print the Pre-test window.
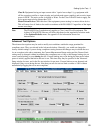
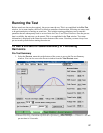
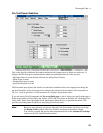
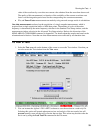
For Quasi-stationary and Fluctuating Harmonic tests, the pre-test checks if you have correctly classified
your equipment as Class D versus any other class in the Standard Test Setup window. It displays the
input-current waveshape of the equipment under test, which lets you examine the waveshape for “fit”
into the Class D special waveshape window.
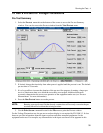
ñ The Pre-test graph displays one cycle of voltage and current, superimposed on the Class D
waveshape window. The current cycle that is superimposed in the Class D waveshape window is
the half-cycle having the highest peak value within a single 16-cycle snapshot taken at the end of
the pre-test interval (see “one-shot measurements” later in this chapter for more information).
Press the Power Statistics tab if you need to configure the active power requirements for
determining Class D limits, or if you need to display additional power measurement information.
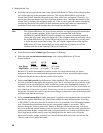
ñ The Class Indicator displays a green background if the data collected from the equipment under
test matches the Class selection. If the data collected from the equipment under test does not
match the Class selection, the Class indicator displays a red background. In this case you should
return to the Standard Test Setup window, select the correct class, and rerun the pre-test. Refer to
appendix D for information about the class determination logic of the Agilent 14761A HFTS
software.
NOTE: Class D equipment must have input power > 75 W and ≤ 600 W, and 95% of its input-
current waveshape must fall within the Class D waveshape window. For EN 61000-3-2
testing, devices generating Class D waveforms but NOT meeting all Class D input power
criteria will be tested using Class A limit values for odd harmonics. If testing against
limits for even harmonics is also desired, select Class A. Testing a device that meets the
Class D "special waveshape" with Class A selected, results in compliant test reports if
the "Motor Driven Device" checkbox, available for EN 61000-3-2 testing, is also
selected.
ñ The Percent in Envelope indicator displays the percentage of waveform data within the Class D
waveshape standard if Class A or Class D has been selected.
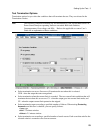
ñ The Voltage THD “IN SPEC” or “OUT OF SPEC” indicator summarizes the results of testing to
determine if the output voltage of the ac source is within the harmonic voltage limits as specified
in EN 61000-3-2/EN 60555-2. The voltage THD results are based on measurements of
individual voltage harmonics up to the 40th harmonic, and a comparison of these measurements
to the limits specified in the regulations. Select the Source Harmonics tab to display the
individual worst-case voltage harmonics that occurred during the pre-test.
ñ The Measured Values area on the right side of the display summarizes nine of the most common
mains input characteristics (see “Pre-test Measurements” for more information).